Drawing Arcs绘制圆弧
Your model is more than just straight lines. SketchUp can help you create curved geometry using arcs. Before you begin drawing arcs, here are a few handy details about the way arc entities work:你的模型不仅仅是直线。SketchUp可以帮助您使用圆弧创建弯曲几何体。在开始绘制圆弧之前,这里有一些关于圆弧图元工作方式的方便细节:
An arc contains multiple connected line segments, but exists within your model as a single entity.圆弧包含多条连接的线段,但在模型中作为单个实体存在。An arc can both define the edge of a face and divide a face.圆弧既可以定义面的边缘,也可以分割面。Although an arc is one entity, SketchUp's inference engine identifies each segment that makes up an arc and highlights any geometric point if you hover your cursor over one.虽然圆弧是一个实体,但SketchUp的推理引擎会识别构成圆弧的每个线段,并在将游标悬停在一个几何点上时突出显示任何几何点。Each arc contains 12 segments by default. However, you can tell SketchUp how many segments to use in an arc entity. More segments means your arc may appear smoother, but SketchUp needs to work harder to display your model. Fewer than 12 segments keeps your model simple, but the arc may look a bit blocky.默认情况下,每条弧包含12个分段。但是,您可以告诉SketchUp在圆弧图元中使用多少段。更多的分段意味着您的弧线可能看起来更平滑,但SketchUp需要更努力地显示您的模型。少于12个分段可以使你的模型保持简单,但弧线可能看起来有点块状。
SketchUp offers four tools to help you draw arcs in your model, each with its own unique method of creating an arc to best suit what you want to appear in your model:SketchUp提供了四种工具来帮助您在模型中绘制圆弧,每种工具都有自己独特的创建圆弧的方法,以最好地适应您想要在模型中显示的内容:
Arc:弧:When this tool is activated a protractor appears to help you set the beginning and ending of the arc based on your desired angle. Your first click defines the center point, the second your endpoint, and the third finishes the arc creating an open arc made of straight-edge segments.激活此工具后,会出现一个量角器,帮助您根据所需的角度设置圆弧的起点和终点。第一次单击定义中心点,第二次单击定义端点,第三次单击完成圆弧,创建由直边段组成的开放圆弧。Pie tool:饼图工具:This tool works just like the Arc tool, but creates a closed pie shape that becomes a face.此工具的工作方式与Arc工具一样,但会创建一个闭合的饼状,变成一个面。2 Point Arc tool:2点弧工具:Activating this tool changes your cursor to a pencil. Your first click defines one end of the arc, the second the other end. The third click defines the bulge of the arc.激活此工具会将游标更改为铅笔。第一次单击定义圆弧的一端,第二次单击定义另一端。第三次单击定义了圆弧的凸起。3 Point Arc tool:3点弧工具:Activating this tool also changes the cursor to a pencil. The first click sets your starting point, the second a pivot point, and the third defines the endpoint.激活此工具也会将游标更改为铅笔。第一次单击设置起点,第二次单击设置枢轴点,第三次单击定义终点。
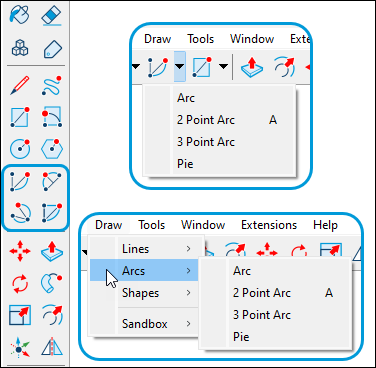
You can find the arc tools in a few different places:您可以在几个不同的地方找到弧形工具:
The Getting Started or Drawing toolbars.入门或绘图工具栏。The Large Tool Set toolbar大工具集工具栏The Draw > Arcs submenu“绘制”>“圆弧”子菜单The Tool Palette (macOS only)工具面板(仅限macOS)
The following video introduces how you draw with the rainbow of arc tools and each tool's golden secrets. Or read on for details about drawing with each arc tool.以下视频介绍了如何使用彩虹弧工具进行绘画,以及每种工具的黄金秘诀。或者继续阅读有关使用每个弧形工具绘图的详细信息。
Table of Contents目录
Drawing with the Arc and Pie Tools使用Arc和Pie工具绘图Drawing with the 2-Point Arc Tool使用两点圆弧工具绘图Drawing with the 3-Point Arc Tool使用三点圆弧工具绘图Editing an Arc Entity编辑圆弧图元
Drawing with the Arc and Pie tools使用Arc和Pie工具绘图
The Arc tool and the Pie tool are handy when you need to know your arc's angle, rather than a bulge or radius. The Arc tool draws an open arc, and the Pie tool draws a closed, pie-shaped arc.当您需要知道圆弧的角度,而不是凸起或半径时,圆弧工具和饼图工具非常方便。弧形工具绘制一个开放的弧形,饼状工具绘制一条封闭的饼状弧形。
To create an arc with the Arc or Pie tool, follow these steps:要使用圆弧或饼图工具创建圆弧,请执行以下步骤:
Select the Arc tool (选择“弧形”工具( ) or the Pie tool (
 ). )或“饼图”工具()。
The cursor changes to a pencil with an open arc or a closed arc, respectively, and a half-circle protractor indicates the orientation of a drawing plane.游标分别变为具有开放弧或闭合弧的铅笔,半圆量角器指示绘图平面的方向。Click to place the center of your arc. A full circle protractor appears locking the orientation of the drawing plane.单击以放置圆弧的中心。此时会出现一个完整的圆形量角器,锁定绘图平面的方向。
Move the cursor to the starting point of your arc. Notice that the Radius value in the Measurements box changes dynamically as you move the cursor. If you like, you can type a number and unit and press Enter to set a precise radius value.将游标移动到圆弧的起点。请注意,当您移动游标时,“测量”框中的“半径”值会动态变化。如果愿意,可以键入数字和单位,然后按Enter键设置精确的半径值。Click to place the starting point of your arc. A straight dotted line representing the radius of your arc appears, as shown in the figure. Notice that the Measurements box changes to accept an Angle value.单击以放置圆弧的起点。如图所示,将显示一条代表圆弧半径的直虚线。请注意,测量框将更改为接受角度值。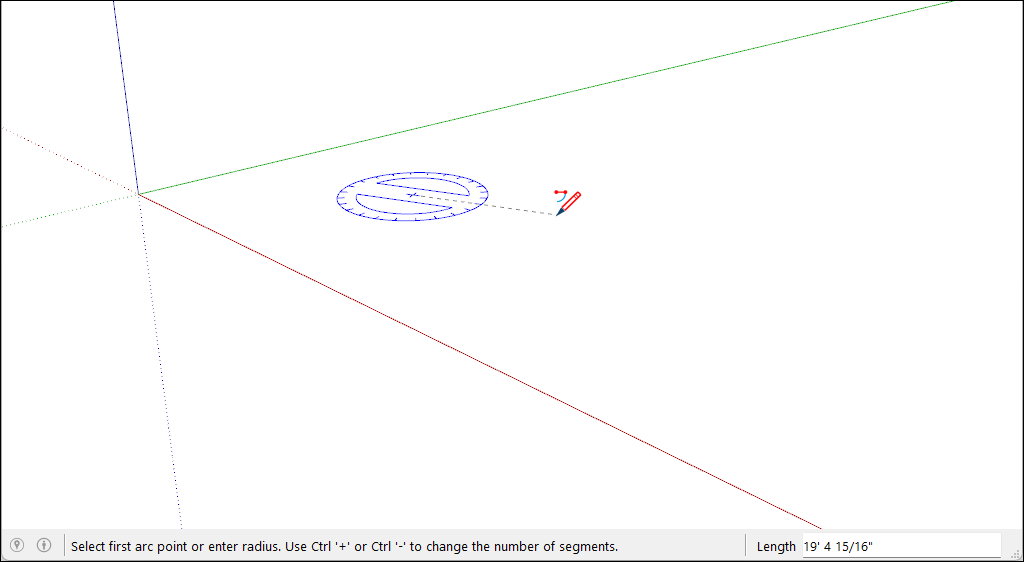
Move the cursor to the ending point of your arc.将游标移动到圆弧的终点。Click to place the ending point of your arc. You may also type an angle value and press Enter or Return. If you used the Arc tool, SketchUp creates an open arc. If you used the pie tool, you will see a pie-shaped face. The following figure shows an open arc on the left and a pie shape on the right.单击以放置圆弧的终点。您也可以键入角度值,然后按Enter或Return键。如果使用圆弧工具,SketchUp会创建一个开放圆弧。如果使用饼图工具,您将看到一个饼状的面。下图显示了左侧的开放圆弧和右侧的饼状。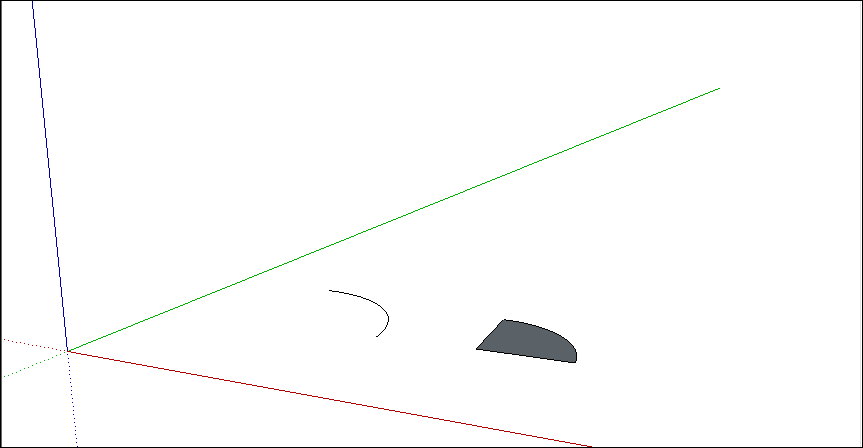
Arcs created with the Arc or Pie tool are drawn with a fixed number of line segments by default. These segments grow or shrink in length depending on the completeness of the arc. 默认情况下,使用“圆弧”或“饼图”工具创建的圆弧将使用固定数量的线段绘制。这些段的长度根据弧的完整性而增长或收缩。You can change the number of line segments or base the arc on circle segments - the number of segments it would take for the arc to form a complete circle - instead. To change the number of segments:您可以更改线段的数量,也可以将圆弧基于圆弧段(圆弧形成完整圆所需的线段数量)。要更改分段数,请执行以下操作:
Immediately after drawing the arc, type the number of sides you want and the letter S for sides then press Enter or Return.绘制圆弧后,立即键入所需的边数和边的字母S,然后按Enter或Return键。For example, typing 10s creates an arc with 10 line segments.例如,键入10s会创建一个包含10条线段的圆弧。
To increase the number of segments press Ctrl + (Microsoft Windows) or Option + (macOS).要增加分段数,请按Ctrl +(Microsoft Windows)或Option +(macOS)。To decrease the number of segments press Ctrl - (Microsoft Windows) or Option - (macOS).要减少分段数,请按Ctrl -(Microsoft Windows)或Option -(macOS)。Please note, if you're using a French Canadian keyboard, press the Ctrl key (Microsoft Windows) and the +/= key to increase the segments.请注意,如果您使用的是加拿大法语键盘,请按Ctrl键(Microsoft Windows)和+/-键以增加分段。For macOS, press Command and = to increase segments or - to decrease segments.对于macOS,按Command和=可增加分段,按-可减少分段。
To base your arc on circle segments:要将圆弧基于圆弧段,请执行以下操作:
Immediately after drawing the arc, type the number of circle sides and the letter C for circle then press Enter or Return.绘制圆弧后,立即键入圆边数和圆的字母C,然后按Enter或Return键。For example, typing 20c tells SketchUp to base your arc on a 20-sided circle.例如,键入20c命令SketchUp将圆弧以20边圆为基础。
Drawing with the 2 Point Arc tool使用2点圆弧工具绘图
When you draw an arc with the 2 Point Arc tool, you set the starting point, the ending point, and the bulge distance. The distance between the starting point and the ending point is also known as the chord length.使用“两点圆弧”工具绘制圆弧时,可以设置起点、终点和凸出距离。起点和终点之间的距离也称为弦长。
To draw a 2-point arc, follow these steps:要绘制两点圆弧,请执行以下步骤:
Select the 2 Point Arc tool (选择“两点弧”工具( ). The cursor changes to a pencil with an arc.)。游标变为带圆弧的铅笔。
Click to place the starting point of your arc. The Measurements box is now ready to accept a Length value.单击以放置圆弧的起点。测量框现在已准备好接受长度值。Move the cursor to the ending point of your chord. (Press the Esc key at any point during the operation to start over.)将游标移动到和弦的终点。(在操作过程中的任何时候按Esc键重新开始。)Click to place the ending point or type a length value and press Enter. A straight line is created. The Measurements box changes to accept a Bulge value.单击以放置终点或键入长度值,然后按Enter键。创建了一条直线。“测量”框将更改为接受“凸起”值。Move your cursor perpendicular to the straight line to adjust the bulge distance. If you want to draw a half circle, watch for the half-circle inference, as shown in the figure. The inference tells you when the arc is a half-circle.垂直于直线移动游标以调整凸出距离。如果你想画一个半圆形,注意半圆形推理,如图所示。推理告诉你什么时候弧是半圆形。You can tap the arrow key to lock your movement to that inference; Up for Blue, Left for Green, Right for Red. You'll see a notification at the cursor that the inference is locked.您可以点击箭头键将您的移动锁定到该推断;Up表示蓝色,Left表示绿色,Right表示红色。您将在游标处看到推理已锁定的通知。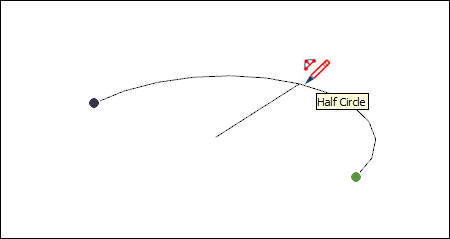
Click to set the bulge distance or type a value, such as 5' or 7mm, and press Enter or Return.单击以设置凸出距离或键入一个值,如5'或7mm,然后按Enter或Return键。
Tip: Immediately after you draw a 2-point arc, you can change the bulge, radius, or number of segments with the Measurements box. Remember that you don't need to click in the Measurements box first; simply type a value and press Enter or Return. Here's how to change each value:绘制两点圆弧后,可以立即使用“测量”框更改凸起、半径或分段数。请记住,您不需要先单击“测量”框;只需键入一个值,然后按Enter或Return键。以下是如何更改每个值:
Bulge distance:凸出距离:After you finish creating a 2-point arc, the Measurements box is ready to accept a Bulge value by default. Simply type the value and units (if different from the default units in your template).创建完两点弧后,默认情况下,测量框已准备好接受凸起值。只需键入值和单位(如果与模板中的默认单位不同)。Radius:半径:You can specify an arc radius instead of a bulge distance. Type the desired radius in the Measurements box and add the letter R for radius. For example:可以指定圆弧半径而不是凸出距离。在“测量”框中键入所需的半径,并添加字母R作为半径。例如:24r or 3'6"r or 5mrNumber of segments:分段数量:Type a number and followed by the letter S for segments. For example: 20s键入一个数字,然后用字母S表示分段。例如:20s
Drawing with the 3 Point Arc tool使用3点圆弧工具绘图
When you use the 3 Point Arc tool, you draw the arc based on a pivot point. Follow these steps to use the 3 Point Arc tool:使用“三点圆弧”工具时,可以基于枢轴点绘制圆弧。按照以下步骤使用3点圆弧工具:
Select the 3 Point Arc tool (选择“3点圆弧”工具( ). )。
). )。The cursor changes to a pencil with an arc.游标变为带圆弧的铅笔。Click to establish a starting point of the arc.单击以建立圆弧的起点。Move the cursor away from the starting point.将游标移离起点。Click again to establish the second point. A small dot appears, which is a pivot point for the arc.再次单击以建立第二个点。将出现一个小点,它是圆弧的枢轴点。Move the cursor away from the dot. An arc appears as you move the cursor. You can tap the arrow key to lock your movement to that inference; Up for Blue, Left for Green, Right for Red. You'll see a notification at the cursor that the inference is locked.将游标移离点。移动游标时会出现一个弧形。您可以点击箭头键将您的移动锁定到该推断;Up表示蓝色,Left表示绿色,Right表示红色。您将在游标处看到推理已锁定的通知。When you like the shape of your arc, click to finish creating the arc.当您喜欢圆弧的形状时,单击以完成圆弧的创建。Note:Press the ESC key at any point during the operation to start over.在操作过程中的任何时候按ESC键重新开始。
Tangent Inferences for 2-Point and 3-Point Arc Tools2点和3点圆弧刀具的切线推断
You can create a tangent arc using either the 2-Point or 3-Point arc tools using inferences. Hover over an edge you want to use as a tangent basis before clicking to begin your arc. To lock your tangent inference, press the Alt key (Microsoft Windows) or the Command key (macOS).您可以使用推理使用2点或3点圆弧工具创建切线圆弧。在单击开始圆弧之前,将鼠标悬停在要用作切线基础的边上。要锁定切线推断,请按Alt键(Microsoft Windows)或Command键(macOS)。
Editing an arc entity编辑圆弧图元
You can edit the radius of an arc entity using the Move tool or in the Entity Info dialog box.可以使用“移动”工具或在“图元信息”对话框中编辑圆弧图元的半径。
With the Move tool (选择“移动”工具(![]() ) selected, you can edit an arc entity as follows:
) selected, you can edit an arc entity as follows:![]() )后,可以按如下方式编辑圆弧图元:
)后,可以按如下方式编辑圆弧图元:
Adjust the midpoint: Hover the Move tool's cursor to locate the midpoint of the arc. Then click and drag to adjust the arc, as shown in the figure.调整中点:将“移动”工具的游标悬停在圆弧的中点。然后单击并拖动以调整圆弧,如图所示。Move an end point: Click and drag an arc's endpoint to adjust the arc's length and radius.移动端点:单击并拖动圆弧的端点以调整圆弧的长度和半径。

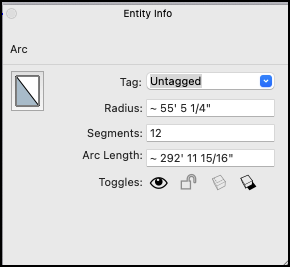
To access your arc's Entity Info panel, context-click the arc you want to edit. From the context menu choose Entity Info. In the Entity Info panel type a new value for the radius or number of segments.要访问圆弧的“实体信息”面板,请右键单击要编辑的圆弧。从上下文菜单中选择实体信息。在“实体信息”面板中,键入半径或分段数的新值。
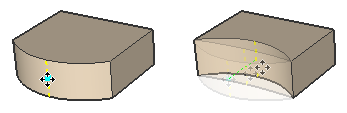
When you use the Push/Pull tool to extrude a 2D face that includes an arc, SketchUp extrudes a special surface entity whose radius can also be edited. Use the Move tool to reposition the midpoint edge, and all the geometry that makes up the extruded arc will move accordingly, as shown in the figure.当您使用“推/拉”工具拉伸包含圆弧的二维面时,SketchUp会拉伸一个特殊的曲面图元,其半径也可以编辑。使用“移动”工具重新定位中点边,构成拉伸圆弧的所有几何图形都将相应地移动,如图所示。