Flipping, Mirroring, Rotating and Arrays翻转、镜像、旋转和数组
With SketchUp's flipping and rotating tools, your geometry becomes as nimble as an acrobatic troupe. The Flip Along command enables geometry to backflip 180 degrees along any axis. With the Rotate tool, your geometry can spin and fold like a professional gymnast.使用SketchUp的翻转和旋转工具,您的几何体变得像杂技团一样灵活。“沿方向翻转”命令允许几何体沿任何轴向后翻转180度。使用“旋转”工具,您的几何体可以像专业体操运动员一样旋转和折叠。
Table of Contents目录
Using the Flip Tool使用翻转工具
The Flip (翻转工具(![]() ) tool does exactly what it says on the box, helps you flip your geometry so that you can quickly re-orient objects or make symmetrically oriented copies.
) tool does exactly what it says on the box, helps you flip your geometry so that you can quickly re-orient objects or make symmetrically oriented copies.![]() )完全按照方框上的指示执行操作,帮助您翻转几何体,以便您可以快速重新定位对象或制作对称定向的副本。
)完全按照方框上的指示执行操作,帮助您翻转几何体,以便您可以快速重新定位对象或制作对称定向的副本。
You'll find the Flip tool in one of the following locations:您将在以下位置之一找到翻转工具:
The Getting Started toolbar入门工具栏The Large Toolset大型工具集The Edit menu编辑菜单- (iOS)
The Standard toolbar标准工具栏
Just like other tools you can always use SketchUp's search bar and assign it your own keyboard shortcut.就像其他工具一样,您始终可以使用SketchUp的搜索栏并为其分配自己的键盘快捷键。
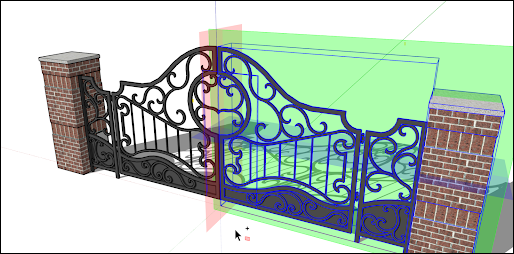
Select the geometry you want to flip before activating the Flip tool, or simply activate the Flip tool and hover over the geometry you want to flip.After hovering, clicking once begins the Flip operation在激活翻转工具之前,选择要翻转的几何体,或者只需激活翻转工具并将鼠标悬停在要翻转的几何形状上。悬停后,单击一次即可开始翻转操作Three semi-transparent planes appear, each corresponding to the selection's cardinal orientation.出现三个半透明平面,每个平面对应于选择的主方向。If needed, adjust each plane by click-dragging along one of the primary axes. Inferences will appear when dragging to help with placement. Each time you click and drag a plane adjusts the flip operation.如果需要,通过单击并沿其中一个主轴拖动来调整每个平面。拖动时会出现推断,以帮助放置。每次单击并拖动平面时,都会调整翻转操作。Hover over one of the planes and click once to flip the geometry about that plane.将鼠标悬停在其中一个平面上,然后单击一次以翻转该平面上的几何体。
Flip Tool Modifiers翻转工具修改器
Copy Mode复制模式
With the Flip tool active, pressing Ctrl (Windows) or Option (macOS) engages Copy mode. When engaged, click and drag a plane to the desired spot. When you release your mouse button, SketchUp creates a flipped copy of your selected geometry.在翻转工具处于活动状态时,按Ctrl键(Windows)或Option键(macOS)可启用复制模式。接合后,单击平面并将其拖动到所需的位置。当您释放鼠标按钮时,SketchUp会创建所选几何体的翻转副本。
Axes Mode轴模式
If you prefer to flip an object using its parent (or context) axes, use the Alt key on Windows or Command on Mac. Activating this mode toggles Flip between a selected object axes orientation and the parent axes orientation.如果您更喜欢使用其父(或上下文)轴翻转对象,请在Windows上使用Alt键,在Mac上使用Command键。激活此模式可在选定对象轴方向和父轴方向之间切换翻转。
Custom Flip Plane自定义翻转平面
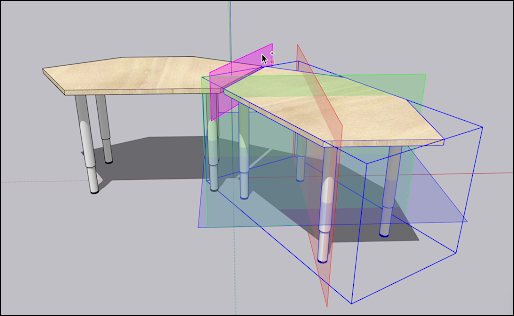
If you need to flip something outside of the default axes, you can identify a custom flip plane. To flip using a custom plane, activate the Flip tool and hover over a face in the modeling window. A custom, magenta colored, flip plane will appear. 如果需要翻转默认轴之外的对象,可以标识自定义翻转平面。要使用自定义平面翻转,请激活“翻转”工具,然后将鼠标悬停在建模窗口中的某个面上。将出现一个自定义的洋红色翻转平面。As with other planes, click on that magenta plane to flip, or click or click and drag that magenta plane.与其他平面一样,单击该品红色平面进行翻转,或单击或单击并拖动该品红色面。
Rotating geometry at an angle以一定角度旋转几何体
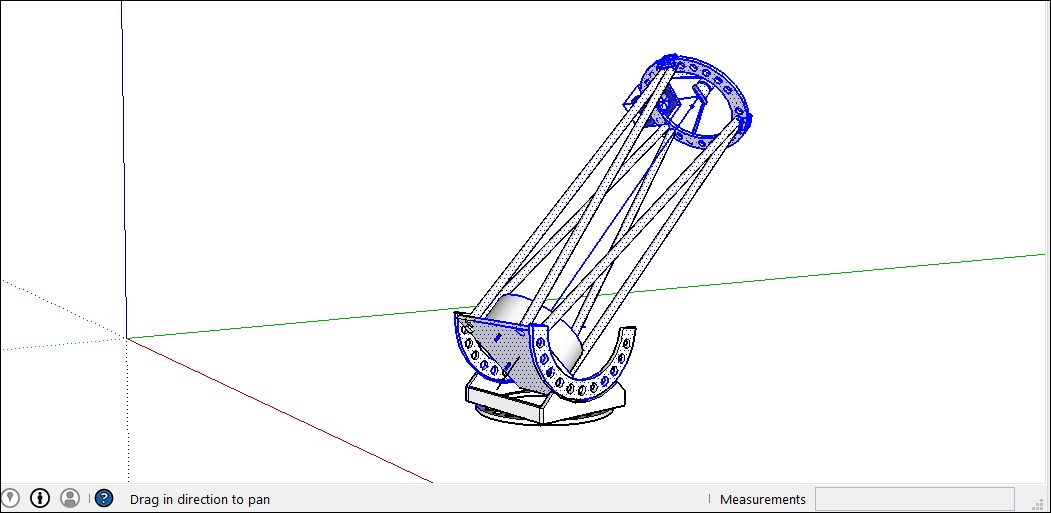
With the Rotate tool, you can rotate geometry at any angle. For example, say you want to rotate this telescope so that it points at a different angle or a different part of the sky.使用“旋转”工具,可以以任何角度旋转几何体。例如,假设你想旋转这台望远镜,使其指向不同的角度或天空的不同部分。
Here's how to use the Rotate tool to spin geometry around:以下是如何使用“旋转”工具旋转几何体:
With the Select tool (使用“选择”工具( ), select the geometry you want to rotate. Here, the geometry that points the telescope into the sky is selected, but not the base, which needs to stay on the ground.),选择要旋转的几何图形。在这里,选择将望远镜指向天空的几何形状,但不选择需要留在地面上的底座。
Select the Rotate tool (选择“旋转”工具( ). The Rotate tool's protractor-shaped cursor appears)。出现“旋转”工具的量角器形状游标
Move the cursor around until it's on the plane you want to use for your rotation. To lock the plane, press the Shift key until you click to set the angle's vertex. When your plane is perpendicular to an axis, the cursor turns red, green, or blue, respectively, as shown in the figure.四处移动游标,直到它位于要用于旋转的平面上。要锁定平面,请按Shift键,直到单击以设置角度的顶点。当平面垂直于轴时,游标分别变为红色、绿色或蓝色,如图所示。Tip:When you press and hold the Shift key to constrain the plane of rotation, you can press Alt (Microsoft Windows> or Command (OS X) to free the protractor from the inferenced plane.按住Shift键约束旋转平面时,可以按Alt(Microsoft Windows>或Command(OS X)将量角器从推断平面中释放出来。The angle of the protractor will remain the angle of the original plane, but now you can move the protractor to inference other geometry.量角器的角度将保持为原始平面的角度,但现在您可以移动量角器来推断其他几何体。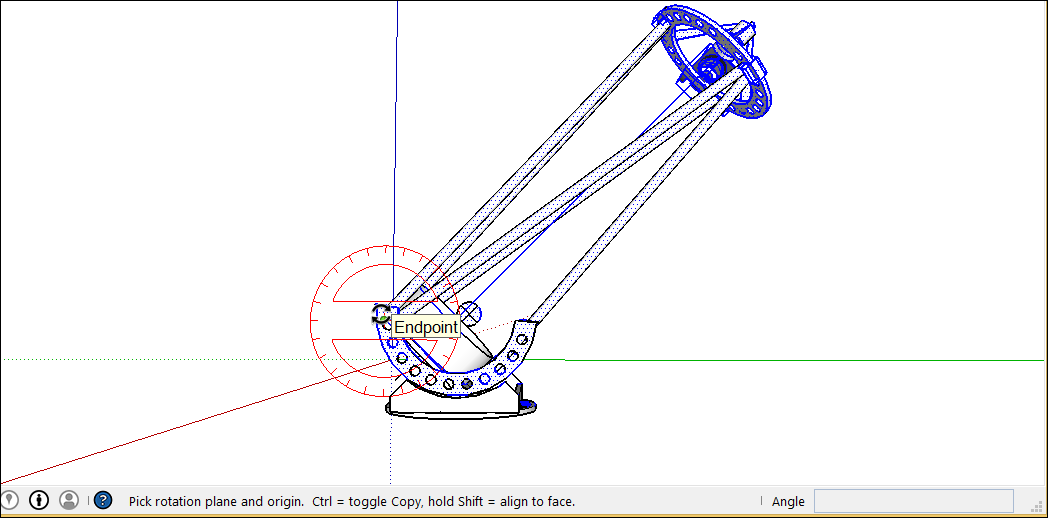 Tip:
Tip:In this example, inferring from a face that's on the same plane as the desired rotation is the easiest way to find the right plane. Hold down the scroll wheel of your three-button mouse to temporarily switch to the Orbit tool (在这个例子中,从与所需旋转在同一平面上的面推断是找到正确平面的最简单方法。按住三键鼠标的滚轮,暂时切换到“动态观察”工具( ) and find a good view of your desired plane. See Viewing a Model for details about viewing options.),找到所需平面的良好视图。有关查看选项的详细信息,请参阅查看模型。
Click to set your angle's vertex (Callout 1 in the following figure).单击以设置角度的顶点(下图中的标注1)。With the circular arrow cursor, click to set first point of your rotation angle. In this example, the starting point (Callout 2 in the following figure) is parallel to the current angle of the telescope.使用圆形箭头游标,单击以设置旋转角度的第一个点。在这个例子中,起点(下图中的标注2)平行于望远镜的当前角度。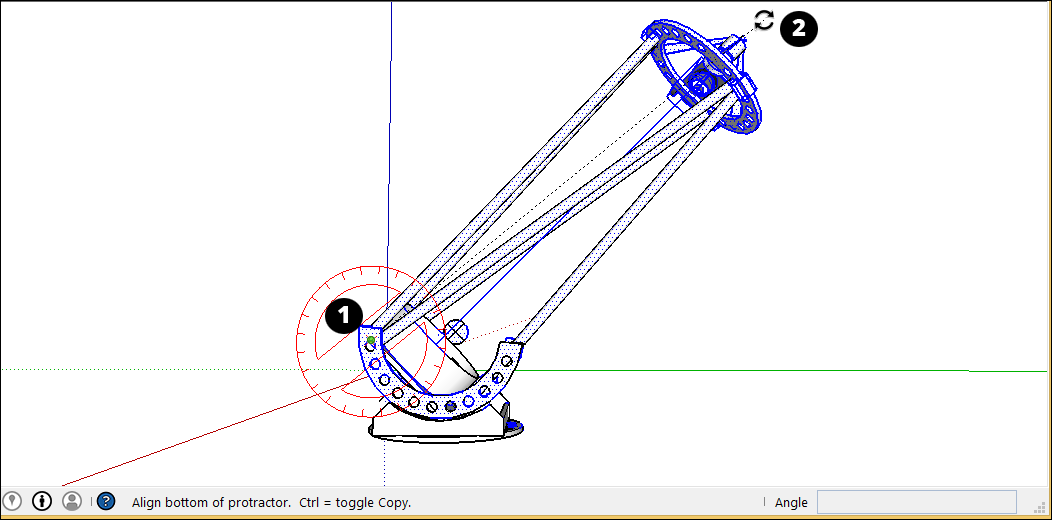
Move the cursor in the direction of your rotation and click to complete the rotation angle. In the figure, the circular arrow cursor is positioned where you might click to complete the rotation (Callout 3). Notice that the Measurements box indicates the angle.沿旋转方向移动游标,然后单击以完成旋转角度。在图中,圆形箭头游标位于您可以单击以完成旋转的位置(标注3)。请注意,测量框指示角度。
(Optional) Type a precise angular rotation or slope value and then press Enter. The following table outlines how to specify each value. Negative values move the angle rotation in a counter-clockwise direction.(可选)键入精确的角度旋转或坡度值,然后按Enter键。下表概述了如何指定每个值。负值会沿逆时针方向移动角度旋转。
| To Specify This . . . | Type This | Example |
|---|---|---|
| Type 34.1 to rotate by an exact 34.1 degree angle. | ||
| Type 8:12 for a slope of 8 over 12. |
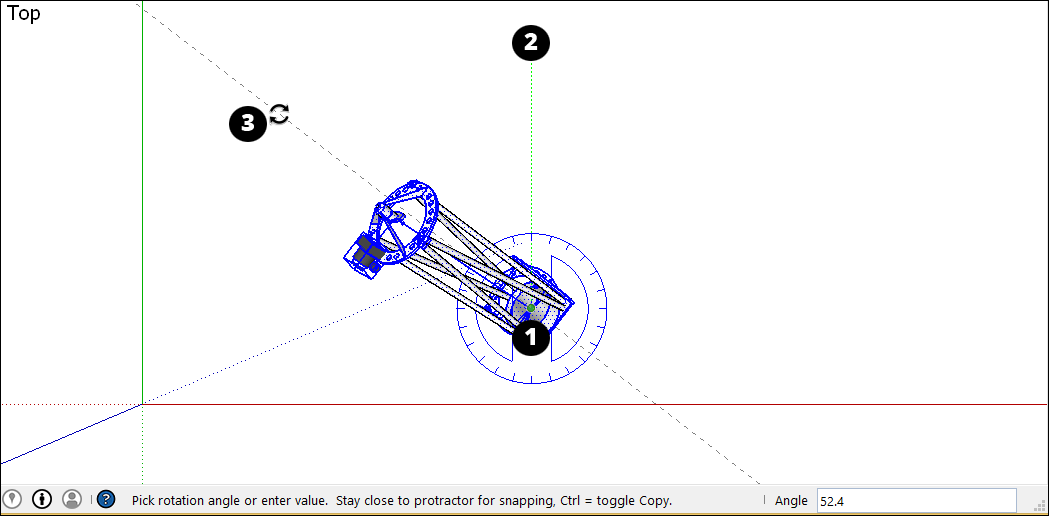
Here's another example to help you understand how to achieve your desired rotation angle. Imagine you need to rotate the whole telescope to a different part of the sky (northwest, say, instead of due north). 这是另一个例子,可以帮助您了解如何实现所需的旋转角度。想象一下,你需要将整个望远镜旋转到天空的不同部分(比如西北部,而不是正北)。Start by selecting the whole telescope and then select Camera > Standard Views > Top to see the telescope from above. 首先选择整个望远镜,然后选择“相机>标准视图>顶部”,从上方查看望远镜。(Viewing a Model explains SketchUp's viewing options.) (查看模型解释了SketchUp的查看选项。)With the Rotate tool selected, you then lock the protractor cursor in the blue direction and click the top to set the angle's vertex (Callout 1). 选择“旋转”工具后,将量角器游标锁定在蓝色方向,然后单击顶部以设置角度的顶点(详图索引1)。Click to start your angle at due North (2) and then click again to complete the angle at your desired Northwest direction (3).单击以从正北(2)开始角度,然后再次单击以在所需的西北方向(3)完成角度。
In the following video, watch the Rotate tool in action, where you see how to rotate clock hands and open a vault door, fold a SketchUp face into a paper airplane, and more.在下面的视频中,观看“旋转”工具的操作,您将看到如何旋转时钟游标、打开保险柜门、将SketchUp面折叠成纸飞机等。
Corner Inference Grips角推理抓握
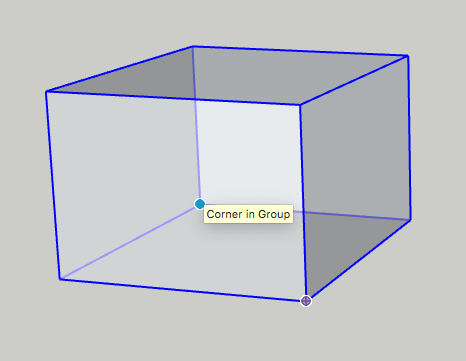
When selecting or hovering over a component/group, you’ll notice there are inference icons. These reference icons are presented differently depending on the geometry and action being performed. In the image below, the corners of the component/group’s bounding box to help you better rotate the component/group. 当选择或悬停在组件/组上时,您会注意到有推理图标。这些参考图标的显示方式因几何形状和所执行的操作而异。在下图中,组件/组边界框的角可以帮助您更好地旋转组件/组。The component/group grips are represented as a gray dot at every corner of the box. You can grab and rotate the object using these grips.组件/组夹点在框的每个角都表示为灰点。您可以使用这些夹点抓取和旋转对象。
When you move your cursor over a corner which is obscured by other geometry, the gray dot will become blue and your component will display as transparent to help you see the obscured corner and geometry behind for placement.当您将游标移动到被其他几何体遮挡的角上时,灰点将变为蓝色,您的组件将显示为透明,以帮助您看到遮挡的角和后面的几何体,以便放置。
You can cycle through available grips, Object Center, Context Edge Center and Context Edge Corner by finding your first grip, then toggling through them using Command on Mac or Alt on Windows.您可以通过找到第一个夹点,然后使用Mac上的Command或Windows上的Alt在可用夹点、对象中心、上下文边缘中心和上下文边缘角之间切换来循环。
Folding geometry along an axis沿轴折叠几何图形
SketchUp geometry is so flexible, you can fold it like paper. Follow these steps:SketchUp几何图形非常灵活,可以像折叠纸一样折叠。请按照以下步骤操作:
With the Select tool (使用“选择”工具(
), select the geometry you want to fold.),选择要折叠的几何图形。Select the Rotate tool (选择“旋转”工具(
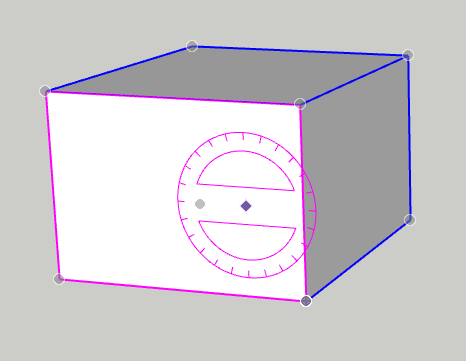
).)。With the Rotate tool's protractor-shaped cursor, click and drag from one endpoint on the fold line to the other endpoint. Release the mouse button when you're done. In this example, the line that bisects the polygon is the fold line.使用“旋转”工具的量角器形状游标,单击并从折叠线上的一个端点拖动到另一个端点。完成后松开鼠标按钮。在这个例子中,平分多边形的线是折线。Click at the starting point of the rotation. In the figure, the circular arrows cursor is where the rotation begins.单击旋转的起点。在图中,圆形箭头游标是旋转开始的位置。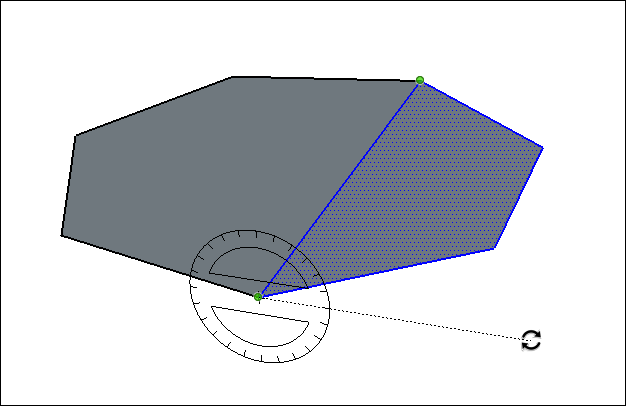
Move the mouse to rotate. If angle snaps are active under preferences, movements close to the protractor result in angle snaps, whereas those farther away allow free rotation. Also, as you move the cursor, notice that the angle degrees of rotation appear in the Measurements box.移动鼠标进行旋转。如果在首选项下角度捕捉处于活动状态,则靠近量角器的移动会导致角度捕捉,而远离量角器则允许自由旋转。此外,移动游标时,请注意“测量”框中会显示旋转角度。Click at the ending point to complete the rotation. The following figure shows the rotation's ending point and the dynamic preview of the folded polygon.单击终点以完成旋转。下图显示了旋转的终点和折叠多边形的动态预览。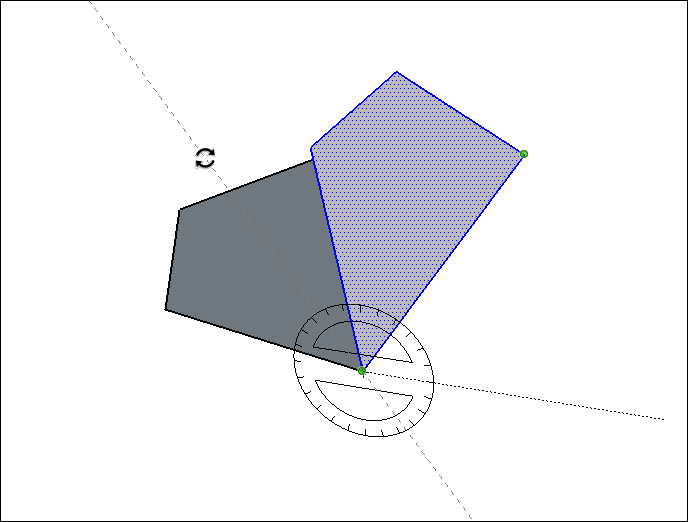
(Optional) Type a precise angular rotation or slope value and then press Enter. See the earlier table for details about how to specify each value. Negative values fold the geometry in a counter-clockwise direction.(可选)键入精确的角度旋转或坡度值,然后按Enter键。有关如何指定每个值的详细信息,请参阅上表。负值会沿逆时针方向折叠几何图形。