Matching a Photo to a Model (or a Model to a Photo)将照片与模型匹配(或将模型与照片匹配)
SketchUp’s Match Photo feature has inspired many happy dances, because it enables you toSketchUp的Match Photo功能激发了许多快乐的舞蹈,因为它使您能够
Apply a photo to an existing model:将照片应用于现有模型:Say you have a model of an existing structure and you want the model to look realistic. Applying a photo with Match Photo is much easier than drawing that detail and applying materials to individual elements.假设你有一个现有结构的模型,你希望模型看起来逼真。使用Match photo应用照片比绘制细节并将材料应用于单个元素要容易得多。Create a model from a photo:从照片创建模型:When you want to model an existing structure, Match Photo enables you to use a photo as a starting point. You can essentially trace the photo to draw the model.当您想对现有结构进行建模时,Match Photo允许您使用照片作为起点。你基本上可以通过追踪照片来绘制模型。
Until you get the hang of Match Photo, you may suspect that SketchUp dumped a box of rainbow spaghetti on your model like a toddler bored with pasta crafts. 在你掌握Match Photo的诀窍之前,你可能会怀疑SketchUp把一盒彩虹意大利面扔在你的模特身上,就像一个厌倦了意大利面工艺品的蹒跚学步的孩子。Match Photo is a bit confusing at first, but this article gives you the tips and steps that you need to use Match Photo in the magical way its developers intended. Match Photo一开始有点令人困惑,但本文为您提供了以开发者所期望的神奇方式使用Match Photo所需的提示和步骤。When you’re first learning how to use Match Photo, orient yourself to the color-coded tools that Match Photo spills onto your screen and check out what photos work well with the Match Photo feature. 当您第一次学习如何使用Match Photo时,请熟悉Match Photo溢出到屏幕上的颜色编码工具,并查看哪些照片与Match Photo功能配合良好。Then try your hand at matching a photo, following the detailed steps in the following sections.然后,按照以下部分中的详细步骤,尝试匹配照片。
Table of Contents目录
Introducing Match Photo’s color-coded tools介绍匹配照片的颜色编码工具
To start using Match Photo, select Camera > Match New Photo. 要开始使用“匹配照片”,请选择“相机”>“匹配新照片”。Select the photo you want to use, and your screen looks something like the following figure, which shows an image captured from Google Street View. 选择您要使用的照片,您的屏幕看起来如下图所示,其中显示了从谷歌街景中捕获的图像。The following list identifies all the tools that appear on-screen:以下列表标识了屏幕上显示的所有工具:
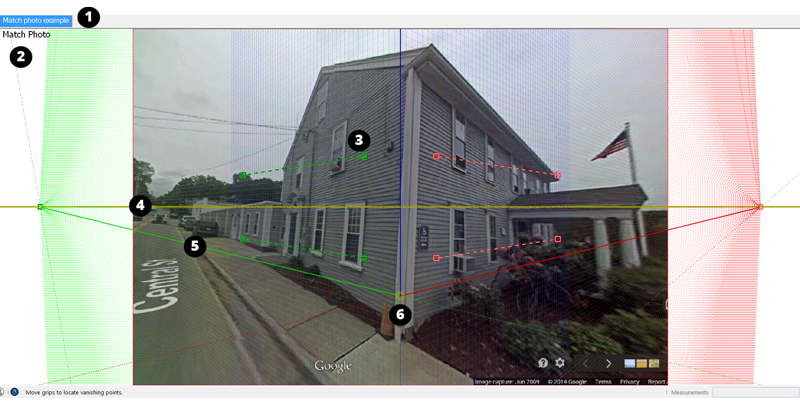
Scene tab:“场景”选项卡:A scene is a saved camera view of your model that’s associated with a tab. If you orbit away from this particular view, the matched photo disappears. But you can click the Match Photo scene tab to return to the view with the photo.场景是与选项卡关联的模型的已保存相机视图。如果您从该特定视图进行动态观察,则匹配的照片将消失。但是,您可以单击“匹配照片”场景选项卡返回照片视图。Match Photo view:匹配照片视图:When the camera is in Match Photo view, you see Match Photo in the upper left of the drawing window.当相机处于“匹配照片”视图时,您会在绘图窗口的左上角看到“匹配照片》。Vanishing point bar:消失点栏:You see two green bars and two red bars with dashed lines and a square grip on each end. You click and drag the grips to align these bars with elements in your photo.你看到两个绿色条和两个红色条,每条都有虚线和一个方形握把。单击并拖动夹点,将这些条与照片中的元素对齐。Horizon line:地平线:This yellow line aligns with the horizon in your model. Typically, if you set the vanishing point bars, the horizon line takes care of itself.这条黄线与模型中的地平线对齐。通常,如果设置消失点条,地平线会自行处理。Axis bars:轴条:The solid green, red, and blue lines represent each axis. As you adjust the vanishing point bars, the axis bars move, too, so you usually don’t need to adjust these manually.绿色、红色和蓝色实线表示每个轴。当您调整消失点栏时,轴栏也会移动,因此您通常不需要手动调整这些栏。You can click and drag up and down the blue axis bar to roughly scale your photo.您可以单击并上下拖动蓝色轴栏来大致缩放照片。Axis origin:轴原点:The origin is where the three axes meet. If you start with a Match Photo-compatible image, Match Photo does a pretty good job of locating the origin for you, but you might need to adjust it a bit.原点是三个轴相交的地方。如果你从与Match Photo兼容的图像开始,Match Photo在为你定位原点方面做得很好,但你可能需要稍微调整一下。In the example, the origin needs to move down a bit so the axis origin is at the corner where the walls and ground meet.在该示例中,原点需要向下移动一点,以便轴原点位于墙和地面相交的拐角处。(If the photo looks down on a building, try a corner where the roof and walls instead.)(如果照片俯视一栋建筑,试着找一个有屋顶和墙壁的角落。)For a photo taken indoors, place the origin where the walls and ceiling or the walls and floor meet in a corner.对于室内拍摄的照片,将原点放在墙壁和天花板或墙壁和地板相交的角落。
Choosing photos that work with Match Photo选择与“匹配照片”兼容的照片
Match Photo works best when your photo meets certain criteria. When you’re taking or choosing photos to use with SketchUp’s Match Photo feature, keep the following tips in mind:当您的照片满足特定条件时,匹配照片效果最佳。当您拍摄或选择与SketchUp的匹配照片功能一起使用的照片时,请记住以下提示:
Match Photo works best with structures made mostly of right angles.Match Photo最适合主要由直角组成的结构。You definitely need at least one right angle for Match Photo to work.你肯定需要至少一个直角才能让“匹配照片”正常工作。Use photos taken at a roughly a 45-degree angle from a corner.使用从角落大约45度角拍摄的照片。The preceding figure from Google Street View is an example of an image taken at a 45-degree angle.谷歌街景的上图是以45度角拍摄的图像示例。If you’re taking photos, you can use Match Photo on several parts of your model if you take photos of each corner.如果你在拍照,如果你拍了每个角落的照片,你可以在模型的几个部分上使用Match Photo。Do not crop photos.不要裁剪照片。Although it may seem possible to use a cropped image, typically vertical lines don’t align well across a cropped image, and you won’t like the result.虽然使用裁剪图像似乎是可能的,但通常垂直线在裁剪图像中不会很好地对齐,你也不会喜欢这样的结果。Avoid warped or distorted photos if you can.如果可以的话,避免扭曲或扭曲的照片。Match Photo doesn’t work best with images that an image editor or specialized camera has warped.Match Photo对于图像编辑器或专用相机扭曲的图像效果不佳。For example, because the Google Street View camera warped the image of the preceding building a bit as the camera went around the corner, the vanishing point bars, axes, and horizon may not line up precisely.例如,由于谷歌街景摄像头在转弯时会稍微扭曲前一栋建筑的图像,消失点条、轴和地平线可能不会精确对齐。However, the school house photos used later in this article match up exactly with the model, because the photos had no distortion at all.然而,本文稍后使用的校舍照片与模型完全匹配,因为照片根本没有失真。Tip:Sometimes an image editor can remove barrel distortion or issues where straight lines are bent away from the center of the image. Barrel distortion typically occurs on wide angle lens cameras.有时,图像编辑器可以消除桶形失真或直线偏离图像中心的问题。镜筒畸变通常发生在广角镜头相机上。Avoid stitched images (panoramas).避免拼接图像(全景图)。Stitched images are typically excessively warped and have multiple vanishing points for each axis.缝合图像通常会过度扭曲,每个轴都有多个消失点。Choose photos without foreground features.选择没有前景特征的照片。When trees and other foreground objects block the view of a building, those foreground elements get in the way of drawing a model based on your photo.当树木和其他前景对象阻挡建筑物的视线时,这些前景元素会妨碍根据照片绘制模型。Make sure your image has two vanishing points.确保你的图像有两个消失点。You’ll have a hard time adjusting the vanishing point bars if your image has only one, infinite vanishing point, such as a hallway or a long train track.如果你的图像只有一个无限的消失点,比如走廊或长长的火车轨道,你很难调整消失点条。Similarly, images taken with a very long telephoto lens (or a satellite or aerial image) also make adjusting the vanishing point bars difficult.同样,使用超长长焦镜头拍摄的图像(或卫星或航空图像)也使得调整消失点条变得困难。
Matching a photo with an existing model将照片与现有模型进行匹配
To apply a photo to an existing model with SketchUp’s Match Photo feature, have your model and your photo on your hard drive. When you’re ready, follow these steps:要使用SketchUp的“匹配照片”功能将照片应用于现有模型,请将您的模型和照片放在硬盘上。准备就绪后,请按照以下步骤操作:
Select File > Open and select the model you want to open in the drawing area. This example uses the following model of a schoolhouse.选择“文件”>“打开”,然后在绘图区域中选择要打开的模型。本例使用以下校舍模型。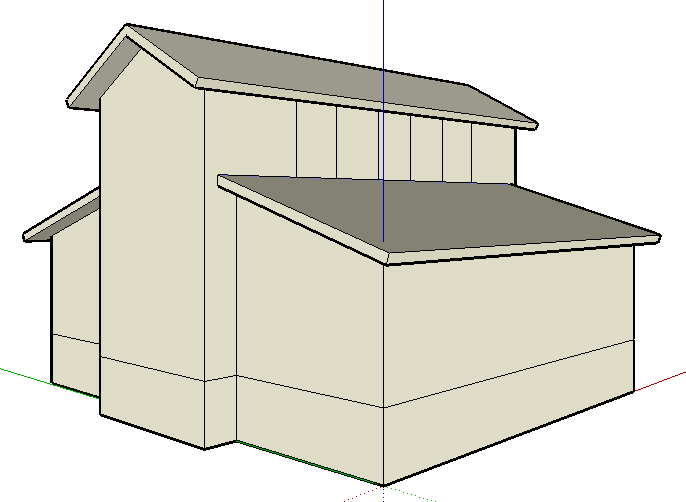
Select Camera > Match New Photo.选择“相机>匹配新照片”。In the Select Background Image File dialog box that appears, navigate to your image file and click Open.在出现的“选择背景图像文件”对话框中,导航到图像文件并单击“打开”。The camera switches to Match Photo view, so your photo appears in the drawing area, as shown in the following figure, and your camera angle is automatically saved to a scene tab, which appears in the upper left.相机切换到“匹配照片”视图,这样你的照片就会出现在绘图区域中,如下图所示,你的相机角度会自动保存到左上角的场景选项卡中。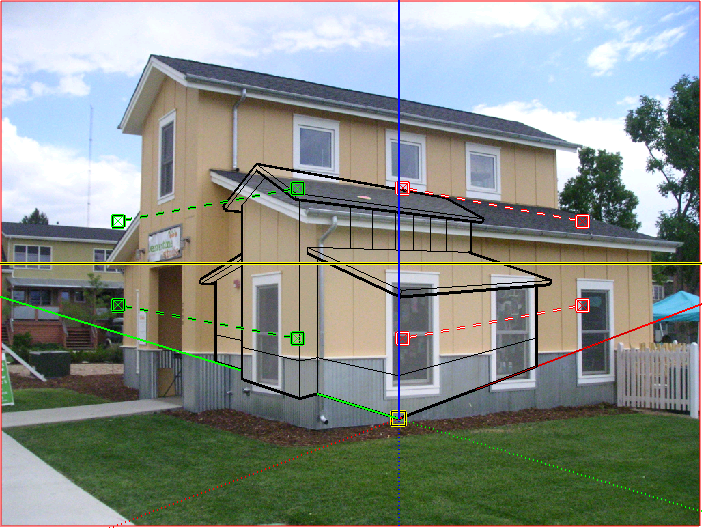 Tip:
Tip:When a Match Photo is active, you can context-click any Match Photo tool to open a context menu. Select Start Over or Cancel Match if your photo matching goes awry.当匹配照片处于活动状态时,您可以右键单击任何匹配照片工具以打开右键菜单。如果照片匹配出错,请选择“重新开始”或“取消匹配”。Select Zoom Matched Photo to fit your photo in the drawing area. Zoom Vanishing Points zooms so that all the vanishing points fit in the drawing area.选择“缩放匹配照片”以使照片适合绘图区域。缩放消失点进行缩放,使所有消失点都适合绘图区域。In the Match Photo dialog box, shown in the following figure, select the style that reflects the type of photo you have.在下图所示的“匹配照片”对话框中,选择反映照片类型的样式。Click Inside for an interior image, click Above for an exterior photo of a building taken from the top, or click Outside an exterior photo taken from the ground.单击“内部”查看内部图像,单击“上方”查看从顶部拍摄的建筑物外部照片,或单击“外部”查看从地面拍摄的外部照片。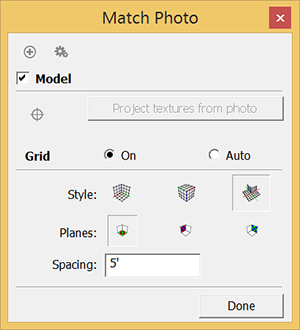 Tip:
Tip:You can adjust the grid to suit your preferences and help you align and scale your photo. Select the Auto radio button to make the grid appear only when you’re adjusting one of the matching tools.您可以调整网格以适应您的偏好,并帮助您对齐和缩放照片。选择“自动”单选按钮,使网格仅在调整其中一个匹配工具时显示。(The vanishing point bars, horizon bar, and axes are always visible in Match Photo view.) Use the Planes options to select whether you want the grid to show the red/green, red/blue, or green/blue planes.(消失点条、水平条和轴在“匹配照片”视图中始终可见。)使用“平面”选项选择网格是显示红色/绿色、红色/蓝色还是绿色/蓝色平面。Type a value in the Spacing text box to set the size of the grid spacing, which can help you scale your model to a multiple of the actual structure’s size.在“间距”文本框中键入一个值来设置网格间距的大小,这可以帮助您将模型缩放到实际结构大小的倍数。Click and drag the axis origin to a distinct origin point on your photo. In this example, that’s the corner where the building meets the ground, as shown in the following figure.单击并拖动轴原点到照片上的不同原点。在这个例子中,这是建筑与地面相接的角落,如下图所示。See Introducing Match Photo’s color-coded tools for tips on setting the axis origin.有关设置轴原点的提示,请参阅介绍“匹配照片”的颜色编码工具。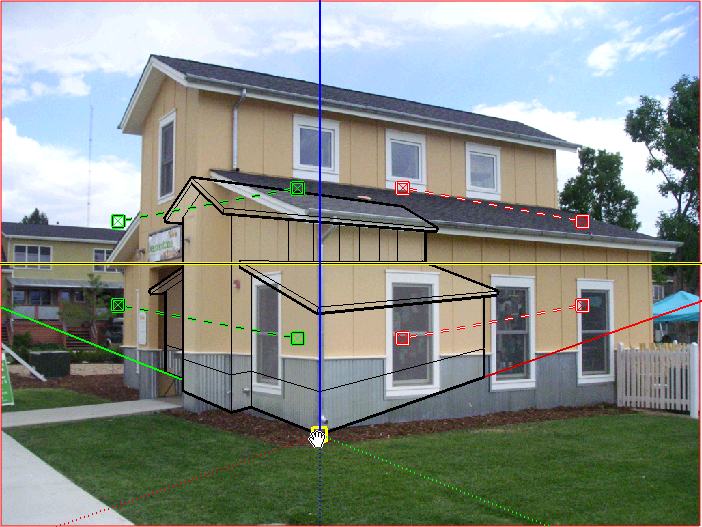
(Optional) Clear the Model checkbox to hide your model from view. You don’t have to hide your model, but it’s often a little easier to line up the vanishing point bars with the photo if the lines in your model aren’t competing with your photo.(可选)清除“模型”复选框以隐藏您的模型。你不必隐藏你的模型,但如果模型中的线条没有与照片竞争,那么将消失点条与照片对齐通常会更容易一些。Click and drag the grips on each of the four vanishing point bars. Align the green vanishing point bars with photo elements that need to be parallel the green axis bar. Make the red vanishing bars align with photo elements that are parallel with the red axis bar.单击并拖动四个消失点栏上的夹点。将绿色消失点条与需要与绿色轴条平行的照片元素对齐。使红色消失条与平行于红色轴条的照片元素对齐。The example in the following figure illustrates how the vanishing point bars align with their respective axis bar.下图中的示例说明了消失点条如何与其各自的轴条对齐。Tip:Window frames, door frames, and roof lines are handy reference points for aligning the vanishing point bars. Also, the longer the vanishing point bar extends, the better your results.窗框、门框和屋顶线是对齐消失点条的方便参考点。此外,消失点条延伸的时间越长,结果就越好。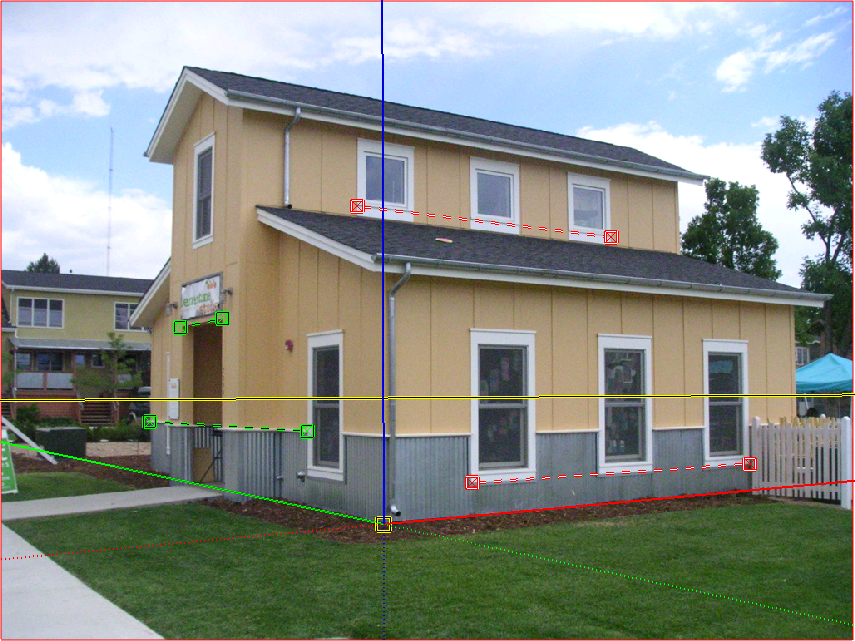
Select the Model checkbox in the Match Photo dialog box so that your model reappears.在“匹配照片”对话框中选中“模型”复选框,以便您的模型重新出现。Hover the cursor over the blue axis bar. When a two-headed arrow cursor appears, click and drag the cursor up or down the blue axis bar to scale your model.将游标悬停在蓝色轴栏上。当出现双向箭头游标时,单击并沿蓝色轴栏向上或向下拖动游标以缩放模型。You want the model outline to line up with your photo, as shown in the following figure.您希望模型轮廓与照片对齐,如下图所示。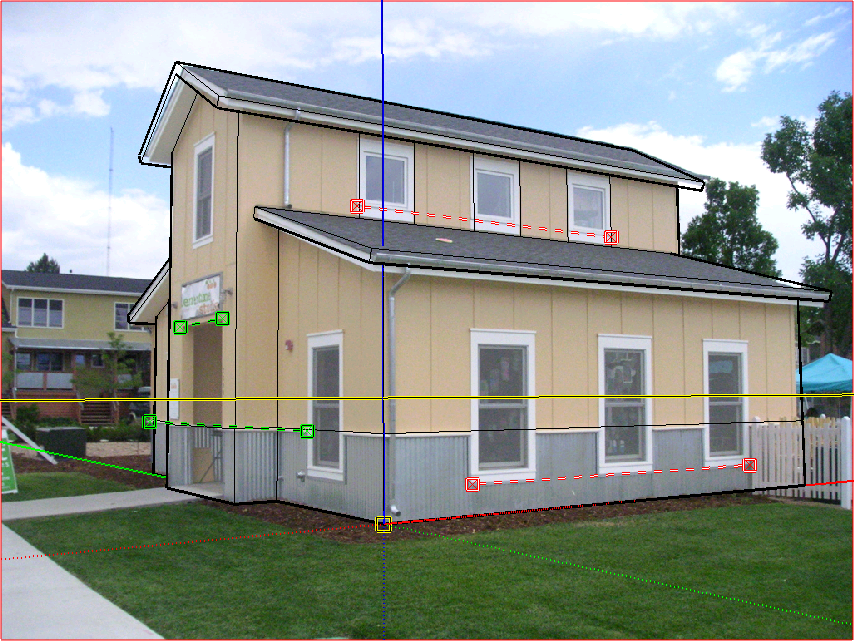
(Optional) In the Match Photo dialog box, click theProject Textures from Photobutton to project the photo on the model.(可选)在“匹配照片”对话框中,单击“从照片投影纹理”按钮将照片投影到模型上。If you project textures, you can see the photo applied to your model’s faces as you orbit around you model. The following figure shows textures projected on the schoolhouse example.如果投影纹理,则可以在绕模型旋转时看到应用于模型面部的照片。下图显示了投影在校舍示例上的纹理。Note:If your model already contains materials, SketchUp asks whether you want to replace the existing materials. You may also see the如果您的模型已经包含材质,SketchUp会询问您是否要替换现有材质。您还可以看到“修剪部分可见的面吗?”的消息。Trim partially visible faces?message.If so, click Yes to apply photo textures only to the visible portion of faces in your model.如果是这样,请单击“是”将照片纹理仅应用于模型中可见的面部部分。Click No to apply textures to an entire face, even only a part of the face is visible.单击“否”将纹理应用于整个面部,即使只有部分面部可见。
Click the Done button to exit the Match Photo toolset.单击“完成”按钮退出“匹配照片”工具集。
Creating a 3D model from a photo从照片创建3D模型
If you have a photo of something you want to model, Match Photo can help you draw the 3D model.如果你有想要建模的东西的照片,“匹配照片”可以帮助你绘制3D模型。
To draw a model with the help of a photo and SketchUp’s Match Photo feature, follow these steps:要在照片和SketchUp的“匹配照片”功能的帮助下绘制模型,请执行以下步骤:
Follow the steps in the preceding section, “Matching a photo with an existing model,” to set up your axis origin, vanishing point bars, and scale. The only difference is that you don’t need to worry about opening the model that goes with your photo or projecting textures onto a not-yet-existing model. These steps explain how to draw the model based on your photo.按照上一节,“将照片与现有模型匹配”中的步骤设置轴原点、消失点条和比例。唯一的区别是,你不需要担心打开照片附带的模型或将纹理投影到尚未存在的模型上。这些步骤解释了如何根据照片绘制模型。Tip:To help you set the scale of your photo, insert one of SketchUp’s 2D people, as shown in the figure. If you don’t already see one of these folks in your model already, find them in the Components panel.为了帮助您设置照片的比例,请插入SketchUp的2D人员之一,如图所示。如果您在模型中还没有看到这些人员之一,请在“组件”面板中找到他们。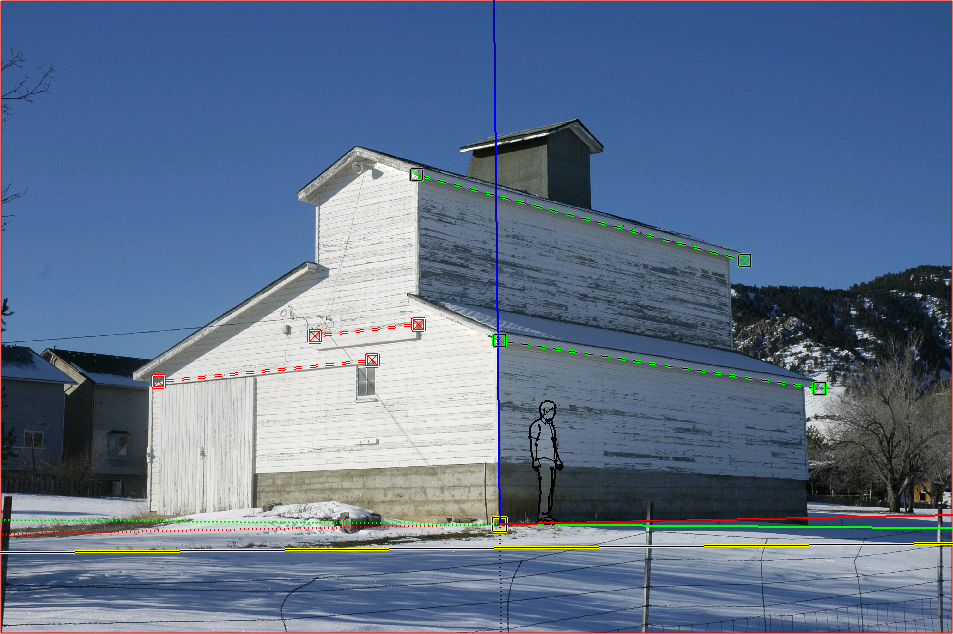
Select the Line tool (选择“直线”工具( ).)。
).)。Starting at the axis origin, trace one of the edges in your photo. Continue tracing edges until you create a face.从轴原点开始,追踪照片中的一条边。继续跟踪边,直到创建面。Use SketchUp’s tools to continue creating your 3D model based on the photo.使用SketchUp的工具继续基于照片创建3D模型。For example, after tracing the side of the barn shown in the following figure, you might use the Push/Pull tool (例如,在跟踪下图所示的谷仓侧面后,您可以使用“推/拉”工具( ) to extrude the face, as shown in the following figure. )来拉伸面,如下图所示。
When you use the drawing tools, you’ll likely leave the Match Photo view. Click the Match Photo tab see your photo again and check the length of your extrusion against the length of the barn in your photo.使用绘图工具时,您可能会离开“匹配照片”视图。单击“匹配照片”选项卡,再次查看您的照片,并将挤出物的长度与照片中谷仓的长度进行比较。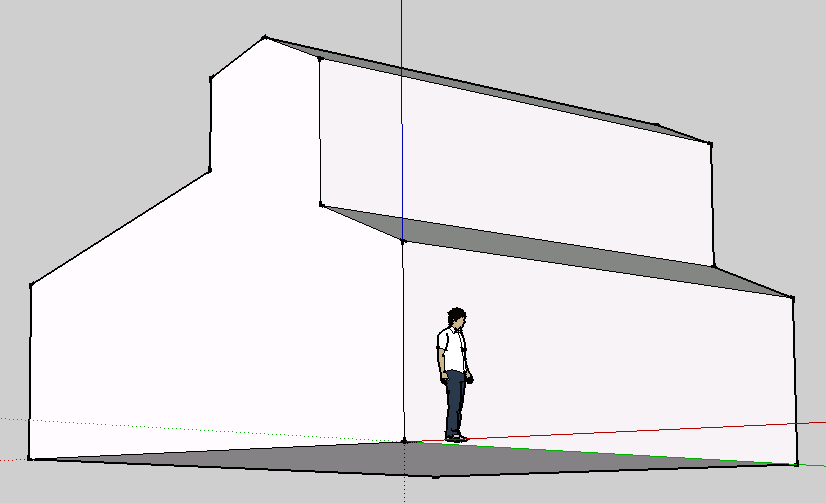 Tip:
Tip:The process of modeling from a photo is iterative. You’ll likely do a little drawing, check your model against the photo, do a little more drawing, and so on.从照片中建模的过程是迭代的。你可能会画一点,对照照片检查你的模型,再画一些,等等。(Optional) Click the scene tab to see your photo and project the photo textures onto your model.(可选)单击场景选项卡查看照片,并将照片纹理投影到模型上。To do so, click Project Textures from Photo in the Match Photo dialog box or context-click the photo and choose Project Photo from the menu that appears.为此,请在“匹配照片”对话框中单击“从照片投影纹理”,或右键单击照片,然后从显示的菜单中选择“投影照片”。In the figure, you see the barn textures projected onto the model.在图中,您可以看到投影到模型上的谷仓纹理。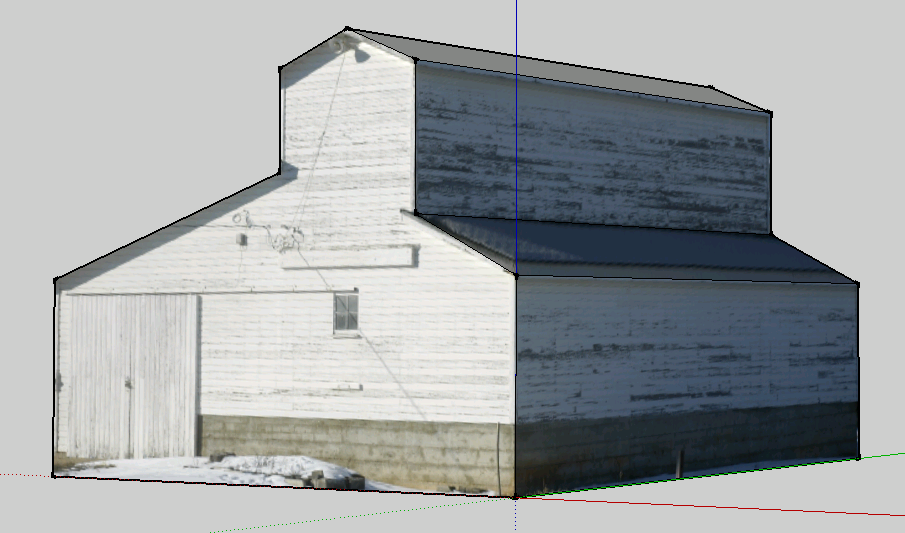
Deleting a matched photo删除匹配的照片
If your matched photo didn’t work out or you don’t need it any more, you simply delete the Match Photo scene. Here are two ways to do so:如果匹配的照片不成功或不再需要,只需删除“匹配照片”场景即可。以下是两种方法:
Context-click the scene tab and select Delete from the menu that appears.右键单击场景选项卡,然后从显示的菜单中选择“删除”。Open the Scenes dialog. In the Scenes dialog that appears, select the scene with your matched photo and then click Remove Scene (the minus sign icon).打开“场景”对话框。在出现的“场景”对话框中,选择具有匹配照片的场景,然后单击“删除场景”(减号图标)。