Measuring Angles and Distances to Model Precisely精确测量模型的角度和距离
What distinguishes solid construction and design from an M.C. Escher optical illusion? Accurate measurements.实体结构和设计与MC有何不同?精确测量。
In SketchUp, the Tape Measure tool, the Protractor tool, and the Measurements box enable you to model precisely:在SketchUp中,卷尺工具、量角器工具和测量框使您能够精确建模:
With the Tape Measure tool (使用卷尺工具( ), you can measure a distance and set precise guide lines or guide points.),您可以测量距离并设置精确的引导线或引导点。Note:
Guide lines and guide points are temporary dashed lines used as guides to draw precisely. They do not interfere with regular geometry.引导线和引导点是临时虚线,用作精确绘制的引导线。它们不会干扰规则的几何形状。The Protractor tool (Protractor工具( ) enables you to measure angles and set a precise angled guide line.)使您能够测量角度并设置精确的角度引导线。
You can enable the Create Guide functionality in both the Tape Measure and Protractor tools by pressing Ctrl on Windows or Command on Mac to toggle it off and on.您可以通过在Windows上按Ctrl键或在Mac上按Command键来关闭和打开“卷尺”和“量角器”工具中的“创建指南”功能。You can lock the tool functionality to an axis by pressing the corresponding Arrow key before or during operation.您可以在操作之前或操作过程中按相应的箭头键将工具功能锁定到轴上。As you use almost any tool in SketchUp, the Measurements box is waiting to accept a precise value.当您在SketchUp中使用几乎任何工具时,测量框正在等待接受精确值。
Beyond these tools, you can also combine the tips in this article with a little math to estimate building height accurately.除了这些工具,您还可以将本文中的提示与一点数学相结合,以准确估算建筑高度。
Table of Contents目录
Measuring a distance测量距离
The Tape Measure tool can measure a distance, create a guide or reveal coordinates along the xis. 卷尺工具可以测量距离、创建参考线或显示沿轴的坐标。Here’s where you find the Tape Measure 您可以在SketchUp界面中找到卷尺![]() in the SketchUp interface:
in the SketchUp interface:![]() :
:
Getting Started toolbar入门工具栏Construction toolbar构造工具栏Large Tool Set toolbar大工具集工具栏Tools menu on the menu bar菜单栏上的工具菜单Tools palette (macOS)工具面板(macOS)
Tip: With the Tape Measure tool selected, you can see the length of line or the area of a face at glance. Hover the Tape Measure cursor over a line or face, and you see the distance or area in the Measurements box.选择卷尺工具后,您可以一目了然地看到线条的长度或面部的面积。将卷尺游标悬停在一条线或一个面上,您将在“测量”框中看到距离或面积。
To measure geometry or set a guide line, follow these steps:要测量几何图形或设置参考线,请执行以下步骤:
Select the Tape Measure tool (选择“卷尺”工具() or press the T key.)或按T键。Note: The default setting for the Tape Measure tool is to create guide lines and guide points as you measure.注意:卷尺工具的默认设置是在测量时创建引导线和引导点。A plus sign appears next to your Tape Measure cursor when in guide creation mode (在指南创建模式下,卷尺游标旁边会出现一个加号( ). )。
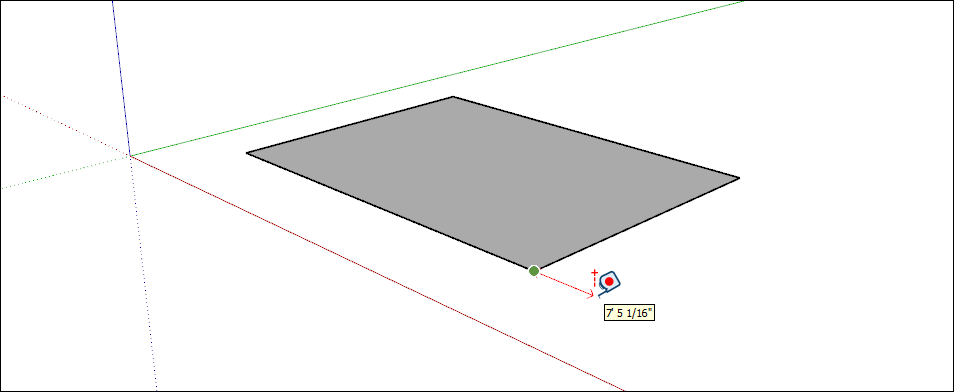
). )。If you wish to simply measure between two points without creating a guide, you can press Ctrl (Microsoft Windows) or Option (macOS). The plus sign next to the Measure tool disappears in this mode. This mode will persist until you switch tools.如果您只想在两点之间进行测量而不创建参考线,可以按Ctrl键(Microsoft Windows)或Option键(macOS)。在此模式下,测量工具旁边的加号会消失。此模式将一直持续到您切换工具为止。Click the starting point of your measurement.单击测量的起点。If you need to select an end point or midpoint, the SketchUp inference engine helps you find it.如果需要选择终点或中点,SketchUp推理引擎将帮助您找到它。To create a guide line, click a line that needs to be parallel to your guide line.要创建参考线,请单击需要与参考线平行的线。Move the cursor in the direction you want to measure. As you move the mouse, a temporary measuring tape line, with arrows at each end, stretches from your starting point, as shown in the figure.沿要测量的方向移动游标。当你移动鼠标时,一条两端都有箭头的临时卷尺线从你的起点开始延伸,如图所示。Tip:
Here are a few tips to help you move the Tape Measure cursor through 3D space:以下是一些提示,可帮助您在三维空间中移动卷尺游标:The measuring tape line changes color to match an axis colors when it is parallel to any axis. In the figure, you see measuring tape aligned to the red axis.当卷尺线平行于任何轴时,卷尺线会改变颜色以匹配轴颜色。在图中,您可以看到卷尺与红色轴对齐。Tap a directional button while measuring to lock an axis.在测量时点击方向按钮以锁定轴。The up arrow locks the blue axis, the left arrow locks the green axis, and the right arrow locks the red axis.向上箭头锁定蓝色轴,左箭头锁定绿色轴,右箭头锁定红色轴。You'll see a notification at the cursor that the inference is locked.您将在游标处看到推理已锁定的通知。The Measurements box dynamically displays the length of your measuring tape.测量框动态显示卷尺的长度。
Press Esc if you need to start over.如果需要重新开始,请按Esc键。
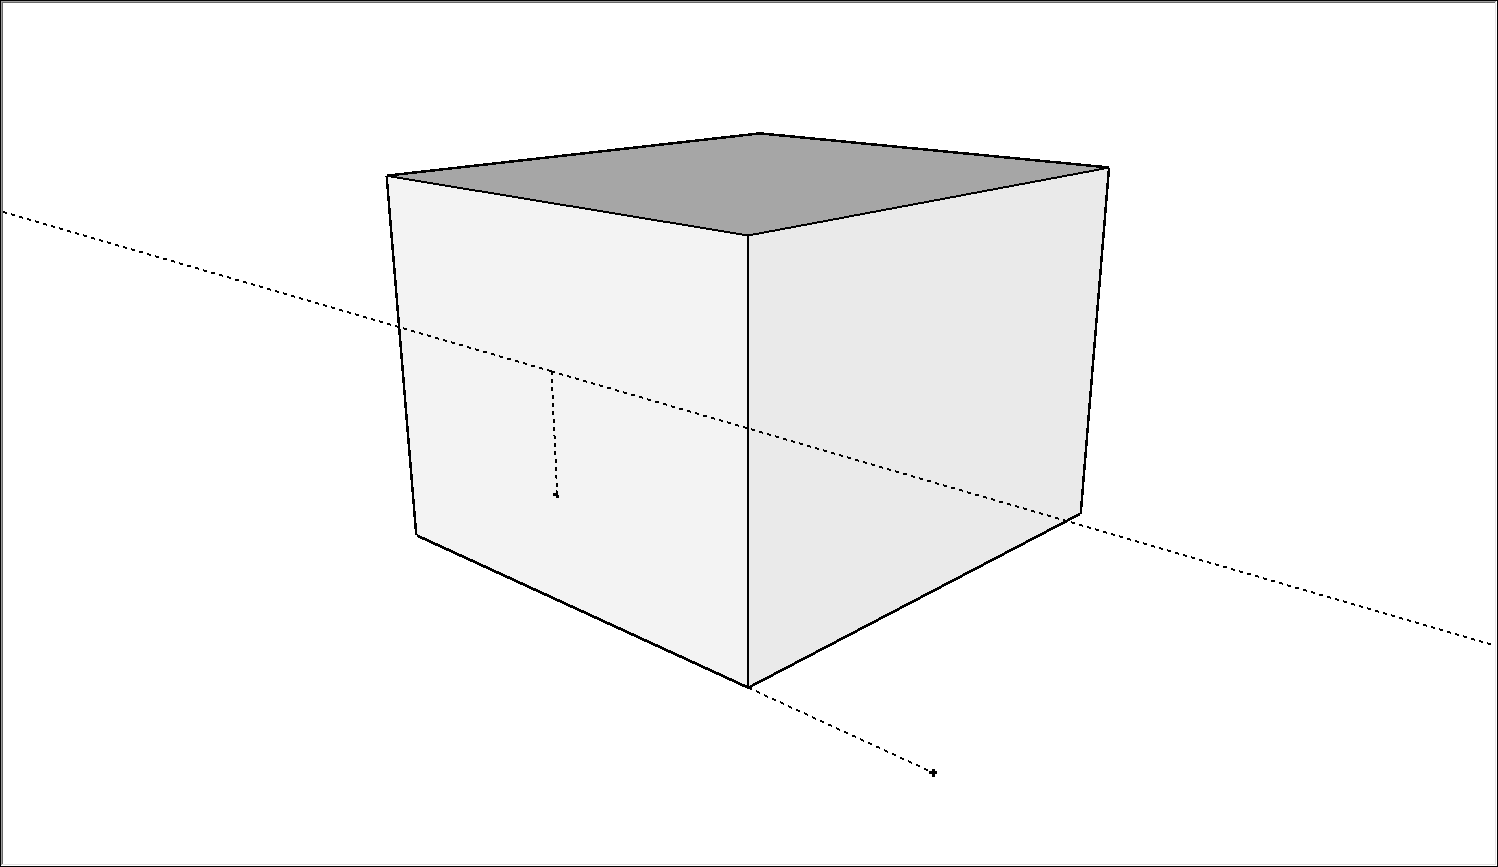
(Optional) To create a guide line, press Ctrl (Microsoft Windows) or Option (macOS).(可选)要创建参考线,请按Ctrl(Microsoft Windows)或Option(macOS)。A plus sign appears next to your Tape Measure cursor (“卷尺”游标().)旁边会出现一个加号。Click at the ending point of your measurement. The distance from the start point appears in the Measurements box.单击测量的终点。与起点的距离显示在“测量”框中。If you pressed Ctrl in the preceding step, a guide line appears as a dashed line that reaches into infinite 3D space (at least within your model).如果在上一步中按Ctrl键,则将显示一条指向无限三维空间(至少在模型内)的虚线。In the following figure, the guidelines mark the distance 3 feet from the interior walls.在下图中,参考线标记了距离内墙3英尺的距离。(See Adding Text to a Model for information about labeling distances in your model.)(有关在模型中标记距离的信息,请参阅向模型添加文本。)(Optional) To move your guide line a precise distance from the starting point, type a number and unit and then press Enter.(可选)要将参考线从起点移动精确的距离,请键入数字和单位,然后按Enter键。
Measuring an angle测量角度
Measure an angle when you want to duplicate that angle elsewhere in your model or create plans, such as for a woodworking project. To measure an angle or create angled guide lines, use the Protractor tool.当您想在模型的其他地方复制角度或创建平面时,例如木工项目,可以测量角度。要测量角度或创建倾斜的参考线,请使用量角器工具。
You find the Protractor tool (您可以在SketchUp界面的几个不同部分找到Protractor工具(![]() ) in a few different parts of SketchUp’s interface:
) in a few different parts of SketchUp’s interface:![]() ):
):
Construction toolbar构造工具栏Large Tool Set toolbar大工具集工具栏Tools menu工具菜单Tool palette (macOS)工具选项板(macOS)
In the video, you see how to measure angles and set guides with the Protractor tool. For steps that walk you through the process, read the rest of this section.在视频中,您将看到如何使用Protractor工具测量角度和设置参考线。有关引导您完成整个过程的步骤,请阅读本节的其余部分。
To measure an angle and create an angled guide line, follow these steps:要测量角度并创建倾斜的参考线,请执行以下步骤:
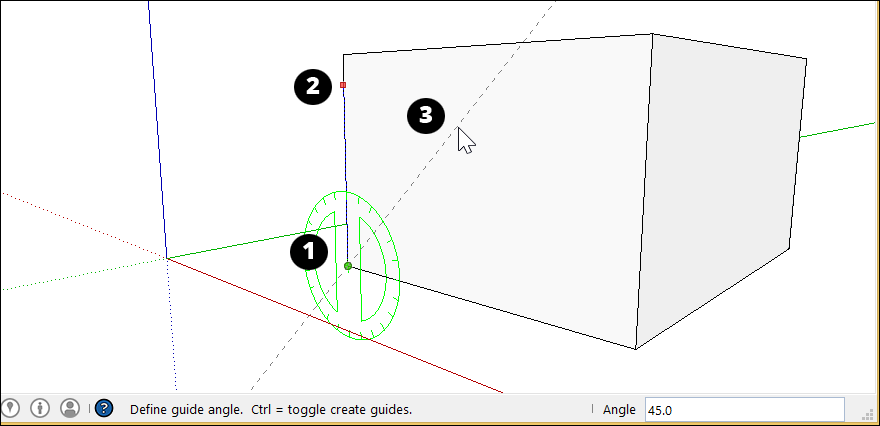
Select the Protractor tool (选择“Protractor”工具(). )。The cursor changes to a protractor. The center point is fixed to the cursor.游标变为量角器。中心点固定在游标上。Click to set the vertex of the angle that you want to measure. (See Callout 1 in the figure.) If you need to lock an orientation, press and hold the Shift key before you click.单击以设置要测量的角度的顶点。(参见图中的标注1。)如果需要锁定方向,请在单击之前按住Shift键。Tip:When you press and hold the Shift key to lock/constrain the plane of rotation, you can tap Alt (Microsoft Windows> or Command (macOS) to free the protractor from the inferenced plane.按住Shift键锁定/约束旋转平面时,可以点击Alt(Microsoft Windows>或Command(macOS))将量角器从推断平面中释放出来。The angle of the protractor will remain the angle of the original plane, but now you can move the protractor to inference other geometry.量角器的角度将保持为原始平面的角度,但现在您可以移动量角器来推断其他几何体。Click where the angle that you want to measure begins. (See Callout 2 in in the figure.)单击要测量的角度开始的位置。(见图中的标注2。)Tip:You can click and drag from the vertex to the first point to define the axis of rotation. This is especially helpful if you need to rotate on an axis that isn’t on the red, green, or blue planes.可以单击并从顶点拖动到第一个点以定义旋转轴。如果需要在不在红色、绿色或蓝色平面上的轴上旋转,这尤其有用。Press Esc at any point to start over.在任何时候按Esc键重新开始。Move the cursor to measure the angle. (See Callout 3 in the figure.)移动游标以测量角度。(见图中的标注3。)Tip:
Here are a few tips to help you find the right angle measurement:以下是一些帮助您找到正确角度测量的提示:As you move the cursor, the angle appears dynamically in the Measurements box.移动游标时,角度会动态显示在“测量”框中。When the cursor is close to the protractor, the angle snaps to the protractor’s tick marks, which indicate 15 degree increments. When your cursor is farther from the protractor’s center, you can measure the angle in more precise measurements.当游标靠近量角器时,角度会捕捉到量角器的刻度标记,指示15度增量。当游标离量角器的中心更远时,可以更精确地测量角度。
Click to set an angled guide line.单击以设置倾斜的参考线。(Optional) Type a value and press Enter to change the angle of your guide line (relative to the start line).(可选)键入一个值,然后按Enter键更改参考线的角度(相对于起点线)。You can type a decimal value, such as 34.1, or a slope, such a 1:6. Change this value as many times as you like until you make another selection or choose another command.您可以键入十进制值,如34.1,或坡度,如1:6。根据需要多次更改此值,直到您做出另一个选择或选择另一个命令。
Editing guide lines编辑指南
To reorient a guide line or guide point, you can move or rotate it. See Moving Entities Around and Flipping and Rotating for details.要重新定位参考线或参考点,可以移动或旋转它。有关详细信息,请参阅“围绕移动实体”和“翻转和旋转”。
Hiding and erasing guide lines隐藏和擦除引导线
Guide lines are usually created as a temporary aid for building a portion of your model. Keeping too many guide lines in your model can decrease SketchUp’s inference accuracy and display performance, so you might want to hide guide lines as you work or delete all guide lines after you finish your 3D model.引导线通常是作为构建模型的一部分的临时辅助而创建的。在模型中保留太多的引导线会降低SketchUp的推理精度和显示性能,因此您可能希望在工作时隐藏引导线,或者在完成3D模型后删除所有引导线。
To hide guide lines, you can use either of the following methods:要隐藏参考线,可以使用以下方法之一:
With the Select tool (使用“选择”工具( ), select one or more guides and then select Edit > Hide.),选择一个或多个参考线,然后选择“编辑>隐藏”。
Context-click a selected guide or guides and select Hide from the menu that appears, as shown in the figure.右键单击选定的一个或多个参考线,然后从显示的菜单中选择“隐藏”,如图所示。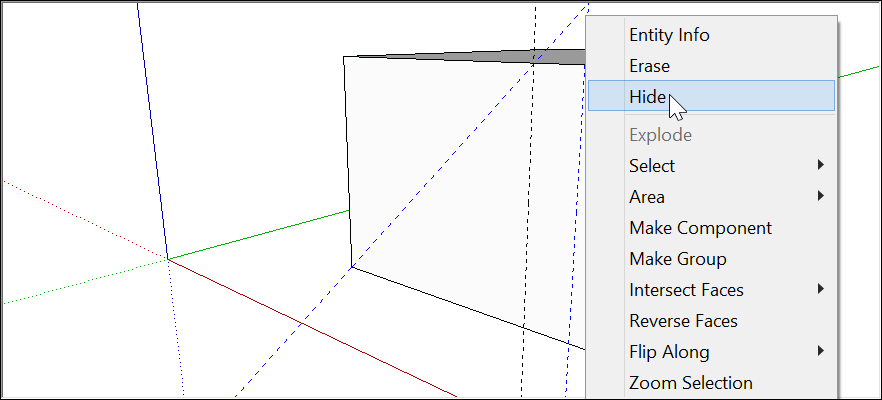
To make hidden guides visible again, select Edit > Unhide and choose an option from the Unhide submenu.要使隐藏的参考线再次可见,请选择“编辑>取消隐藏”,然后从“取消隐藏”子菜单中选择一个选项。
Deleting guide lines removes them altogether, never to return. Here are some ways to delete your guide lines:删除引导线会完全删除它们,再也不会回来了。以下是一些删除指南的方法:
With the Select tool (使用“选择”工具(), select one or more guides and then select Edit > Delete.),选择一个或多个参考线,然后选择“编辑>删除”。- Context-click a guide and choose Erase from the menu that appears.
- Click a guide line with the Eraser tool (
 ).
). Select Edit > Delete Guides to erase all guides in the current context.选择“编辑>删除参考线”以擦除当前上下文中的所有参考线。
Estimating building height accurately准确估算建筑高度
If you don’t know the height of an existing building that you’re trying to model, here are some techniques you can use to make an educated guess:如果你不知道你想要建模的现有建筑的高度,这里有一些技术可以用来做出有根据的猜测:
Count repeated units.计算重复的单位。Take a picture with an object of known height用已知高度的物体拍照Use trigonometry.使用三角法。
When you’re ready to extrude a building’s footprint to the correct height, make sure you’re in ISO view by choosing Camera > Standard Views > Iso. Then use the Push/Pull tool (当您准备将建筑物的足迹拉伸到正确的高度时,请通过选择“摄影机”>“标准视图”>“ISO”来确保您处于ISO视图中。然后使用“推/拉”工具(![]() ) to extrude your building into 3D and enter your building's exact height.
) to extrude your building into 3D and enter your building's exact height.![]() )将建筑拉伸成三维,并输入建筑的确切高度。
)将建筑拉伸成三维,并输入建筑的确切高度。
Method 1: Count repeated units方法1:计数重复单位
Often, buildings are constructed with bricks, blocks or other modular construction materials. Measure the height of a single unit, count the total number of units on the facade, and multiply to get an approximate overall height.通常,建筑物是用砖、砌块或其他模块化建筑材料建造的。测量单个单元的高度,计算立面上的单元总数,然后乘以大致的总高度。
This method also works for entire building levels. If you can measure a single level on the façade of your building, you can multiply by the total number of levels to arrive at an approximate overall measurement.此方法也适用于整个建筑标高。如果您可以测量建筑物立面上的单个标高,则可以乘以标高总数,得出大致的总体测量值。
Method 2: Take a picture with an object of known height方法2:用已知高度的物体拍照
When you’re taking a picture of the building you plan to model, include something (or someone) in the photo whose height you know.当你为你计划建模的建筑拍照时,在照片中包括一些你知道高度的东西(或人)。
Tip: Here are a few tips for estimating building height with this method:以下是用这种方法估算建筑高度的一些提示:
A meter stick or a person works well.一个米尺或一个人工作得很好。Position your “known quantity” as close to the building as possible for accuracy.将你的“已知数量”尽可能靠近建筑物,以确保准确性。Take the photo from as far away as possible to minimize vertical distortion.从尽可能远的地方拍摄照片,以尽量减少垂直失真。
You can use a photo-editing program to estimate the height of your building based on the object (or person) you included in the photograph.您可以使用照片编辑程序根据照片中包含的对象(或人)估算建筑物的高度。
Method 3: Use some simple trigonometry方法3:使用一些简单的三角函数
With a few simple measurements, it’s possible to estimate heights with some accuracy. Take a look at the figure below. All you need to know is:通过一些简单的测量,可以准确地估计高度。请看下图。你需要知道的是:
Your distance from the building您与建筑物的距离Your eye height你的眼睛高度The angle between the ground and the top of the building地面和建筑物顶部之间的角度
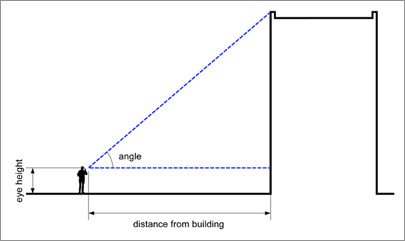
Use this formula to calculate the height of the building:使用以下公式计算建筑物的高度:
Height = ( tan(angle) x distance ) + eye height
For example, given a building distance of 25 meters, an angle of 37 degrees, and an eye height of 1.75 meters, the formula would be:例如,给定建筑距离为25米,角度为37度,眼睛高度为1.75米,公式为:
Height = tan(37) x 25m + 1.75m<br>
= 0.75355 x 25m + 1.75m<br>
= 20.6m
Measurements box quick reference测量框快速参考
In this section, you find tables that outline all the values the Measurements box accepts, depending on what tool you’re using. Remember that, after you use a tool, you can simply type the value and press Enter. 在本节中,您将找到列出测量框接受的所有值的表格,具体取决于您使用的工具。请记住,使用工具后,只需键入值并按Enter键即可。You don’t need to click in the Measurements box. Also, until you make another change to your model or select a different tool, you can continue to enter values that modify your action.您不需要在“测量”框中单击。此外,在您对模型进行另一次更改或选择其他工具之前,您可以继续输入修改操作的值。
Specifying Units of Measurement指定计量单位
The following table outlines how to specify units of measurement. If you don’t indicate a unit, SketchUp uses the units in your template. 下表概述了如何指定度量单位。如果不指定单位,SketchUp将使用模板中的单位。To see or change your default units, select Window > Model Info and select Units in the sidebar on the left.要查看或更改默认单位,请选择“窗口”>“模型信息”,然后在左侧边栏中选择“单位”。
| Unit | Example | |
|---|---|---|
| Inches | number + “ | 10” |
| Feet | number + ’ | 10’ |
| Millimeters | number + mm | 10mm |
| Centimeters | number + cm | 10cm |
| Meters | number + m | 10m |
Creating Arrays创建数组
An array arranges geometry in a line (linear array) or around a point (radial array). 数组将几何体排列成直线(线性数组)或围绕点(径向数组)。You create an array when you copy geometry with the Move tool or the Rotate tool. The following table outlines all the modifiers you can use when creating arrays.使用“移动”工具或“旋转”工具复制几何图形时,可以创建数组。下表概述了创建数组时可以使用的所有修改器。
| Array Type | How to Specify It | Example | Spacing |
|---|---|---|---|
| External | number + x | 3x | |
| External | number + * | 3* | |
| Internal | number + / | 3/ |
Entering tool-specific measurement values输入特定工具的测量值
Immediately after you use a tool, you can enter precise values, which appear in the Measurements box. The values you can enter depend on the tool.使用工具后,您可以立即输入精确的值,这些值显示在测量框中。您可以输入的值取决于工具。
The following links point you to the article that outlines the accepted values and modifiers for each tool:以下链接指向概述每个工具的可接受值和修饰符的文章:
2 Point Arc, Arc, Pie, and 3 Point Arc tools2点圆弧、圆弧、饼图和3点圆弧工具- Arc tool
- Circle tool
- Field of View tool
- Line tool
- Look Around tool
- Move tool
- Offset tool
- Pie tool
- Polygon tool
- Protractor tool
- Push/Pull tool
- Rectangle tool
- Rotate tool
- Scale tool
- Tape Measure tool
- Zoom tool