Scaling Your Model or Parts of Your Model缩放模型或模型的一部分
In SketchUp, you can resize and reshape your model based on the relative sizes of your edges and faces. Here's a quick overview of the available options:在SketchUp中,您可以根据边和面的相对大小调整模型的大小和形状。以下是可用选项的快速概述:
Scale your entire model with the Tape Measure tool.使用卷尺工具缩放整个模型。Resize entities while maintaining their proportions with either the Tape Measure tool or the Scale tool.使用卷尺工具或缩放工具调整实体大小,同时保持其比例。Stretch or squish an entity to scale with the Scale tool. For example, stretch a cabinet so it's twice its current width or narrow a car by 5 percent.使用“缩放”工具拉伸或挤压实体以进行缩放。例如,将橱柜拉伸至其当前宽度的两倍,或将汽车缩小5%。Scale a single component or every component in your model.缩放模型中的单个组件或每个组件。
The following video shows how the Scale tool can scale geometry proportionally or stretch its dimensions.以下视频显示了缩放工具如何按比例缩放几何体或拉伸其尺寸。
If you're looking for details about scaling your entire model or detailed steps that walk you through SketchUp's scaling features, check out the sections later in this article.如果您正在寻找有关缩放整个模型的详细信息,或了解SketchUp缩放功能的详细步骤,请查看本文后面的部分。
Table of Contents目录
Scaling your entire model扩展整个模型
When you want to scale your entire model, use the Tape Measure tool.当您想缩放整个模型时,请使用卷尺工具。
To scale an entire model, such as the floor plan in this example, follow these steps:要缩放整个模型,例如本例中的平面图,请执行以下步骤:
Select the Tape Measure tool (选择“卷尺工具”( ) or press the T key. )或按T键。
The cursor changes to a tape measure.游标变为卷尺。Measure the distance between two points on your model. In this example, say you know the width of the stairs needs to be 48 inches. Here's how to measure that distance:测量模型上两点之间的距离。在这个例子中,假设你知道楼梯的宽度需要是48英寸。以下是如何测量该距离:Click one end of a line segment to set the starting point of a measurement. Use the SketchUp inference engine to make sure you click the exact point.单击线段的一端以设置测量的起点。使用SketchUp推理引擎确保您单击了确切的点。Move the mouse to the end point of the same line segment. As you move the mouse, a temporary measuring tape line, with arrows at each end, stretches out from your starting point.将鼠标移动到同一线段的终点。当你移动鼠标时,一条两端都有箭头的临时卷尺线从你的起点伸出。Click at the other end of the line segment, as shown in the figure. The final distance appears in the Measurements box.单击线段的另一端,如图所示。最终距离显示在测量框中。

Type a new size for the line, which appears in the Measurements box, and press Enter.为出现在“测量”框中的线条键入新尺寸,然后按Enter键。This size is the basis for a proportional rescale of your model.此尺寸是按比例重新缩放模型的基础。In this example, the reference line is scaled to 48”.在这个例子中,参考线被缩放为48"。Tip:You can use imperial or metric units. SketchUp understands both. Just be sure to specify your desired unit if it's not your template's default unit of measurement.您可以使用英制或公制单位。SketchUp理解这两者。如果不是模板的默认计量单位,请务必指定所需的单位。When the following dialog box asks whether you want to resize your model, click the Yes button, and the model is rescaled proportionally.当以下对话框询问您是否要调整模型的大小时,单击“是”按钮,模型将按比例重新缩放。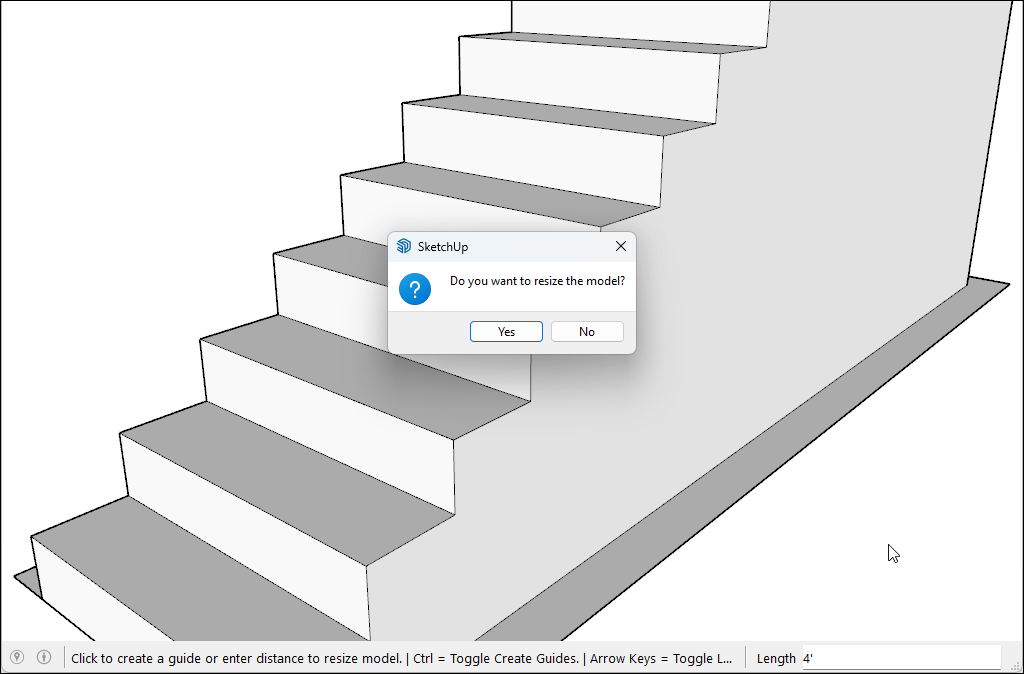
Scaling a selection proportionally按比例缩放选择
When you want to resize geometry within your model and maintain its proportions, you can use either the Tape Measure tool or the Scale tool. Your choice depends on how you want to set the scale:当您想在模型中调整几何体的大小并保持其比例时,可以使用卷尺工具或比例工具。您的选择取决于您希望如何设置比例:
To base the scale on the size of a specific line, use the Tape Measure. For example, you find out one room in your floor plan can only be 10 feet wide, but the rest of the floor plan can stay the same. Or you know a statue must be 3 meters tall.要根据特定线条的大小进行刻度,请使用卷尺。例如,您发现平面图中的一个房间只能有10英尺宽,但平面图的其余部分可以保持不变。或者你知道一座雕像必须有3米高。To resize your selection based on a percentage of your original size,要根据原始大小的百分比调整您的选择,use the Scale tool. For example, choose this method if you want to increase your selection's size by 200% or decrease it to 50%.使用“缩放”工具。例如,如果您想将选择的大小增加200%或减小到50%,请选择此方法。
To scale part of your model with the Tape Measure, follow these steps:要使用卷尺缩放模型的一部分,请执行以下步骤:
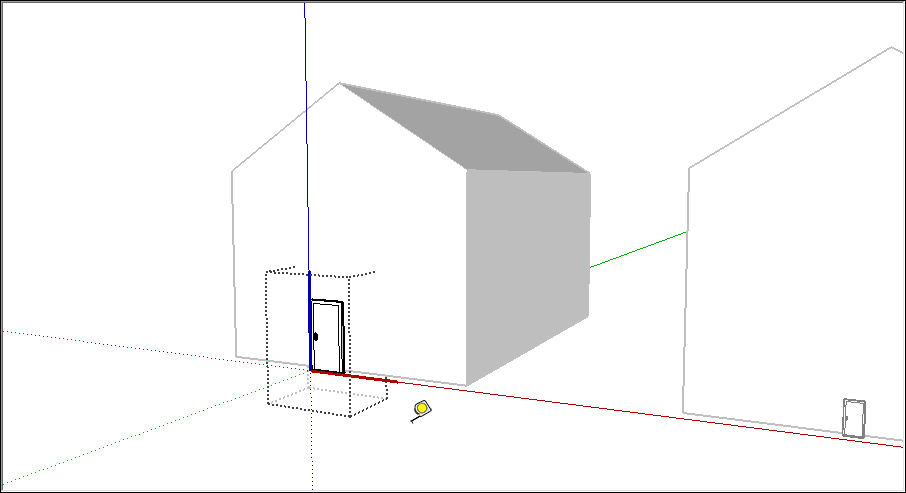
With the Select tool (使用“选择”工具( ), select the entities you want to scale.),选择要缩放的图元。
Context-click your selection and, from the context menu that appears, select Make Group.右键单击您的选择,然后从出现的右键菜单中选择“创建组”。Double-click the group. A box of dashed lines appears around the group, indicating that you've opened the group, as shown in the figure.双击该组。组周围会出现一个虚线框,表示您已打开该组,如图所示。
Select the Tape Measure tool (选择“卷尺”工具() or press the T key.)或按T键。Click one end point of your reference line. Use the SketchUp inference engine to make sure you click the exact end point.单击参照线的一个端点。使用SketchUp推理引擎确保单击确切的终点。Click the other end point of your reference line. The current distance appears in the Measurements box, as shown in the figure. In the example, say you need to decrease this width to 10 feet, due to issues on the site where the floor plan will be built.单击参照线的另一端点。当前距离显示在“测量”框中,如图所示。在这个例子中,假设你需要将这个宽度减小到10英尺,因为将要建造平面图的场地存在问题。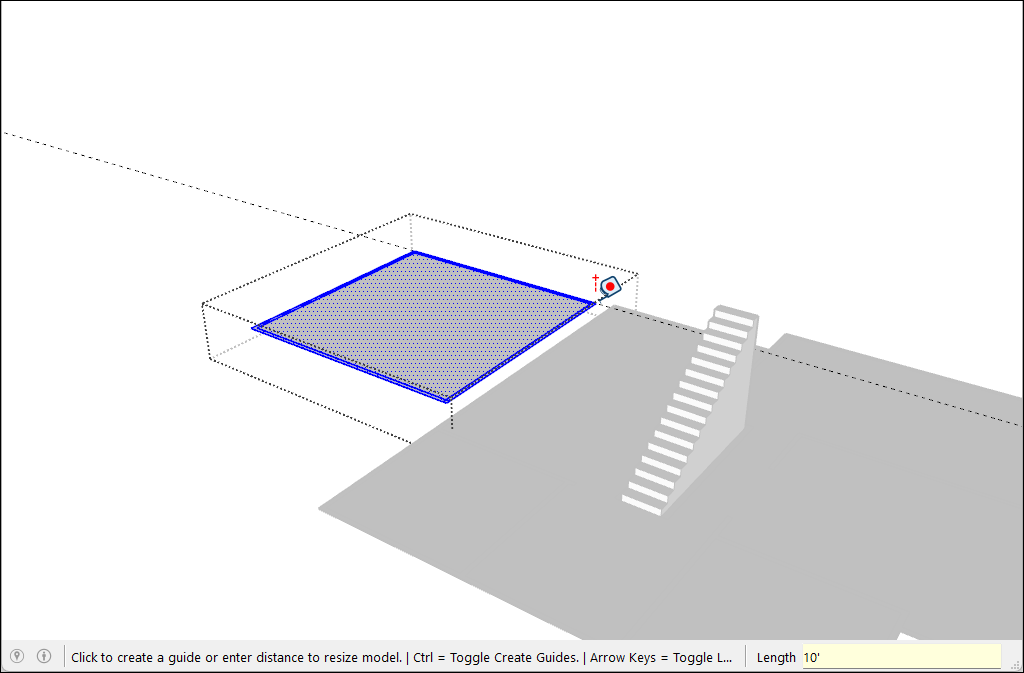
Type a new size for the line (in this example, you type 10') and press the Enter key. This size will be used as the basis for a proportional rescale of your model. SketchUp asks whether you want to resize your group or component.为线条键入新尺寸(在本例中,键入10'),然后按Enter键。此尺寸将用作模型按比例重新缩放的基础。SketchUp会询问您是否要调整组或组件的大小。Click the Yes button, and your selection rescaled proportionally. Check out the result in the following figure. That's a much smaller room.单击“是”按钮,您的选择将按比例重新缩放。看看下图中的结果。那是一个小得多的房间。
When you want to scale your model proportionally by a percentage,当你想按百分比按比例缩放模型时, the Scale tool can do the job easily. Imagine you're not sure how to talk to your client about decreasing a room in their floor plan to 10 feet wide, so you model an elephant in the room while you think it over. Here's how to scale that elephant, or any other selection in your model, by a percentage:缩放工具可以轻松完成这项工作。想象一下,你不确定如何与你的客户谈论将他们平面图中的房间缩小到10英尺宽,所以你在房间里模拟一只大象,同时仔细考虑。以下是如何按百分比缩放大象或模型中的任何其他选择:
With the Select tool (使用“选择”工具( ), select the geometry you want to scale. ),选择要缩放的几何图形。This step is important if you want to scale a complex 3D selection. If you have an easy selection, like a 2D shape or a surface entity, you can skip this step.如果要缩放复杂的3D选择,此步骤很重要。如果你有一个简单的选择,比如二维形状或曲面实体,你可以跳过这一步。Select the Scale tool (选择"缩放"工具( ) or press the S key. )或按S键。
A yellow box with green grips appears around your selection, as shown in the figure. If you skipped Step 1, click the geometry with the Scale tool cursor.如图所示,您的选择周围会出现一个带有绿色夹点的黄色框。如果跳过了步骤1,请使用“缩放”工具游标单击几何体。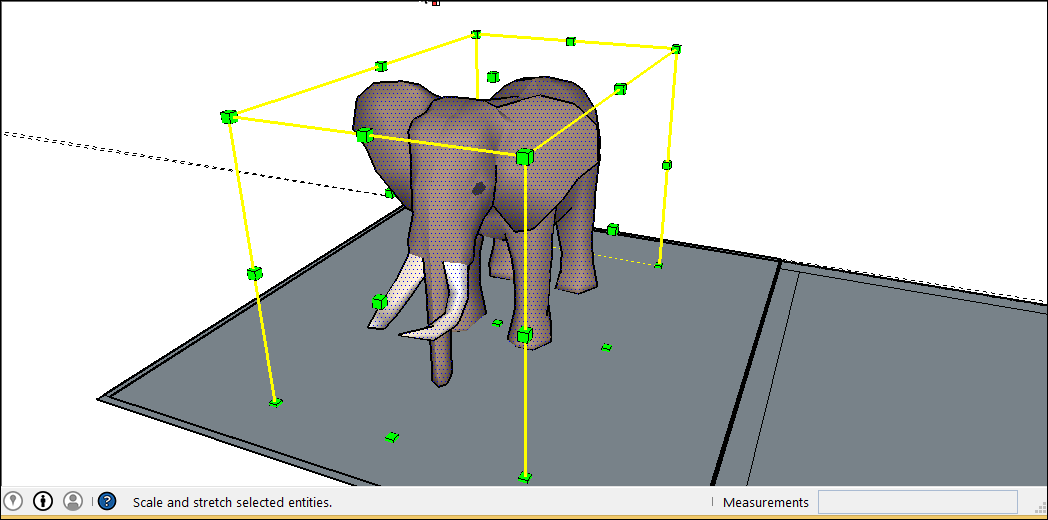
For a uniform scaling, or one that keeps your selection proportional, click a corner scaling grip. The selected grip and the opposite scaling grip turn red, as shown in the following figure, and in the Measurements box, you see a scale of 1.00, which means your geometry is at its original size, or scaled to 100%.要获得均匀缩放或保持选择比例的缩放,请单击角缩放夹点。选定的夹点和相反的缩放夹点变为红色,如下图所示,在“测量”框中,您会看到比例为1.00,这意味着您的几何体处于原始大小,或缩放到100%。Alternatively, you can tap Shift to toggle Scale Uniformly which will prevent the Scale operation from deforming the geometry.或者,您可以点击Shift切换“均匀缩放”,这将防止“缩放”操作使几何体变形。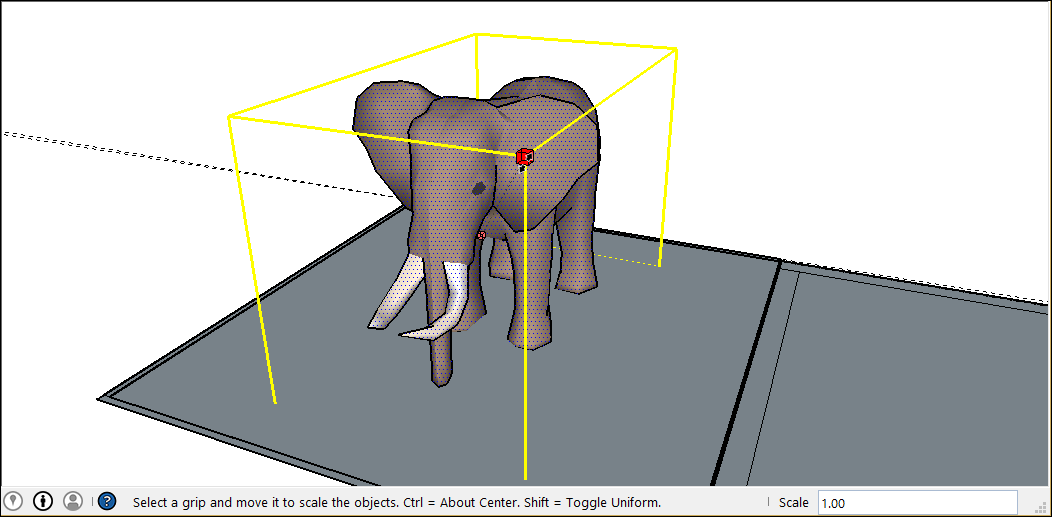
Move the cursor to scale the entity. The Measurements box displays the scale dynamically. Press the Esc key at any point to start over.移动游标以缩放实体。“测量”框动态显示刻度。在任何时候按Esc键重新开始。To set the scale from the center instead of the opposite corner, tap the Ctrl key (Windows) or the Option key (macOS) to toggle this functionality while you move the red corner grip.要从中心而不是对角设置比例,请在移动红色角夹点时点击Ctrl键(Windows)或Option键(macOS)以切换此功能。Click to set your selection's new scale. Or type the desired scale dimensions and press Enter.单击以设置所选内容的新比例。或者键入所需的比例尺寸,然后按Enter键。Note:Technically, in Step 5, you can type a dimension, such as 2m or 3", instead of a scale dimension.从技术上讲,在步骤5中,您可以键入尺寸,如2m或3",而不是比例尺寸。However, scaling based on a dimension with the Tape Measure is generally more intuitive.然而,使用卷尺根据尺寸进行缩放通常更直观。
Stretching or squishing geometry to scale按比例拉伸或挤压几何图形
Sometimes, you need to scale only one dimension of a model (or maybe two). To do so, use the Scale tool's edge or face grips. Here's how the process works, using a cabinet as an example:有时,您只需要缩放模型的一个维度(或者两个维度)。为此,请使用“缩放”工具的边或面夹点。以下是该过程的工作原理,以橱柜为例:
With the Select tool (使用“选择”工具( ), select the geometry you want to scale. ),选择要缩放的几何图形。This step is important for a complex 3D selection. Skip this step for an easy selection, like a 2D shape or a surface entity.这一步对于复杂的3D选择非常重要。跳过此步骤以轻松选择,如二维形状或曲面实体。Select the Scale tool or press the S key. A yellow box with green grips appears around your selection. If you skipped Step 1, click the geometry with the Scale tool cursor.选择"缩放"工具或按S键。您的选择周围会出现一个带有绿色夹点的黄色框。如果跳过了步骤1,请使用“缩放”工具游标单击几何图形。Click an edge or face grip (not a corner grip). The selected grip and the opposite scaling grip turn red, as shown in the figure, and in the Measurements box, you see a scale of 1.00, which means your geometry is at its original size, or scaled to 100%.单击边或面夹点(不是角夹点)。如图所示,选定的夹点和相反的缩放夹点变为红色,在“测量”框中,您会看到比例为1.00,这意味着您的几何体处于原始大小,或缩放到100%。The Measurements box also displays the axis direction for your scale, such as Blue Scale or Red Scale. If you select an edge grip, you see two axes, such as Red, Green Scale.“测量”框还显示标尺的轴方向,如蓝色标尺或红色标尺。如果选择边夹点,则会看到两个轴,如红色、绿色比例。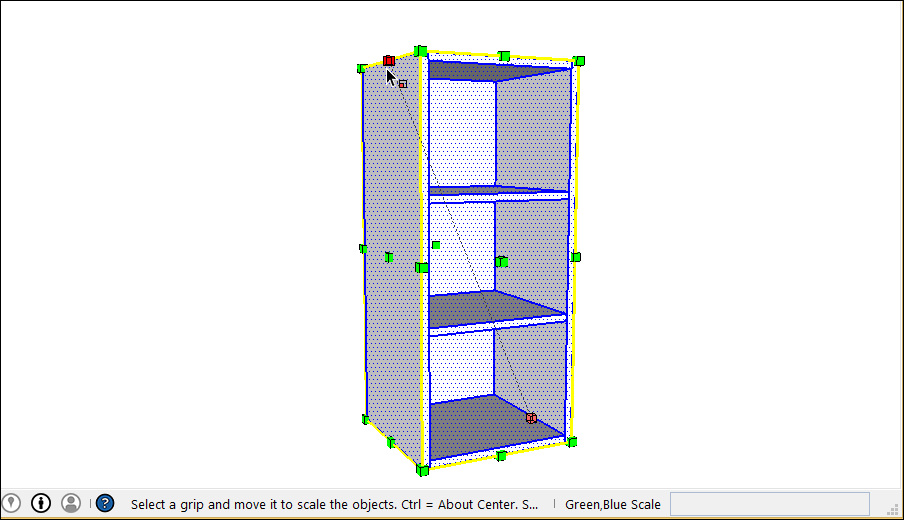
Move the cursor to scale the entity. The Measurements box displays the scale dynamically.移动游标以缩放实体。“测量”框动态显示刻度。Press the Esc key at any point to start over.在任何时候按Esc键重新开始。To set the scale from the center instead of the opposite edge or face, tap the Ctrl key (Windows) or the Option key (macOS) to toggle this functionality while you move the red corner grip.要从中心而不是相反的边或面设置比例,请在移动红色角夹点时点击Ctrl键(Windows)或Option键(macOS)以切换此功能。Click to set your selection's new scale.单击以设置所选内容的新比例。Or type the desired scale dimensions, and press Enter. To set the scale on two or even three axes, type two or three numbers, each separated by a comma, such as 3,2.或者键入所需的比例尺寸,然后按Enter键。要在两个甚至三个轴上设置比例,请键入两个或三个数字,每个数字用逗号分隔,例如3,2。In this example, you see the original cabinet was scaled to be twice as wide but half the height.在这个例子中,您可以看到原始橱柜被缩放为两倍宽但一半高。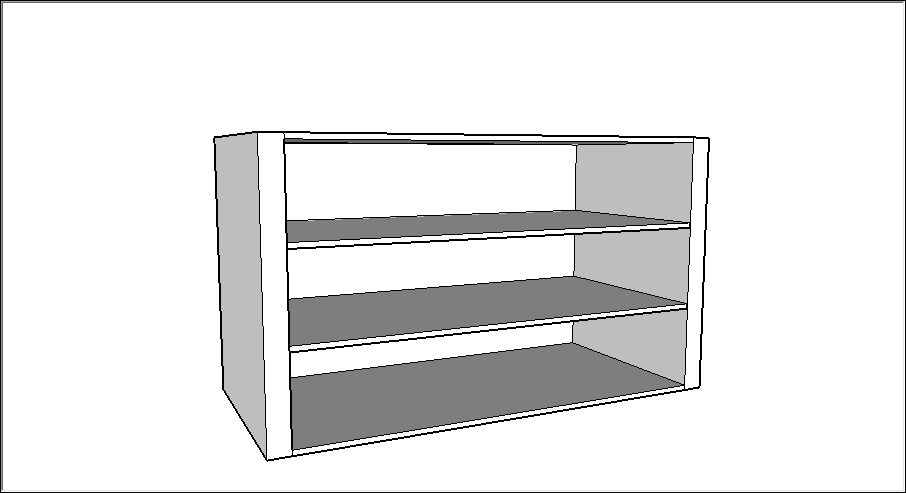
Scaling components缩放组件
You can use these scale techniques on components as well as everyday geometry. (See Adding Premade Components and Dynamic Components for an introduction to components.) 您可以在组件和日常几何体上使用这些缩放技术。(有关组件的介绍,请参阅添加前置组件和动态组件。)When you scale a component, however, you can resize a single instance of the component or all component instances in your model:但是,缩放组件时,可以调整组件的单个实例或模型中的所有组件实例的大小:
Scaling a component changes only the individual instance.缩放组件只会更改单个实例。This feature allows you to have differently scaled versions of the same component in your model.此功能允许您在模型中拥有同一组件的不同缩放版本。To scale a single instance, click the component instance with the Scale tool and use the grips to set the new scale, using any Scale tool technique explained earlier in this article.要缩放单个实例,请使用“缩放”工具单击组件实例,并使用夹点设置新的缩放,使用本文前面解释的任何缩放工具技术。The following figure shows scaling a door component downloaded from the 3D Warehouse.下图显示了如何缩放从三维仓库下载的门构件。
Scaling an entity within a component scales every component instance.缩放组件内的实体会缩放每个组件实例。To scale an entity in a component, you need to open the component by double-clicking it.要缩放组件中的实体,您需要通过双击打开组件。Dashed lines appear around the component, and the lines and faces within the component become editable, as shown in the following figure. With the component open, you can, for example, scale a line entity.虚线出现在组件周围,组件内的线条和面变得可编辑,如下图所示。打开组件后,您可以缩放线条实体。This action affects the component definition and, therefore, all instances of the component are scaled to match.此操作会影响组件定义,因此,组件的所有实例都会被缩放以匹配。With the component open, you can select a line, and therefore can scale with either the Scale tool or the Tape Measure tool, as explained earlier in this article. Note, however, that a uniform scale using the Tape Measure tool is often the easiest way to scale all components in a model.打开组件后,您可以选择一条线,因此可以使用“缩放”工具或“卷尺”工具进行缩放,如本文前面所述。但是,请注意,使用卷尺工具进行一致性缩放通常是缩放模型中所有组件的最简单方法。