Introducing Drawing Basics and Concepts介绍绘画基础和概念
Drawing a model in 3D is different from drawing an image in 2D. This introduction to drawing basics and concepts explains a few ways you can create edges and faces (the basic entities of any SketchUp model). 在3D中绘制模型不同于在2D中绘制图像。本绘图基础和概念介绍解释了创建边和面(任何SketchUp模型的基本实体)的几种方法。You also discover how the SketchUp inference engine helps you place those lines and faces on your desired axis.您还将发现SketchUp推理引擎如何帮助您将这些线和面放置在所需的轴上。
Table of Contents目录
Drawing a line画一条线Creating a face创建一个面Dividing faces划分面孔Opening 3D shapes by erasing edges通过擦除边打开三维形状Healing deleted faces修复已删除的面孔Knowing your inference types了解你的推理类型Finding and locking an inference查找并锁定推理Linear Inferencing Toggle线性推断切换Locking inferences with the keyboard用键盘锁定推理Ensuring edges are aligned to axes确保边缘与轴线对齐
Drawing a line画一条线
Use the Line tool to draw edges (also called line entities). Edges form the structural foundation of all models. Here’s how to draw a line:使用“线”工具绘制边(也称为线图元)。边缘构成了所有模型的结构基础。以下是如何画一条线:
Select the Line tool (选择工具栏上的直线工具( ) on the toolbar (or press the L key). The cursor changes to a pencil.)(或按L键)。游标变为铅笔。
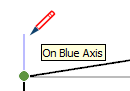
Click to set the starting point of your line. If you click the wrong place, press the Esc key to start over.单击以设置线条的起点。如果单击了错误的位置,请按Esc键重新开始。As you move your cursor around the drawing area, notice the following:在绘图区域中移动游标时,请注意以下事项:A line follows your cursor.游标后面有一条线。The line length is displayed dynamically in the Measurements box. (The Measurements box uses the units specified in your template.)线条长度在“测量”框中动态显示。(测量框使用模板中指定的单位。)The line that’s following your cursor turns red, green, or blue whenever the line is parallel with the red, green, or blue axis, respectively.每当游标后面的线分别与红色、绿色或蓝色轴平行时,该线就会变为红色、绿色和蓝色。If you hover for a moment, a ScreenTip appears, like the On Blue Axis tip shown in the figure. There is no ghost in your machine; that’s the SketchUp inference engine, which you learn more about later in this article.如果您悬停片刻,将出现一个屏幕提示,如图所示的“蓝色轴上”提示。您的机器中没有幽灵;这就是SketchUp推理引擎,您将在本文稍后了解更多。
Click to set the line’s end point. This end point can also be the starting point of another line. Press Esc or select a different tool when you’re done drawing lines.单击以设置线的终点。这个终点也可以是另一条线的起点。绘制完线条后,按Esc键或选择其他工具。After you set the end point, you can press Ctrl+Z (Microsoft Windows) or Command+Z (macOS) to undo your line and start over.设置终点后,可以按Ctrl+Z(Microsoft Windows)或Command+Z(macOS)撤消线条并重新开始。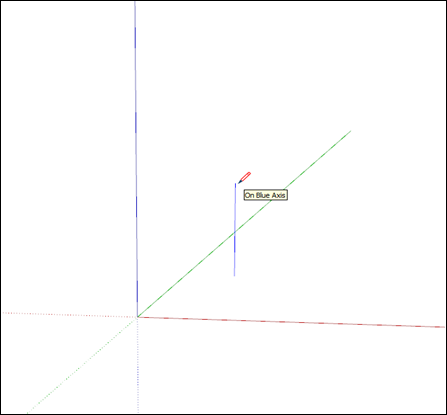
(Optional) To make your line a precise length, type a value and press Enter (Microsoft Windows) or Return (macOS).(可选)要使线条精确,请键入一个值,然后按Enter键(Microsoft Windows)或Return键(macOS)。You can repeat this process as many times as you like until you draw a new line or select another tool.您可以根据需要重复此过程多次,直到绘制一条新线或选择另一个工具。If you don’t specify a unit, SketchUp uses the unit specified in your template.如果不指定单位,SketchUp将使用模板中指定的单位。However, you can type any imperial or metric unit for your line.但是,您可以为线条键入任何英制或公制单位。So you can type 3mm or 5’2” for example.例如,您可以键入3mm或5'2"。Your value appears in the Measurements box as you type.键入时,您的值将显示在“测量”框中。
Note: The Measurements box also accepts 3D coordinates for lines:测量框还接受线条的3D坐标:
An absolute coordinate,绝对坐标,such as [3’, 5’, 7’], places the end of the line relative to the current axes. Square brackets indicate an absolute coordinate.例如[3’, 5’, 7’],将线的末端相对于当前轴放置。方括号表示绝对坐标。A relative coordinate, such as <1.5m, 4m, 2.75m>, places the end of the line relative to the starting point of your line. Angle brackets indicate a relative coordinate.相对坐标,如<1.5m, 4m, 2.75m>,将线的终点相对于线的起点放置。尖括号表示相对坐标。
You can edit the length of a line as long as it doesn’t bound a face. Here’s how to edit a line:您可以编辑线条的长度,只要它不绑定面即可。以下是如何编辑一行:
Select the Move tool (选择“移动”工具( ).)。
).)。Hover the Move tool cursor over one of the line’s end points.将“移动”工具游标悬停在直线的一个端点上。Click and drag the end point to change the line’s length.单击并拖动终点以更改线的长度。
Creating a face创建一个面
When you join several lines into a shape, they form a face.当你将几条线连接成一个形状时,它们会形成一个面。
Not a funny face, or a scary clown face, or even a cute puppy face. By default, faces are plain, but super important: They’re the other half of the duo, edges and faces, which enable every SketchUp model ever made to exist.不是一张滑稽的脸,也不是一张可怕的小丑脸,甚至不是一张可爱的小狗脸。默认情况下,面是普通的,但非常重要:它们是二者的另一半,边和面,这使得每个SketchUp模型都能存在。
The shape tools — Rectangle, Circle, and Polygon — also create faces. (See Drawing Basic Shapes for more about those tools.)形状工具矩形、圆形和多边形也可以创建面。(有关这些工具的更多信息,请参阅绘制基本形状。)
Dividing faces分割面
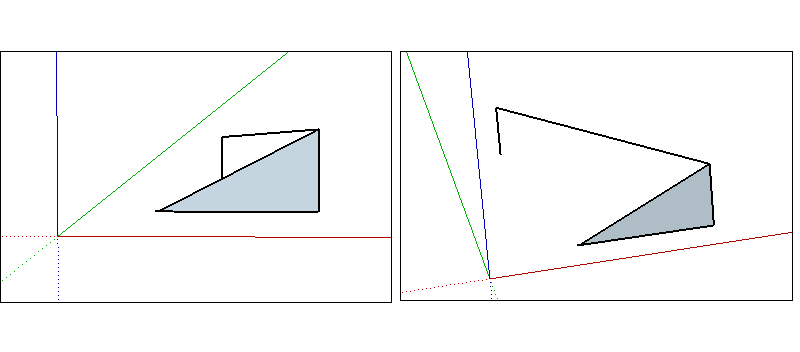
When you draw a line (or a curve) on an existing face, you split the face.在现有面上绘制直线(或曲线)时,会分割该面。
Opening 3D shapes by erasing edges and faces通过擦除边和面打开三维形状
You can erase an edge or face to create an opening in a shape. 可以擦除边或面以在形状中创建洞口。To see how erasing an edge affects your model, first select the Eraser tool (要查看擦除边对模型的影响,请首先选择工具栏中的“橡皮擦”工具(![]() ) in the toolbar or press the E key, and then click an edge:
) in the toolbar or press the E key, and then click an edge:![]() )或按E键,然后单击边:
)或按E键,然后单击边:
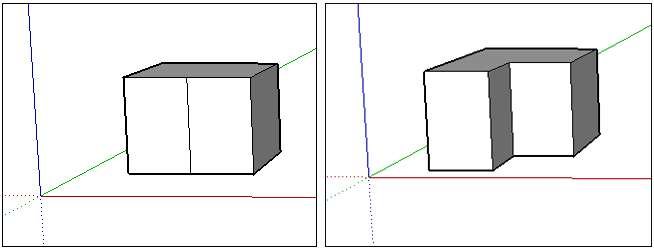
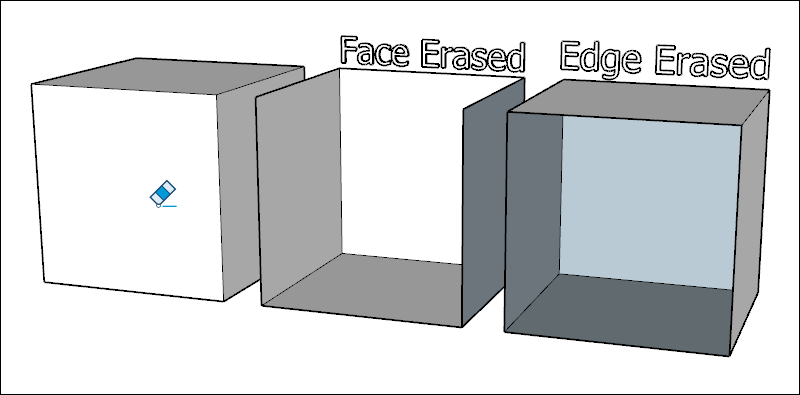
Clicking an edge erases the edge and any face that touched that edge.单击边会擦除边和任何接触该边的面。As Billy Idol almost sang, you can have lines without a face. However, a face must be completely bound by edges.正如Billy Idol几乎要唱的那样,你可以有没有面的线条。但是,面必须完全由边约束。Context-clicking a face and choosing Erase deletes only the face.右键单击一个面并选择“擦除”仅删除该面。
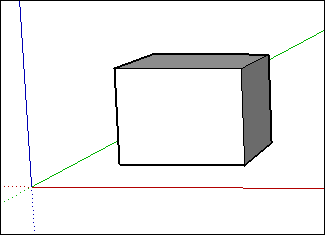
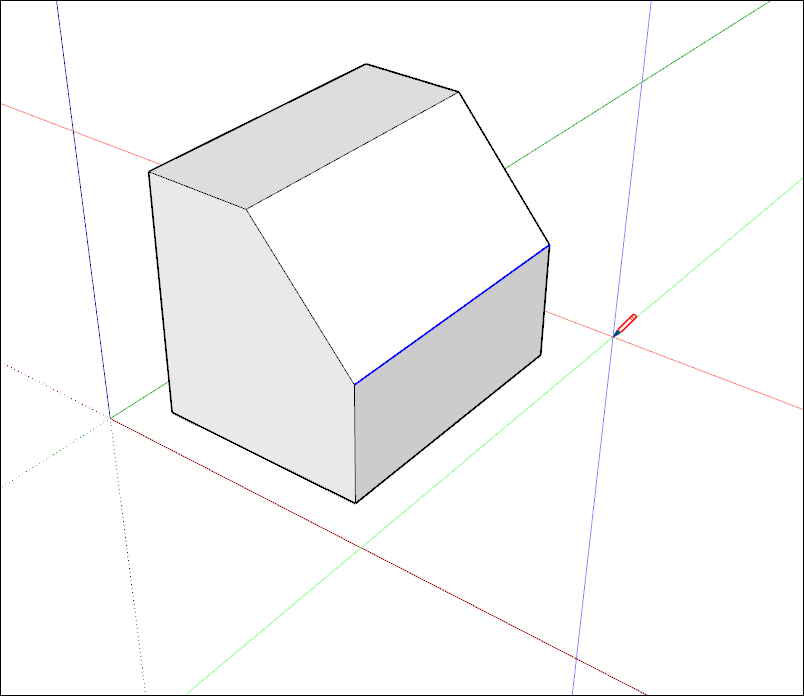
In the figure, you see the original cube and how erasing an edge or face changes the cube.在图中,您可以看到原始立方体以及擦除边或面如何更改立方体。
Healing deleted faces修复已删除的面孔
If you accidentally delete a face, here’s how to bring it back:如果你不小心删除了一个面,以下是如何将其恢复:
If you haven’t made any other changes that you’d like to keep, simply select Edit > Undo from the menu bar.如果您还没有进行任何其他要保留的更改,只需从菜单栏中选择“编辑”>“撤消”即可。Or press the keyboard shortcut for Undo, Ctrl+Z (Microsoft Windows) or Command+Z (macOS).或者按键盘快捷键“撤消”、Ctrl+Z(Microsoft Windows)或Command+Z(macOS)。Redraw the line that caused the faces to disappear, and SketchUp will re-create the faces.重绘导致面消失的线,SketchUp将重新创建面。
Knowing your inference types了解你的推理类型
SketchUp displays several types of inferences: point, linear, and shape. SketchUp often combines inferences together to form a complex inference. Also, components and dynamic components have their own inference types.SketchUp显示几种类型的推理:点、线性和形状。SketchUp经常将推理组合在一起,形成一个复杂的推理。此外,组件和动态组件都有自己的推理类型。
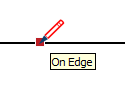
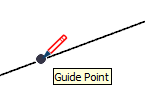
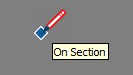
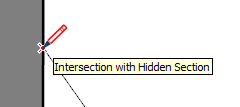
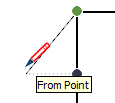
A point inference is based on the exact point of your cursor in your model. 点推断基于模型中游标的确切点。The following table lists the point inference types.下表列出了点推理类型。
| ||
| ||
| ||
| ||
| ||
| ||
| ||
| ||

| ||
| ||

| ||
| ||
|
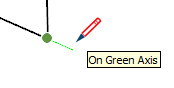
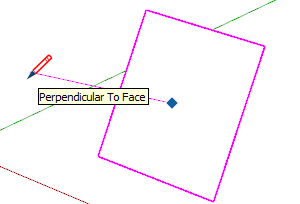
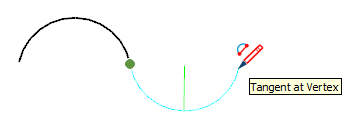
A linear inference snaps along a line or direction in space. In addition to a ScreenTip, a linear inference sometimes displays a temporary dotted line while you draw.线性推理沿着空间中的直线或方向捕捉。除了屏幕提示外,线性推理有时会在绘制时显示一条临时虚线。
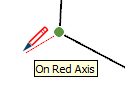
| ||
| ||
| ||
| ||
| ||
| ||
| ||
| ||
| ||
|
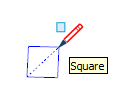
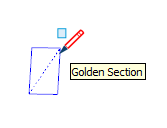
Shape inferences形状推断 help you pinpoint the moment when a rectangle becomes a square, for example. The following table lists all the shape inferences.例如,帮助您确定矩形变为正方形的时刻。下表列出了所有形状推断。
| ||
| ||
| ||
| ||
|
Finding and locking an inference查找并锁定推理
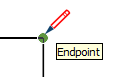
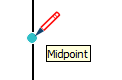
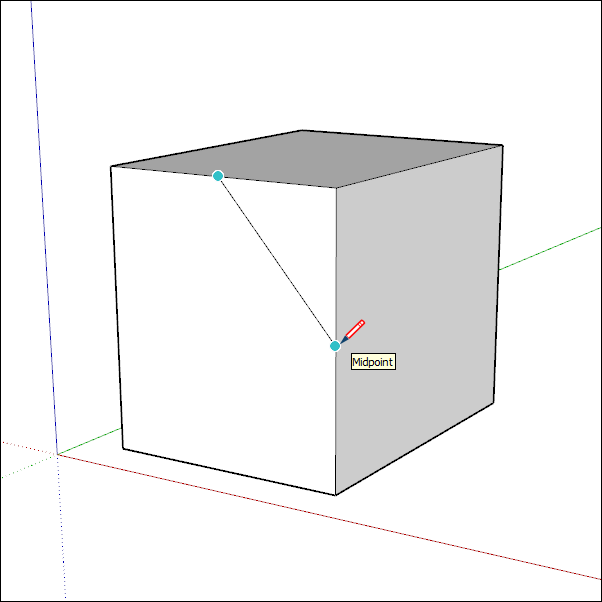
SketchUp has an inference engine that helps you work in 3D space. SketchUp有一个推理引擎,可以帮助您在3D空间中工作。For example, when the Line tool cursor is hovering over the midpoint of another line, the inference engine tells you by displaying a light blue dot and ScreenTip that says, “Midpoint,” as shown here. 例如,当“直线”工具游标悬停在另一条直线的中点上时,推理引擎会显示一个浅蓝色点和屏幕提示“中点”来告诉您,如图所示。Every inference has its own color and ScreenTip. (See Knowing your inference types for a full list.)每个推理都有自己的颜色和屏幕提示。(有关完整列表,请参阅了解推理类型。)
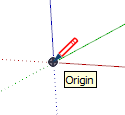
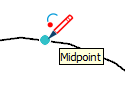
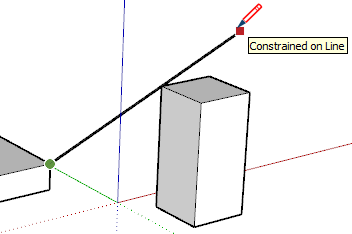
The inference engine can also help you find geometric relationships between lines. 推理引擎还可以帮助您找到直线之间的几何关系。For example, it tells you when a line you’re drawing is perpendicular to another line. 例如,它告诉您绘制的一条线何时与另一条线垂直。In the following figure, notice that a colored dot also appears at the start point of the line, giving you a few bits of information all at once.在下图中,请注意,一个彩色点也出现在线条的起点,一次为您提供一些信息。

Linear Inferencing Toggle线性推断切换
Inferencing is a fundamental feature of SketchUp with most tools depending on it in some manner.. 推理是SketchUp的一个基本功能,大多数工具都以某种方式依赖于它。。However, inferencing can sometimes get in your way, especially when working in a busy area of a model. 然而,推理有时会妨碍你,尤其是在模型的繁忙区域工作时。With the Line tool, you can turn linear inferencing off and back on using a simple modifier action.使用Line工具,您可以使用简单的修饰符操作关闭和重新打开线性推理。
To toggle linear inferencing in the Line tool, you’ll need to click once to start drawing your line. 要在“直线”工具中切换线性推理,您需要单击一次以开始绘制直线。Once you’ve started your line, but before clicking to finish it, simply press the COMMAND key on the Mac or ALT key on Windows which will toggle through the following states:一旦你开始你的行,但在单击完成它之前,只需按Mac上的COMMAND键或Windows上的ALT键,这将在以下状态之间切换:
All Inferences On所有推论All Inferences Off所有推论关闭Parallel and Perpendicular Only仅平行和垂直
All Inferences On所有推论
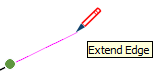
This is the default behavior and what you’ve experienced in SketchUp since Version 1. The Line tool will snap to the red, green, and blue axes, as well as the magenta axis (parallel/perpendicular to a specified edge.)这是默认行为,也是自SketchUp版本1以来您在SketchUp中遇到的行为。线工具将捕捉到红色、绿色和蓝色轴,以及品红色轴(平行/垂直于指定边)
All Inferences Off所有推论关闭
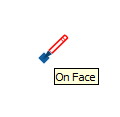
In this state, the Line tool will ignore all linear inferences. Notice that your cursor will move more freely around the screen as you complete edge segments. 在这种状态下,Line工具将忽略所有线性推理。请注意,当您完成边缘分段时,游标将在屏幕上更自由地移动。Note that you can still find other inference types such as On face, Guide points, Midpoints, and more.. Use these other inference types to make sure your lines are drawn on the planes you want.请注意,您仍然可以找到其他推理类型,如面上推理、引导点推理、中点推理等。。使用这些其他推理类型来确保您的线条绘制在所需的平面上。
Parallel and Perpendicular Only仅平行和垂直
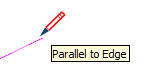
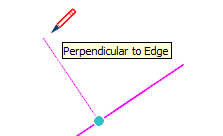
This state shows only parallel and perpendicular linear inferences when using the Line tool. Selecting this option will allow you to draw your line, making sure it is parallel or perpendicular to other geometry, while not getting distracted by other linear inferences that might be tempted to steal your line.使用直线工具时,此状态仅显示平行和垂直的线性推断。选择此选项将允许您绘制线条,确保它与其他几何体平行或垂直,同时不会被可能试图窃取您线条的其他线性推断分心。
Locking inferences with a keyboard用键盘锁定推理
By locking inferences, you can confidently draw along the direction you intend to draw. Another reason to lock an inference is to maintain one drawing direction while you reference geometry from another part of the model. 通过锁定推理,你可以自信地沿着你打算画的方向画。锁定推理的另一个原因是,在从模型的另一部分引用几何图形时,保持一个绘图方向。That’s a more advanced move, but very helpful. The easiest way to lock an inference to the default axes directions is to use the arrow keys. Note that you'll see a notification at the cursor that the inference is locked.这是一个更先进的举措,但非常有帮助。将推理锁定到默认轴方向的最简单方法是使用箭头键。请注意,您将在游标处看到推理已锁定的通知。
| Key | |
|---|---|
| ↑ | |
| ← | |
| → | |
| ↓ | |
| Shift | |
| Shift+Alt (Windows) or Shift + Command (MacOS) |
Some tools, like the circle and rotate tools, can lock to a plane (instead of a drawing direction) as shown below. For these tools you can lock the drawing plane by choosing the colored direction for the tool’s axis or “normal”.一些工具,如圆形和旋转工具,可以锁定到平面(而不是绘图方向),如下所示。对于这些工具,您可以通过选择工具轴的着色方向或“法线”来锁定绘图平面。
Ensuring edges are aligned to axes确保边缘与轴线对齐
To ensure your edges align to axes, you may find it helpful to change the cursor to the axes colors. Or if you need to check the alignment of existing geometry, change your edges to the axes colors.为了确保您的边与轴对齐,您可能会发现将游标更改为轴颜色很有帮助。或者,如果需要检查现有几何体的对齐情况,请将边更改为轴颜色。
To change your cursor to axes colors, follow these steps:要将游标更改为轴颜色,请执行以下步骤:
Select Window > Preferences (Microsoft Windows) or SketchUp > Preferences (macOS). The SketchUp Preferences" dialog box appears.选择“窗口”>“首选项”(Microsoft Windows)或“SketchUp”>“首选项”(macOS)。此时会出现“SketchUp首选项”对话框。Select the Drawing item on the left.选择左侧的“绘图”项。In the Miscellaneous area of the Drawing panel, select the Display cross hairs checkbox.在“绘图”面板的“杂项”区域中,选中“显示十字准线”复选框。Click OK to close the SketchUp Preferences dialog box. The cursor displays cross hairs that are the color of the axes, as shown here.单击“确定”关闭“SketchUp首选项”对话框。游标显示十字准线,即轴的颜色,如图所示。
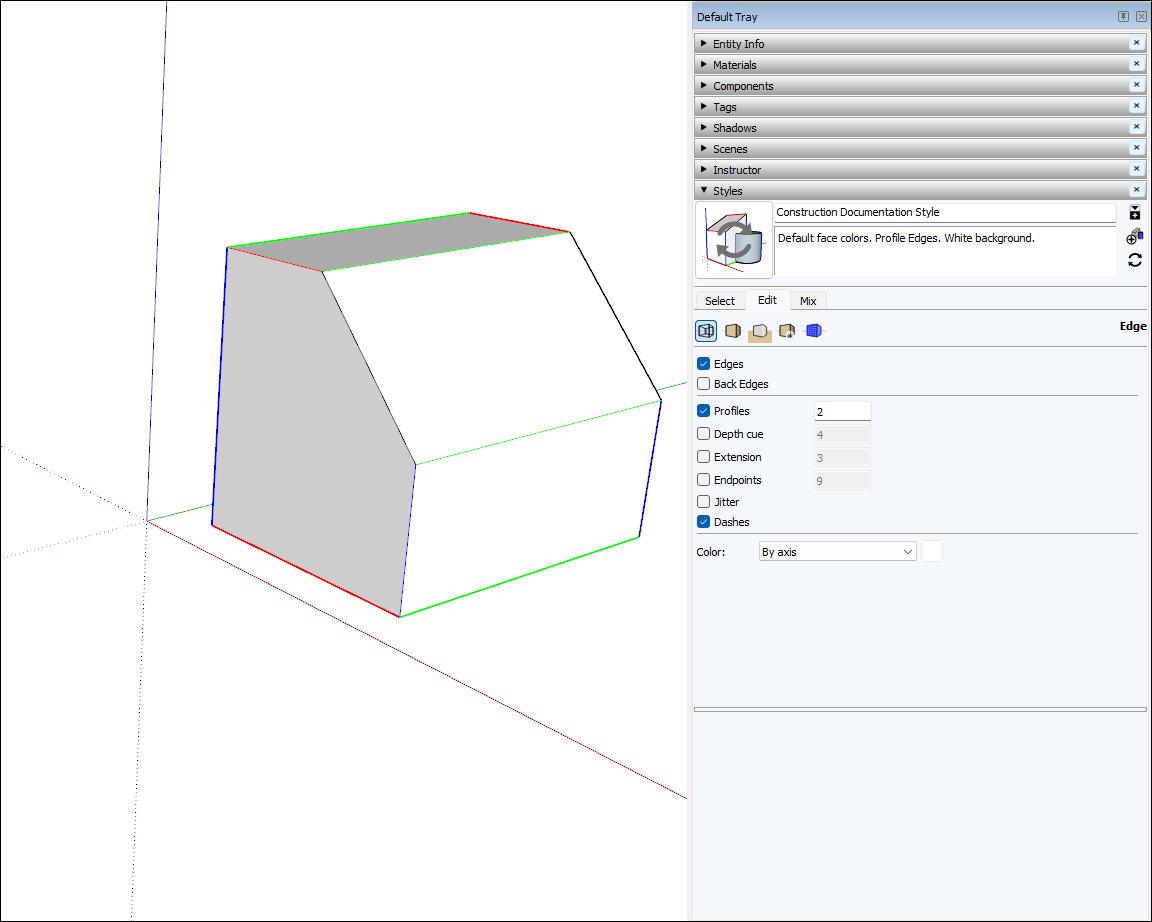
To make the edges in your model reflect the axis color to which it is aligned, follow these steps:要使模型中的边反映其对齐的轴颜色,请执行以下步骤:
Select Window > Styles.选择“窗口>样式”。In the Styles dialog box, select In Model from the drop-down list of styles libraries.在“样式”对话框中,从样式库的下拉列表中选择“在模型中”。Click the Edit tab.单击“编辑”选项卡。Click the Edge Settings icon, shown in the figure.单击“边缘设置”图标,如图所示。From the Color drop-down list, select By axis. The colors of the edges in your model change to reflect their alignment to the axes (unless an edge isn’t aligned to an axis, and then the edge color does not change).从“颜色”下拉列表中,选择“按轴”。模型中边的颜色会发生变化,以反映它们与轴的对齐情况(除非边没有与轴对齐,那么边的颜色就不会改变)。The following figure shows which edges are (and are not) aligned to the three axes.下图显示了哪些边与三个轴对齐(和不对齐)。