Aggregation Editor聚合编辑器
Posted on: 02/06/2020 (last updated: 09/03/2022) by Kathryn Vargas
- tl;dr
To build our MongoDB aggregation example, we will be using the Aggregation Editor, the stage-by-stage aggregation pipeline editor in Studio 3T.为了构建MongoDB聚合示例,我们将使用“聚合编辑器”,即Studio 3T中的逐阶段聚合管道编辑器。Build accurate aggregation queries and make debugging easier by defining stage operators and checking inputs and outputs at each stage.通过定义阶段运算符并检查每个阶段的输入和输出,构建准确的聚合查询,并简化调试。Download it here, or if you have already done so, skip to the example.在这里下载,或者如果您已经下载了,请跳到示例。Shortcuts快捷键Open Aggregation Editor打开聚合编辑器 – F4
Execute Full Pipeline执行完整的管道 – F5
Show Input to this Stage展示对这个阶段的投入 – F6
Show Output from this Stage显示此阶段的输出 – F7
Move Selected Stage Up将所选舞台上移 – Shift + F8
Move Selected Stage Down将所选阶段下移 – F8
Add New Stage添加新阶段 – Shift + Ctrl + N (Shift + ⌘+ N)
Open Aggregate Query打开聚合查询 – Ctrl + O (⌘+ O)
Save Aggregate Query保存聚合查询 – Ctrl + S (⌘+ S)
Save Aggregate Query As将聚合查询另存为 – Shift + Ctrl + S (Shift + ⌘ + S)
Toggle query auto-completion切换查询自动完成 – Ctrl + Space (^ + Space)
Format code格式代码 – Ctrl + Alt + L (⌥ + ⌘ + L)
►https://player.vimeo.com/video/681876283
Basics基础
To open Aggregation Editor:要打开聚合编辑器,请执行以下操作:
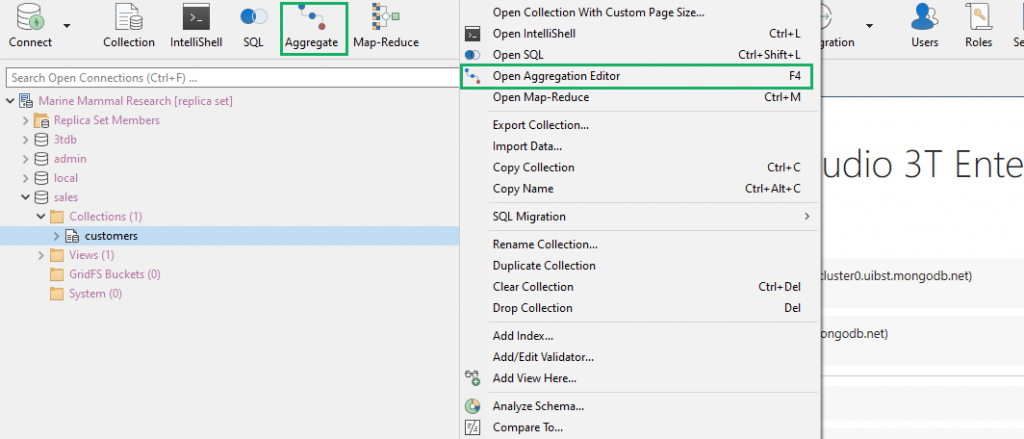
Toolbar工具栏 –Click on the Aggregate button点击“聚合”按钮Right-click右击 –Right-click on a target collection and choose Open Aggregation Editor右键单击目标集合,然后选择“打开聚合编辑器”Shortcut快捷键 –Press F4按F4
The Aggregation Editor has five main tabs: Pipeline, Stage, Query Code, Explain, and Options.聚合编辑器有五个主要选项卡:“管道”、“阶段”、“查询代码”、“解释”和“选项”。
Pipeline tab“管道”选项卡
The Pipeline tab is the default tab upon opening Aggregation Editor.“管道”选项卡是打开“聚合编辑器”时的默认选项卡。
It has two main sections: Pipeline flow (top) is where you can see all stages at a glance and add, edit, duplicate, and move them as needed. 它有两个主要部分:“管道流”(顶部)是一个可以一目了然地看到所有阶段的地方,可以根据需要添加、编辑、复制和移动它们。Pipeline output (bottom) is where you can view the output of the full pipeline.“管道输出”(底部)是可以查看整个管道输出的地方。
Stage tab(s)“阶段”选项卡
Adding the first stage opens a Stage 1 tab next to the Pipeline tab. 添加第一个阶段会在“管道”选项卡旁边打开“阶段1”选项卡。Each additional stage opens an appropriately-named, new tab.每个附加阶段都会打开一个适当命名的新选项卡。
The Stage tab has two main sections. “阶段”选项卡有两个主要部分。Stage editor (top) is where the query is written. “阶段编辑器”(顶部)是编写查询的地方。Stage data (bottom) is where the inputs and outputs are displayed in their respective panels, Stage Input and Stage Output.“阶段数据”(底部)是输入和输出显示在各自面板、“阶段输入”和“阶段输出”中的位置。
Query Code tab“查询代码”选项卡
Query Code translates aggregation queries – as they were last run in the Pipeline or Stage tabs – to JavaScript (Node.js), Java (2.x and 3.x driver API), Python, C#, PHP, Ruby, and the mongo shell language.查询代码将聚合查询转换为JavaScript(Node.js)、Java(2.x和3.x驱动程序API)、Python、C#、PHP、Ruby和mongo shell语言,就像它们上次在管道或阶段选项卡中运行一样。
Aggregation queries translated to the mongo shell language can be directly opened in a separate IntelliShell tab.翻译成mongo shell语言的聚合查询可以直接在单独的IntelliShell选项卡中打开。
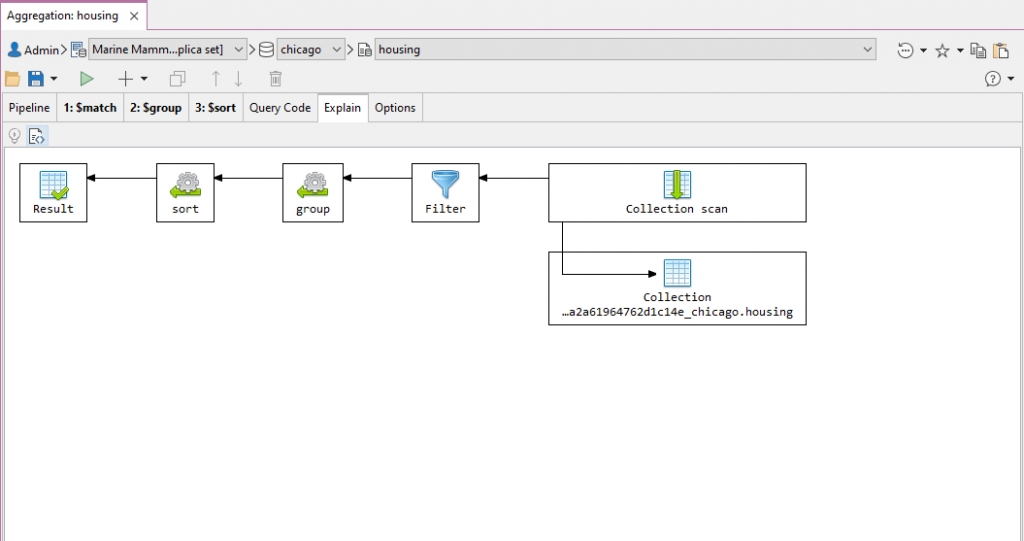
Explain tab“解释”选项卡
The Explain tab visualizes the information provided by Explain选项卡以图表格式显示explain() – the steps MongoDB took to execute the aggregation query – in a diagram format.explain()提供的信息,即MongoDB执行聚合查询所采取的步骤。
Options tab“选项”选项卡
The Options tab is where disk use and custom collation settings can be set.“选项”选项卡用于设置磁盘使用和自定义排序规则设置。

Allow Disk Use enables writing to temporary files, which will then allow aggregation operations to write data to the “允许磁盘使用”允许写入临时文件,这将允许聚合操作将数据写入_tmp subdirectory in the dbPath directory.dbPath目录中的_tmp子目录。
Customizing your queries’ collation influences how searching and sorting is performed. 自定义查询的“排序规则”会影响搜索和排序的执行方式。Read more about collation here.阅读更多关于排序规则的信息。
A MongoDB aggregation exampleMongoDB聚合示例
To illustrate how Aggregation Editor works, we’ll go through a three-stage aggregation query example which uses:为了说明聚合编辑器的工作原理,我们将介绍一个三阶段聚合查询示例,该示例使用:
$matchas Stage 1作为第一阶段$groupas Stage 2第二阶段$sortas Stage 3第三阶段
We’ll use the publicly-available housing data from the City of Chicago Data Portal, You can download the zip file here, then import the JSON file to your MongoDB database.我们将使用芝加哥市数据门户网站上公开的住房数据,您可以在这里下载zip文件,然后将JSON文件导入MongoDB数据库。
Identify the question to answer确定要回答的问题
The question we want to ask of our data is simple:我们想问的问题很简单:
Which zip code has the greatest number of senior housing units available?哪个邮政编码的老年公寓数量最多?
To think how we’ll answer this and how we’ll form our query, let’s take a look at the data.想一想我们将如何回答这个问题,以及我们将如何形成查询,让我们来看看这些数据。
Click on Execute full pipeline – which looks like a play button – on the toolbar to view the data. 单击工具栏上的“执行完整管道”(看起来像一个播放按钮)以查看数据。Note that executing an empty pipeline simply shows the contents of the collection.请注意,执行空管道只是显示集合的内容。
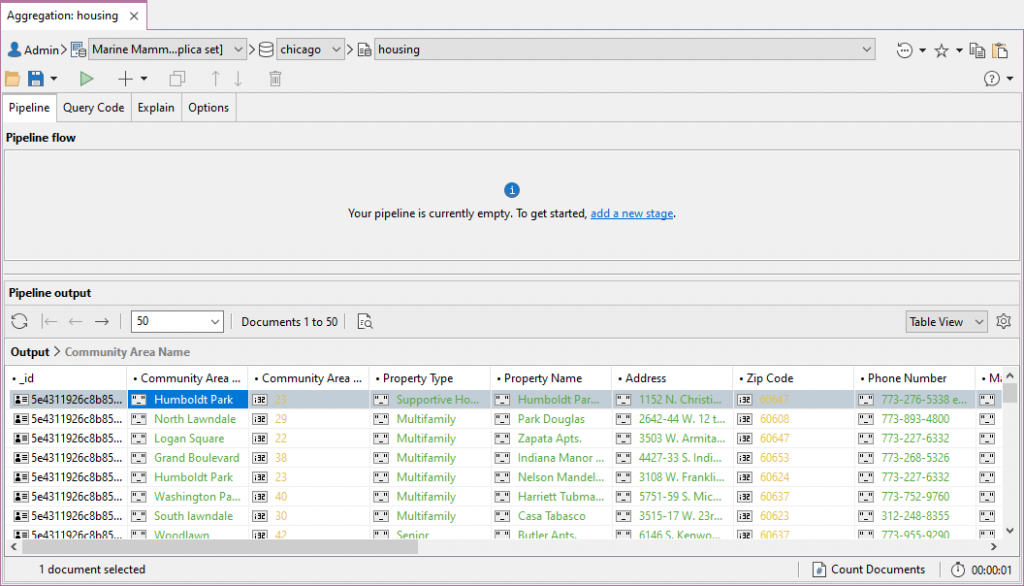
If you prefer a JSON view of the data, it’s included below. 如果您更喜欢数据的JSON视图,请参阅下面的内容。Studio 3T supports dynamically switching between Table, Tree and JSON views of your results, everywhere in the app.Studio 3T支持在应用程序中的任何地方,在结果的表格、树形和JSON视图之间动态切换。
{
    "_id" : ObjectId("5e4311926c8b851306f35d61"),
    "Community Area Name" : "Humboldt Park",
    "Community Area Number" : NumberInt(23),
    "Property Type" : "Supportive Housing",
    "Property Name" : "Humboldt Park Residences ",
    "Address" : "1152 N. Christiana Ave.",
    "Zip Code" : NumberInt(60647),
    "Phone Number" : "773-276-5338 ext. 225",
    "Management Company" : "LUCHA",
    "Units" : NumberInt(69),
    "X Coordinate" : NumberDecimal("1153731.4411072168"),
    "Y Coordinate" : NumberDecimal("1907707.148117049"),
    "Latitude" : NumberDecimal("41.9025857989"),
    "Longitude" : NumberDecimal("-87.7107605283"),
    "Location" : "(41.9025857989, -87.7107605283)",
    "Historical Wards 2003-2015" : NumberInt(10),
    "Wards" : NumberInt(49),
    "Community Areas" : NumberInt(24),
    "Zip Codes" : NumberInt(4299),
    "Census Tracts" : NumberInt(150)
}
Now we can see that we have the fields we need.现在我们可以看到,我们有我们需要的领域。
We can check 我们可以检查Property Type to see that it’s senior housing. Property Type(物业类型),看看是否是老年公寓。Zip Code and Units give us the zip code and number of available units there are, respectively.Zip Code和Units分别为我们提供了邮政编码和可用单元的数量。
To answer our question, we need to combine these into the right aggregation query.为了回答问题,我们需要将它们组合到正确的聚合查询中。
Add Stage 1: Match criteria with MongoDB $match添加阶段1:使用MongoDB$Match匹配标准
Click on Add a new stage within the Pipeline flow to add the first stage or click on the green plus icon in the toolbar.单击管道流中的“添加新阶段”以添加第一个阶段,或单击工具栏中的绿色加号图标。
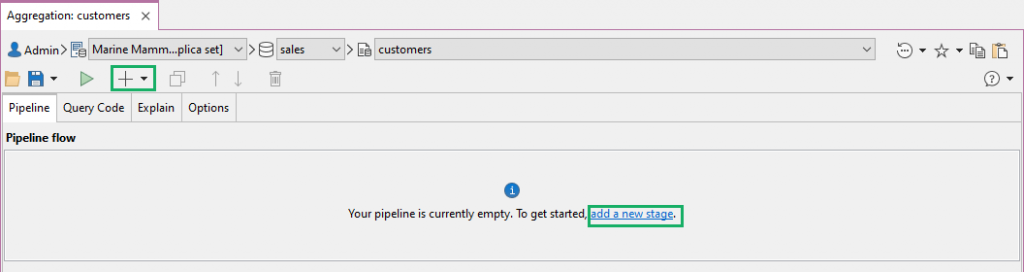
This will open a Stage 1 tab next to the Pipeline tab.这将在“管道”选项卡旁边打开“阶段1”选项卡。
Choose 从下拉菜单中选择$match from the dropdown menu. $match。It’s here where we select the stage’s “operator”, which defines what the stage actually does.在这里,我们选择舞台的“运算符”,它定义了舞台的实际功能。
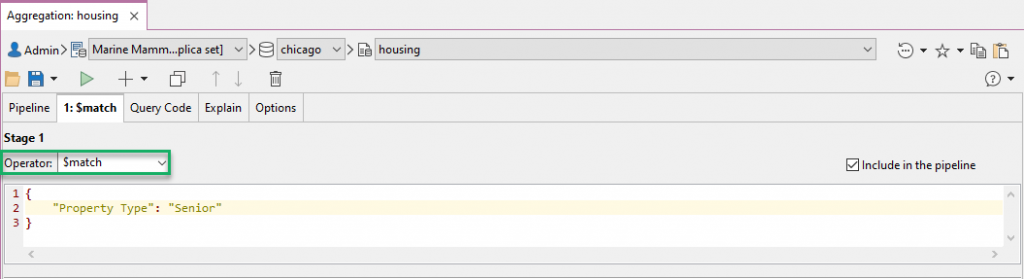
The $match operator takes the input set of documents and outputs only those that match the given criteria. $match运算符获取文档的输入集,并仅输出与给定条件匹配的文档。It is essentially a filter.它本质上是一个筛选器。
We want to filter out all senior housing units, so we’ve typed the query:我们想筛选出所有高级住房单元,因此我们键入了以下查询:
{
    "Property Type": "Senior"
}
Trigger query-autocompletion by pressing ^ + Space, or right-clicking anywhere in the Stage editor and choosing Open Auto-Completion.按^+空格键,或右键单击阶段编辑器中的任意位置并选择“打开自动完成”,触发查询自动完成。
Check stage inputs检查阶段输入
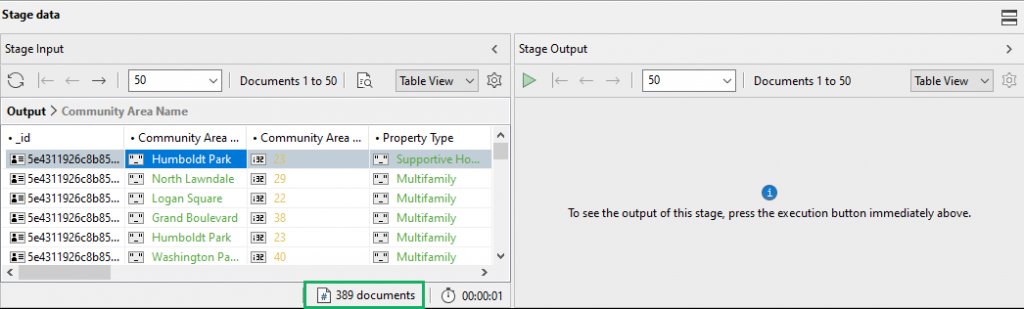
Under Stage Input, click on Execute – the play button – to view how many input documents went into the 在“阶段输入”下,单击“执行”(播放)按钮,查看进入$match stage.$match阶段的输入文档数量。
By clicking on Count Documents, we can see that there were 389 input documents, which is exactly how many documents there are in the 通过点击“计数文档”,我们可以看到有389个输入文档,这正是housing collection.housing集合中有多少文档。
Check stage outputs检查阶段输出
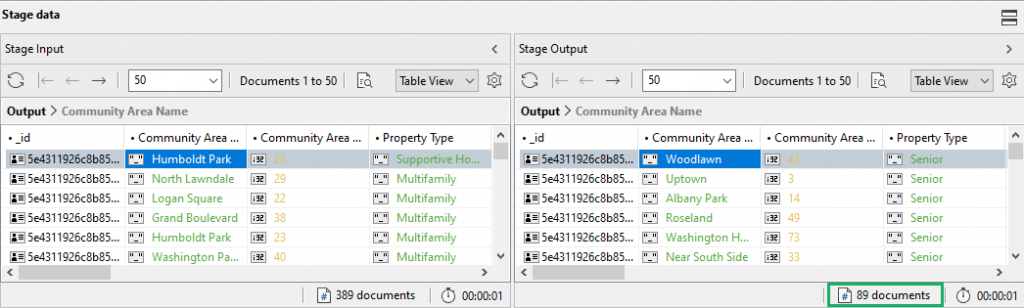
We know that 389 documents went into the stage, but how many documents matched our specification, 我们知道有389个文档进入了这个阶段,但有多少文档符合规范"Property Type": "Senior"?"Property Type": "Senior"?
By clicking on Execute under Stage Output and clicking on Count Documents, we can see that 89 documents have a value of 通过单击“阶段输出”下的“执行”并单击“计数文档”,我们可以看到89个文档的字段Senior for the field Property Type.Property Type的值为Senior。
The stage input and output checks are convenient features for keeping track of your data at each stage in the aggregation pipeline.阶段输入和输出检查是方便的功能,用于跟踪聚合管道中每个阶段的数据。
Now that we have the results we need from Stage 1 – a quick visual check of the column 现在,我们已经获得了阶段1所需的结果——快速直观地检查列Property Type should do – we’re ready to pass them on to next stage of our aggregation pipeline, the $group stage.Property Type就可以了——我们已经准备好将它们传递到聚合管道的下一个阶段$group阶段。
Add Stage 2: Group results with MongoDB $group添加第2阶段:MongoDB$Group的分组结果
We now need a way to group the senior housing units from Stage 1 by zip code, and then calculate the sum of housing units for each zip code. 我们现在需要一种方法,将第一阶段的老年住房单元按邮政编码分组,然后计算每个邮政编码的住房单元总数。The $group operator is exactly what we need for this.$group运算符正是我们所需要的。
To add a new stage:要添加一个新阶段:
Toolbar工具栏 –Click on the green plus icon点击绿色加号图标Pipeline tab“管道”选项卡 –Right-click anywhere in the Pipeline flow section and choose Add New Stage在“管道流”区域的任意位置单击鼠标右键,然后选择“添加新阶段”Shortcut快捷键 –Press按Shift + Ctrl + N (Shift + ⌘ + N)
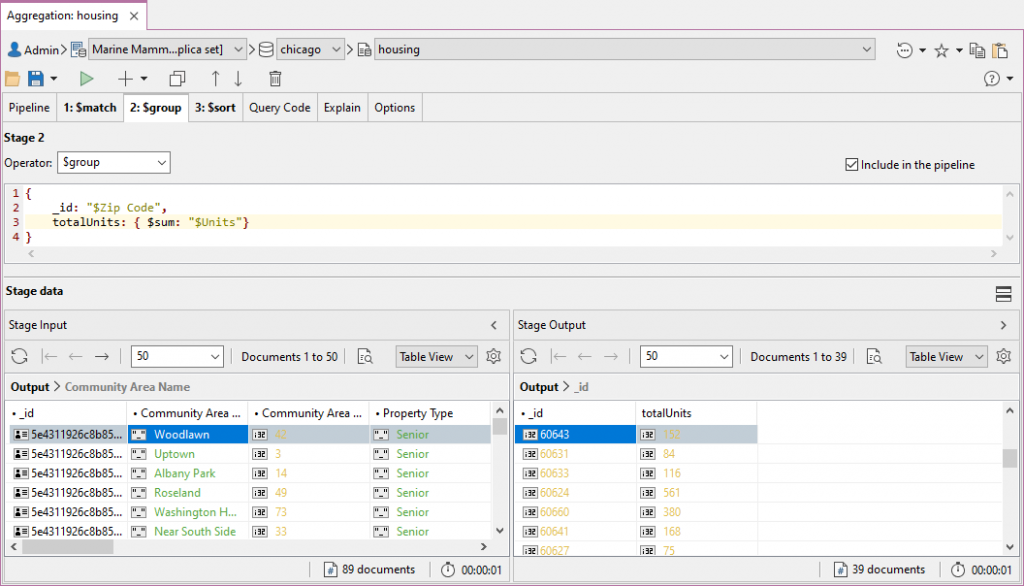
Choose the 从下拉列表中选择$group operator from the dropdown and write the query:$group运算符并编写查询:
{
    _id: "$Zip Code",
    total: { $sum: "$Units" }
}
This specification states that the output documents of this stage will contain:本规范规定,本阶段的输出文件将包含:
an一个带有不同邮政编码的_idwith a distinct zip code as a value and will group input documents together that have the same zip code_id作为值,将具有相同邮政编码的输入文档分组在一起atotalfield whose value is the sum of all theUnitsfield values from each of the documents in the grouptotal字段,其值是组中每个文档的所有Units字段值之和
We can check the stage input, which we expect to be 89 documents. Nice!我们可以检查阶段输入,我们希望它是89个文档。棒!
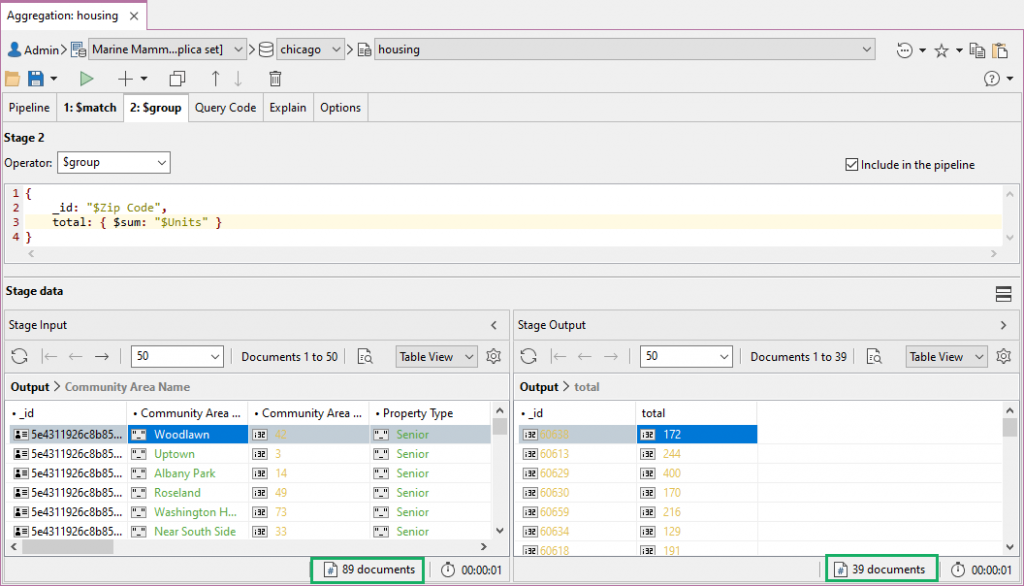
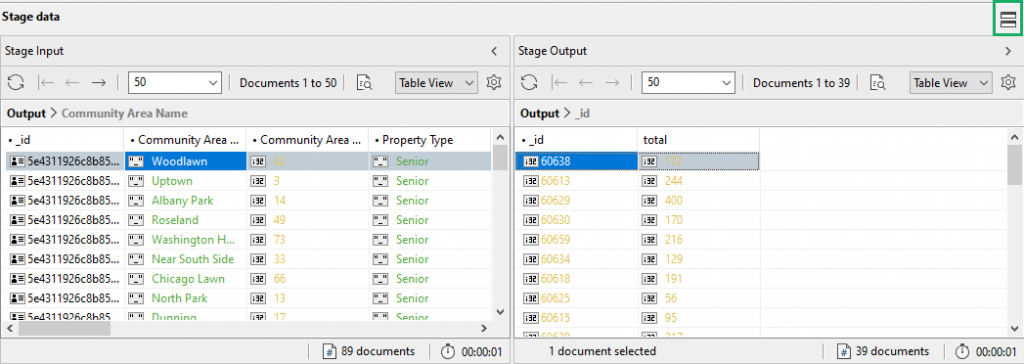
The stage output returns 39 documents – meaning there were 39 unique zip codes – and only the fields we need, stage输出返回39个文档——这意味着有39个唯一的邮政编码——并且只返回我们需要的字段,_id and total._id和total。
Add Stage 3: Sort results with MongoDB $sort添加阶段3:使用MongoDB$Sort对结果进行排序
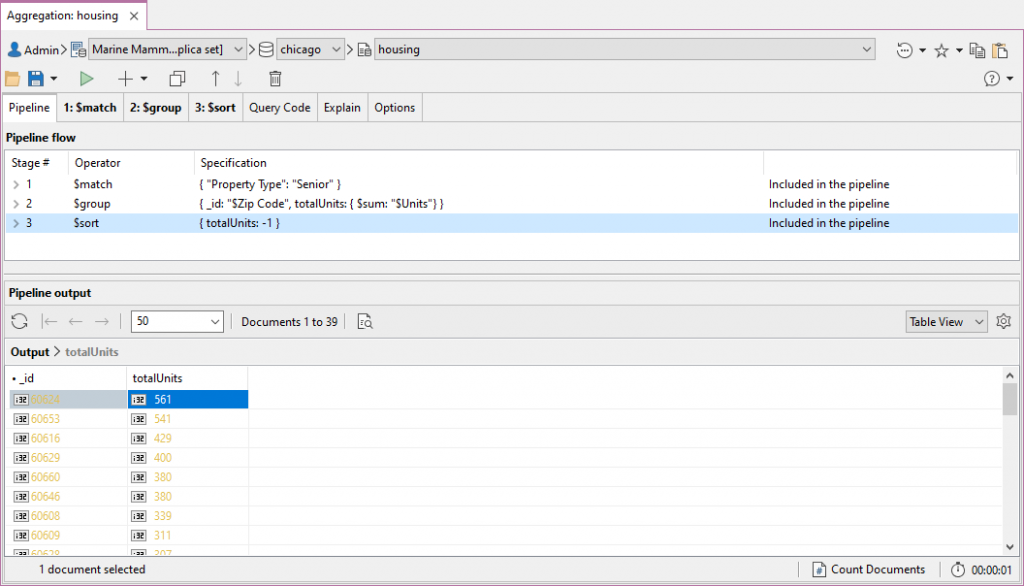
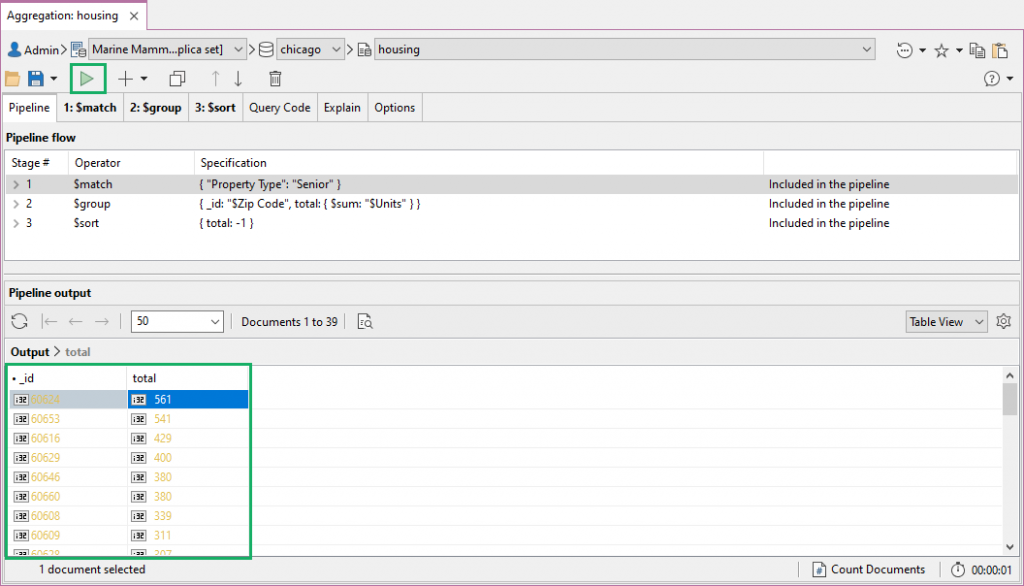
As we want to know the zip codes that have the greatest number of senior housing units available, it would be convenient to sort the results from the greatest to the least total units available.由于我们想知道可供居住的老年公寓数量最多的邮政编码,因此可以方便地将结果从可供居住的最大单元到最小单元进行排序。
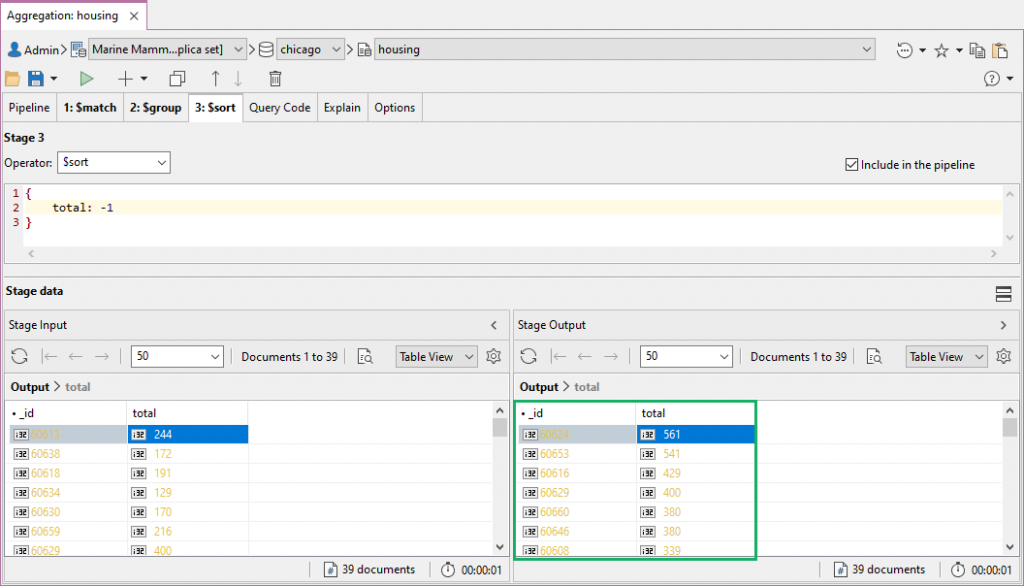
To do this, we’ll add a third stage, choose the 为此,我们将添加第三个阶段,从下拉列表中选择$sort operator from the dropdown, and write the following specification:$sort运算符,并编写以下规范:
{
    total: -1
}
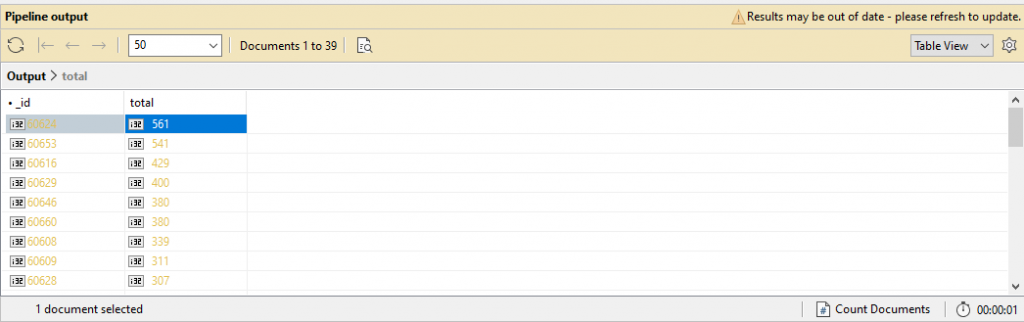
The stage input and output should, of course, be the same, but the zip codes should now be arranged in descending order.当然,阶段输入和输出应该相同,但邮政编码现在应该按降序排列。
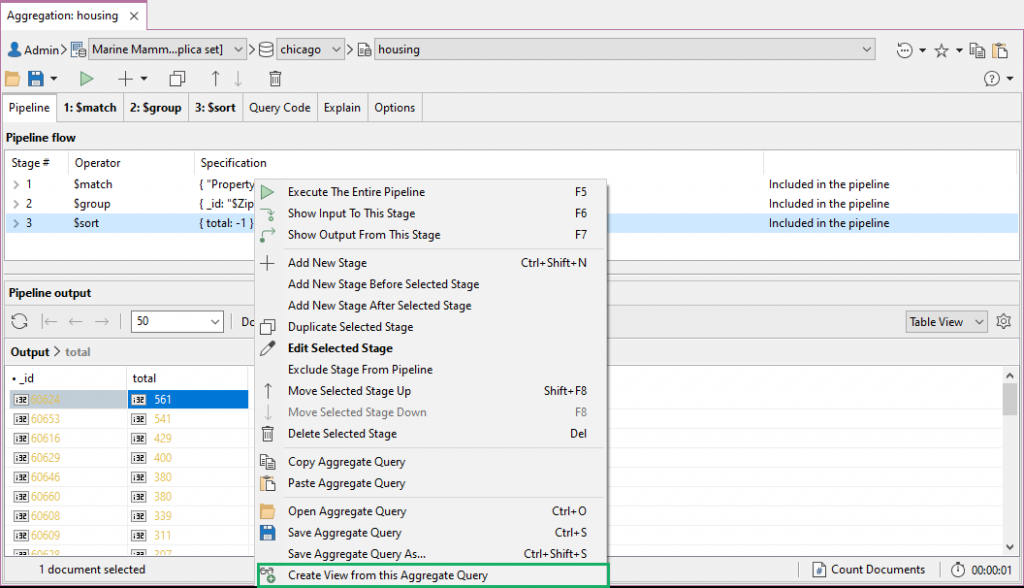
It looks like 60624 is the place to be (for Chicago-based retirees).看来60624是个好去处(芝加哥退休人员的去处)。
Execute the full aggregation pipeline执行完整的聚合管道
The Pipeline tab displays all the stages we’ve built in our aggregation pipeline – Stages 1, 2 and 3 – in one view.“管道”选项卡在一个视图中显示我们在聚合管道中构建的所有阶段——阶段1、阶段2和阶段3。
To execute the full pipeline:要执行完整的管道:
Toolbar工具栏 –Click on the play button in the toolbar单击工具栏中的“播放”按钮Pipeline or Stage tab“管道”或“阶段”选项卡 –Right-click anywhere and choose Execute full pipeline右键单击任意位置,然后选择“执行完整管道”Shortcut快捷键 –Press按F5
The Pipeline output section should populate with the same results as those found in the last stage output.管道输出部分应填充与上一阶段输出中相同的结果。
Add a stage before or after a selected stage在所选阶段之前或之后添加阶段
It is also possible to place an additional stage before or after any selected stage:也可以在任何选定阶段之前或之后放置附加阶段:
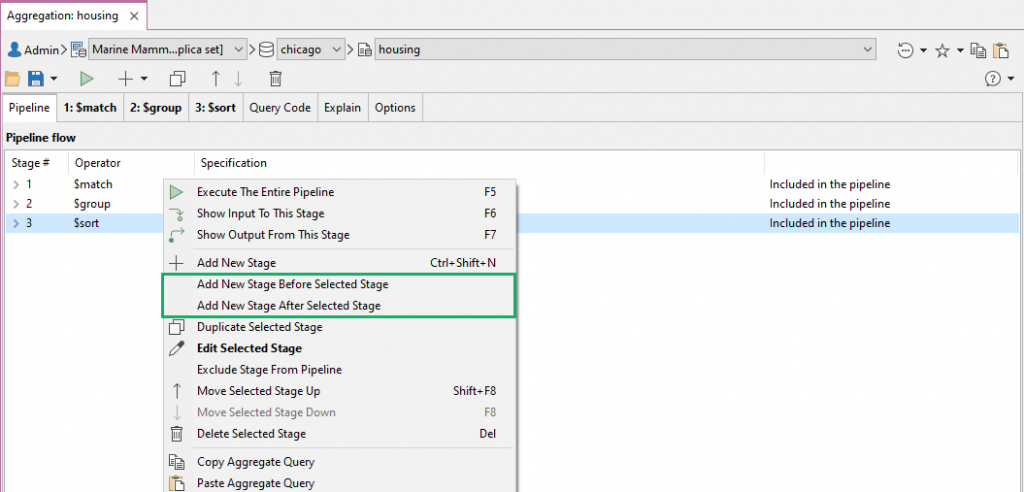
Toolbar工具栏 –Click on the down arrow next to the (+) icon and choose Add New Stage Before Selected Stage or Add New Stage After Selected Stage单击(+)图标旁边的向下箭头,选择“在所选阶段之前添加新阶段”或“在所选阶段之后添加新阶段”Pipeline tab“管道”选项卡 –Right-click anywhere in the Pipeline flow and choose Add New Stage Before Selected Stage or Add New Stage After Selected Stage在管道流中的任意位置单击鼠标右键,然后选择“在选定阶段之前添加新阶段”或“在选定阶段之后添加新阶段”
Duplicate a stage复制阶段
Choose the stage you want to clone and:选择要克隆的阶段,然后:
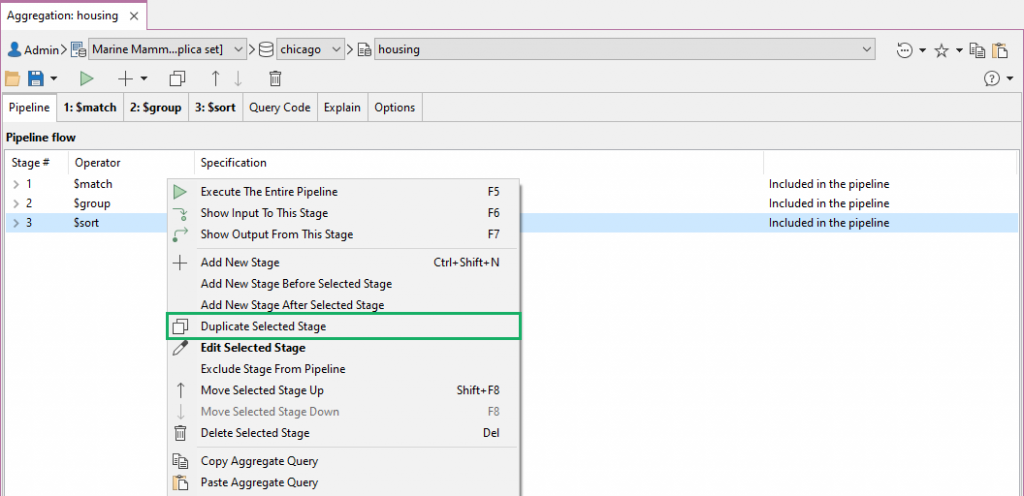
Toolbar工具栏 –Click on the Duplicate (the selected stage) button单击“复制”(所选阶段)按钮Pipeline tab“管道”选项卡 –Right-click on your target stage and choose Duplicate Selected Stage右键单击目标阶段并选择“复制选定阶段”Stage tab“阶段”选项卡 –Select the stage to duplicate, right-click anywhere within the tab and choose Duplicate Selected Stage选择要复制的阶段,在选项卡中的任意位置单击鼠标右键,然后选择“复制选定阶段”
Move a stage移动阶段
Select the stage to move in the Pipeline tab, or click on the target Stage tab, and:在“管道”选项卡中选择要移动的阶段,或单击“目标阶段”选项卡,然后:
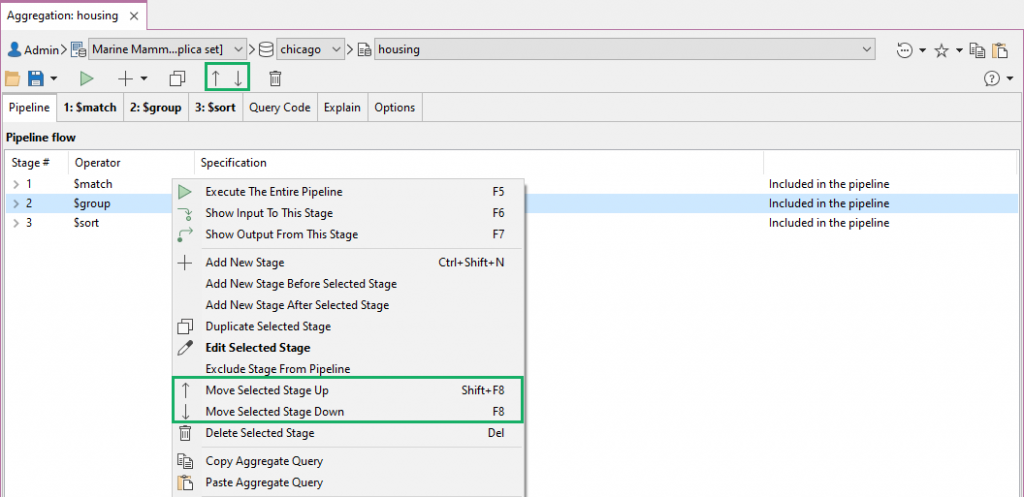
Toolbar工具栏 –Click on the up and down arrows单击上下箭头Pipeline tab“管道”选项卡 –Right-click anywhere in the Pipeline flow section and select Move Selected Stage Up or Move Selected Stage Down在“管道流”区域中的任意位置单击鼠标右键,然后选择“向上移动选定阶段”或“向下移动选定阶段”Stage tab“阶段”选项卡 –Choose the stage to move, right-click anywhere within the tab and choose Move This Stage Up or Move This Stage Down选择要移动的阶段,右键单击选项卡中的任意位置,然后选择“向上移动此阶段”或“向下移动此阶段”Shortcuts快捷键 –Press Shift + F8 to move a selected stage up or F8 to move it down按Shift+F8向上或按F8向下移动选定的阶段
Enable or disable a stage启用或禁用阶段
To temporarily enable or disable stages in your pipeline, simply check or uncheck the Include in the pipeline checkbox as needed:要临时启用或禁用管道中的阶段,只需根据需要选中或取消选中“管道中包含”复选框:

Or right-click on a stage on the Pipeline tab and choose Include Stage in Pipeline or Exclude Stage in Pipeline.或者在“管道”选项卡上的某个阶段上单击鼠标右键,然后选择“管道中包含阶段”或“管道中排除阶段”。

Tab names of excluded stages will be italicized (see Stage 3).被排除阶段的选项卡名称将以斜体显示(见阶段3)。
Delete a stage删除阶段
Select the stage to be deleted in the Pipeline tab or its corresponding Stage tab and:在“管道”选项卡或其相应的“阶段”选项卡中选择要删除的阶段,然后:
Toolbar工具栏 –Click on the Delete button点击“删除”按钮Pipeline tab“管道”选项卡 –Right-click anywhere in the Pipeline flow section and choose Delete Selected Stage在“管道流”区域的任意位置单击鼠标右键,然后选择“删除所选阶段”
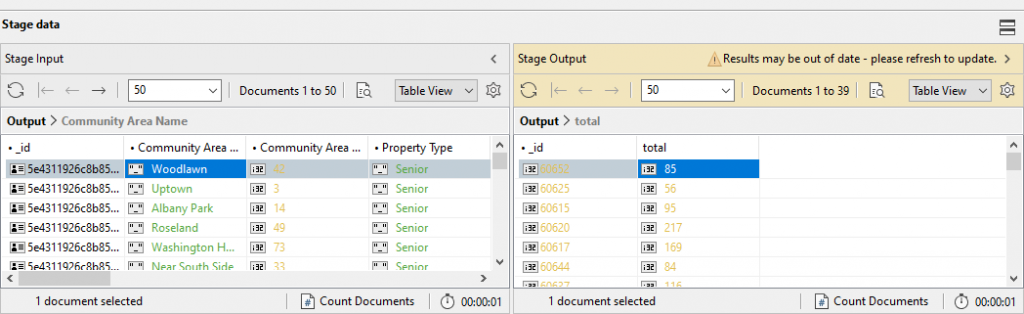
Toggle between vertical and horizontal layouts在垂直和水平布局之间切换
Click on the Window icon on the top-right corner of the Stage data section to show stage inputs and outputs horizontally or vertically.单击舞台数据部分右上角的窗口图标,水平或垂直显示舞台输入和输出。
Refresh results刷新结果
Refresh results in the Pipeline output, Stage Input, and Stage Output sections:在管道输出、阶段输入和阶段输出部分刷新结果:
Toolbar工具栏 –Click on the Refresh icon in the respective toolbars单击相应工具栏中的刷新图标Right-click anywhere in these sections and choose Refresh View在这些部分的任意位置单击鼠标右键,然后选择“刷新视图”Shortcut快捷键 –Press按Ctrl + R (⌘ + R)
Change databases, collections, and connections while building aggregation queries在生成聚合查询时更改数据库、集合和连接
In the toolbar, click on any database, collection, or connection to select a different option from the dropdown menu.在工具栏中,单击任何数据库、集合或连接,从下拉菜单中选择其他选项。

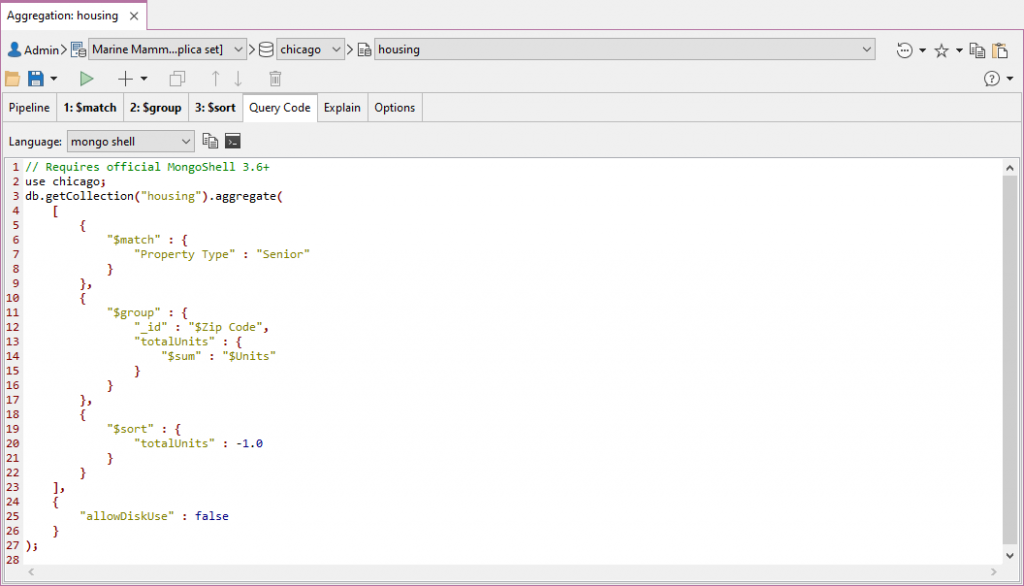
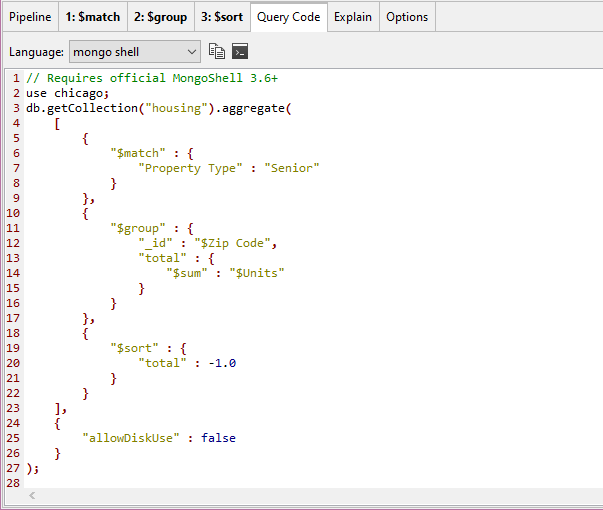
View the aggregation query in full mongo shell code在完整的mongo shell代码中查看聚合查询
To see the full MongoDB aggregation query instead of viewing them line-by-line or tab-by-tab as stages:要查看完整的MongoDB聚合查询,而不是将它们逐行或逐选项卡作为阶段查看,请执行以下操作:
Execute the full pipeline.执行完整的管道。Click on the Query Code tab.单击“查询代码”选项卡。Choose mongo shell from the dropdown.从下拉列表中选择mongo shell。
All mongo shell code generated through Query Code can be opened directly in a separate IntelliShell tab by clicking on the Open IntelliShell icon.通过查询代码生成的所有mongo shell代码都可以通过单击“打开IntelliShell”图标在单独的IntelliShell选项卡中直接打开。

Read more about IntelliShell, Studio 3T’s built-in mongo shell with auto-completion.了解更多有关IntelliShell的信息,这是Studio 3T的内置mongo shell,具有自动完成功能。
Generate JavaScript, Java, Python, C#, PHP, and Ruby code from MongoDB aggregation queries从MongoDB聚合查询生成JavaScript、Java、Python、C#、PHP和Ruby代码
To view an aggregation query’s equivalent code:要查看聚合查询的等效代码,请执行以下操作:
Execute the full pipeline.执行完整的管道。Click on the Query Code tab.单击“查询代码”选项卡。Select the target language.选择目标语言。
Here’s our MongoDB aggregation query, in Python:以下是MongoDB聚合查询(Python):
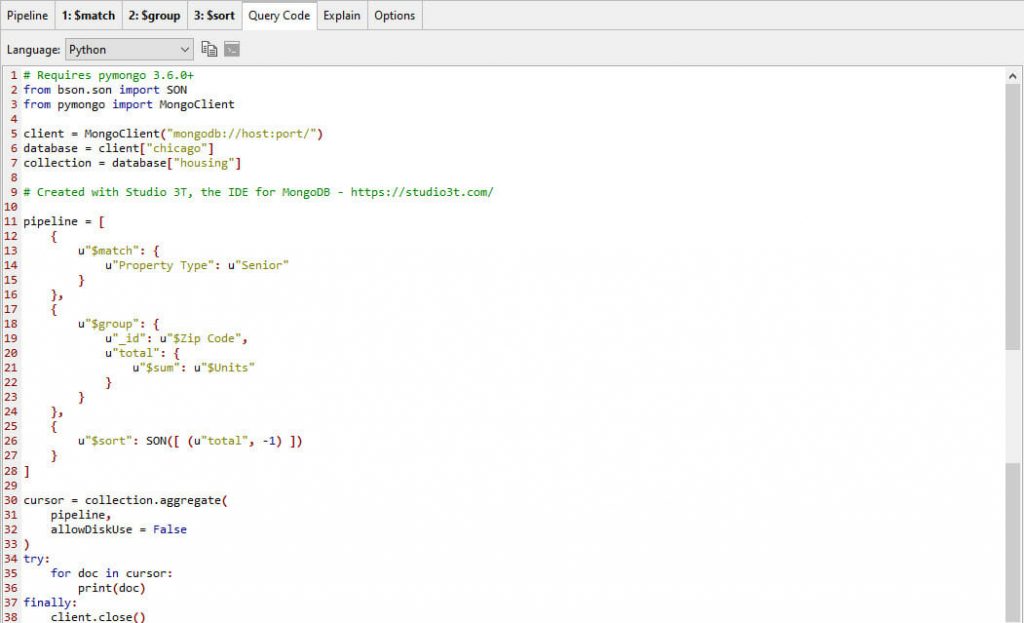
Read about Query Code in full here.在此处完整阅读“查询代码”。
Create a view from an aggregation query从聚合查询创建视图
Views are a great shortcut to accessing the data you need without having to run the same queries.视图是访问所需数据的绝佳快捷方式,无需运行相同的查询。
Right-click anywhere in the Pipeline and Stage tabs and choose Create view from this aggregation query.在“管道”和“阶段”选项卡中的任意位置单击鼠标右键,然后选择“从此聚合查询中创建视图”。
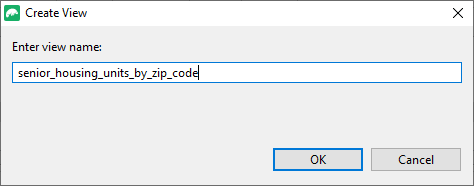
Name the view and click OK.命名视图并单击“确定”。
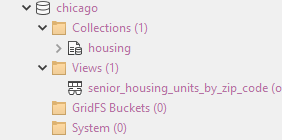
Your view should appear in the Connection Tree, under the database where your collection is located, within a separate folder called Views.视图应该出现在连接树中,在集合所在的数据库下,一个名为“视图”的单独文件夹中。
Explain the full pipeline解释完整的管道
The Explain Tab features Visual Explain, which shows information on query plans and execution statistics normally provided by the “解释”选项卡的功能是“图形化解释”,它显示通常由explain() method.explain()方法提供的查询计划和执行统计信息。
Execute the full pipeline.执行完整的管道。Click on the Explain tab.单击“解释”选项卡。
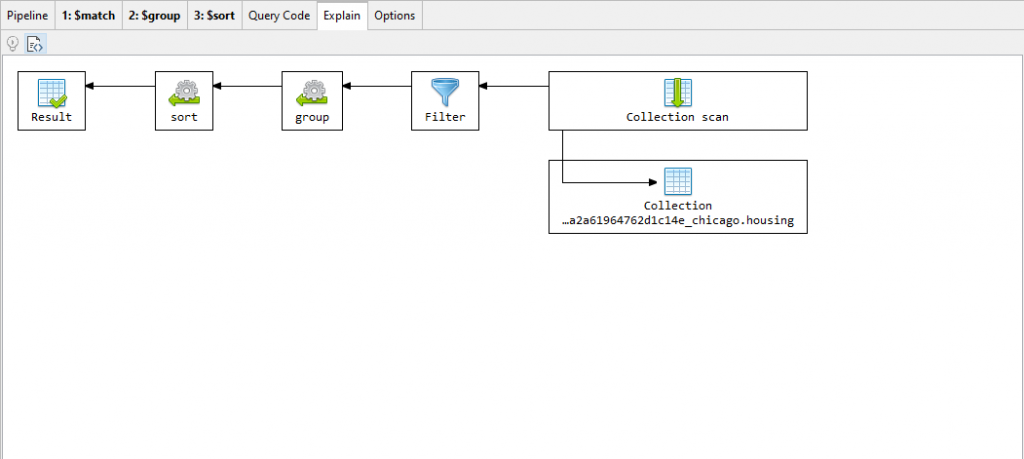
Because of limitations in MongoDB, runtime statistics are not available for aggregation queries built through Aggregation Editor.由于MongoDB中的限制,运行时统计信息不适用于通过“聚合编辑器”生成的聚合查询。
Save aggregate queries保存聚合查询
To save your aggregation query as a JavaScript file:要将聚合查询保存为JavaScript文件,请执行以下操作:
Pipeline and Stage tabs“管道”和“阶段”选项卡 –Right-click anywhere and choose Save Aggregate Query (As)在任意位置单击鼠标右键,然后选择“将聚合查询另存为”Shortcut快捷键 –Save Aggregate Query保存聚合查询 – Ctrl + S (⌘ + S),Save Aggregate Query As将聚合查询另存为 – Shift + Ctrl + S (Shift + ⌘ + S)
Open aggregate queries打开聚合查询
To open aggregation queries previously saved as JavaScript files:要打开以前保存为JavaScript文件的聚合查询,请执行以下操作:
Pipeline and Stage tabs“管道”和“阶段”选项卡 –Right-click anywhere and choose Open Aggregate Query右键单击任意位置,然后选择“打开聚合查询”Shortcut快捷键 –Press按Ctrl + O (⌘ + O)
Copy and paste aggregate queries复制和粘贴聚合查询
The copy and paste function is extremely helpful, especially when working across Studio 3T’s various features (for example, going from SQL Query to the View Editor).复制和粘贴功能非常有用,尤其是在使用Studio 3T的各种功能时(例如,从SQL查询到视图编辑器)。
To copy and paste an aggregation query:要复制和粘贴聚合查询,请执行以下操作:
Pipeline and Stage tabs“管道”和“阶段”选项卡 –Right-click anywhere and choose Copy Aggregate Query or Paste Aggregate Query在任意位置单击鼠标右键,然后选择“复制聚合查询”或“粘贴聚合查询”