Adding Colors and Textures with Materials使用材质添加颜色和纹理
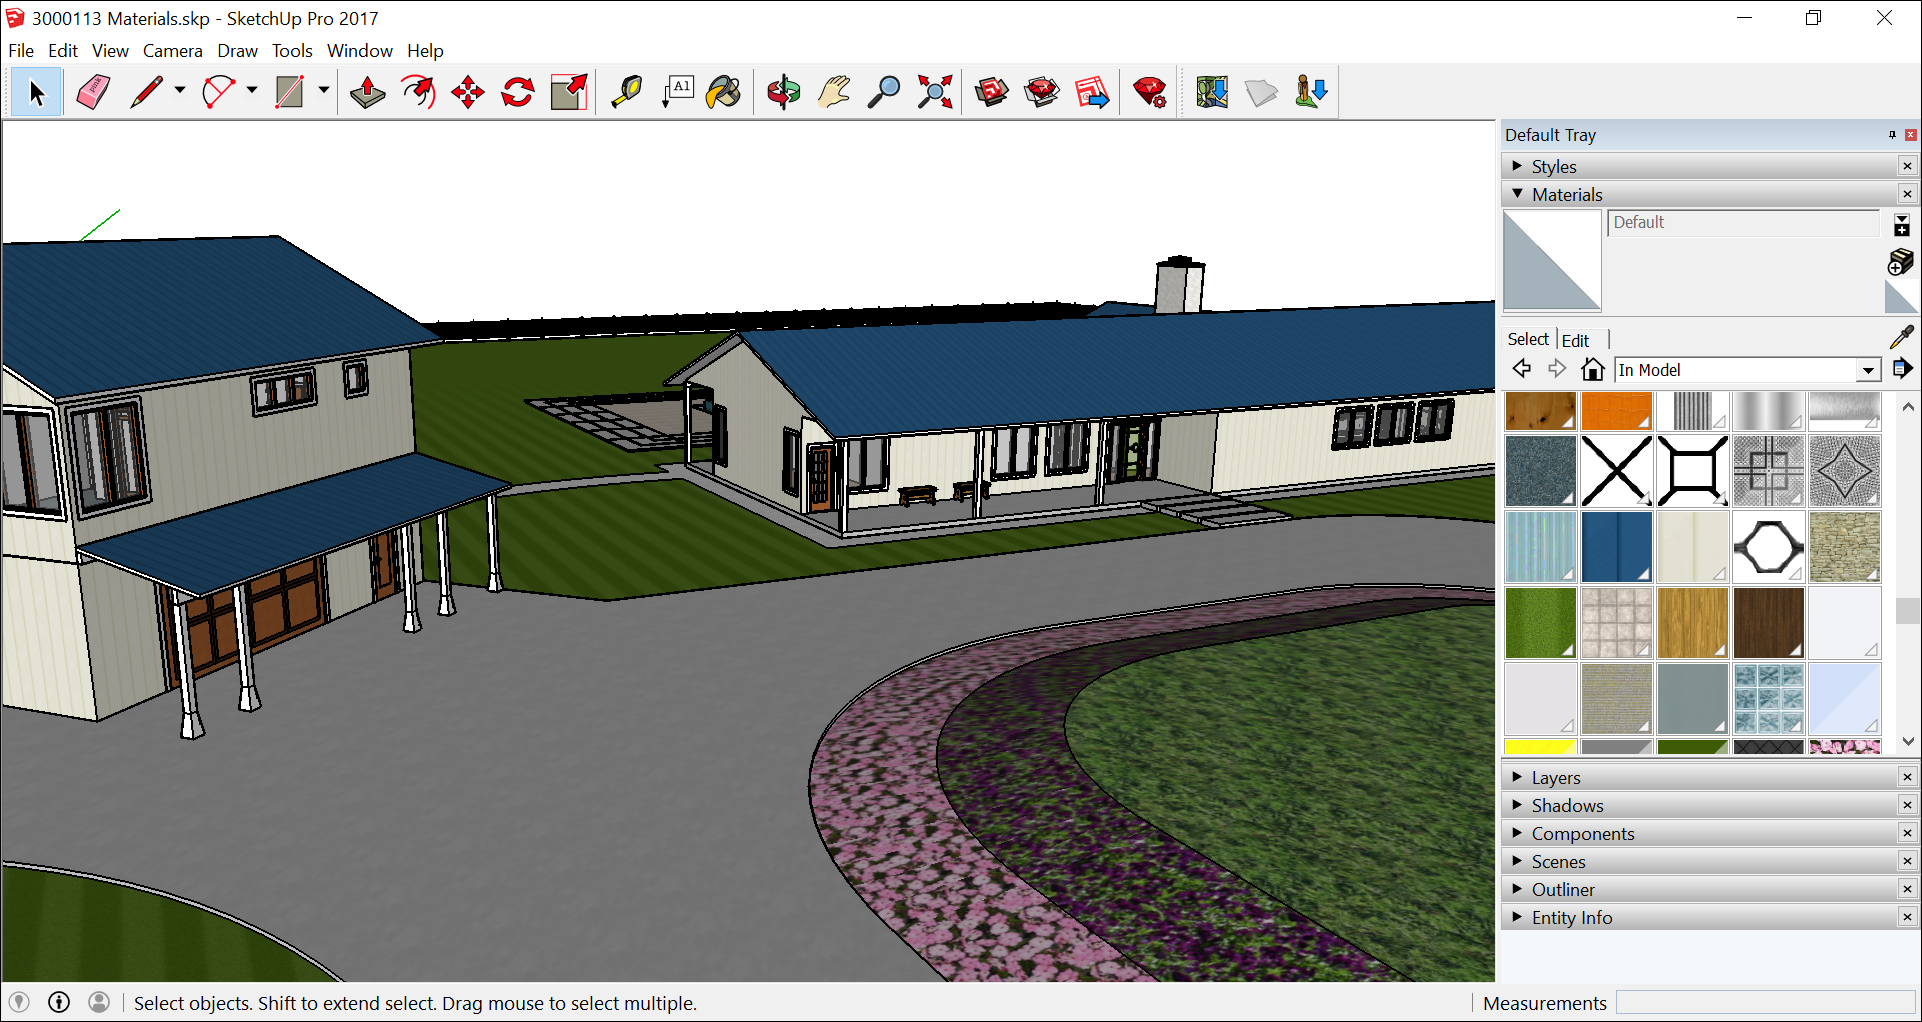
To add detail and realism to your models, SketchUp enables you to paint materials on faces. Materials are essentially paints that have a color and optional texture (defined within an image file). 为了给模型添加细节和真实感,SketchUp允许您在面上绘制材质。材质本质上是具有颜色和可选纹理(在图像文件中定义)的涂料。For example, in the following figure, the roofing material has a blue color and a texture that simulates metal roofing. The siding and grass are also materials that have a color and texture.例如,在下图中,屋顶材料具有蓝色和模拟金属屋顶的纹理。墙板和草也是有颜色和纹理的材料。
After you apply materials like these to your model, the special capabilities of SketchUp’s materials can help you do any of the following:将这些材质应用于模型后,SketchUp材质的特殊功能可以帮助您执行以下任何操作:
Replace one material with another:用一种材料替换另一种材料:Say you want to show a metal roof instead of shingles. You can swap the roofing material for shingles quickly and easily.假设你想展示一个金属屋顶而不是瓦片。你可以快速轻松地将屋顶材料换成瓦片。Edit the material:编辑材质:Because the color and texture are separate, you can change them independently of each other. For example, you can change the siding color (how does yellow look?) but keep the same texture. You can also edit a material’s opacity, which controls how opaque or transparent the material is.因为颜色和纹理是分开的,所以可以彼此独立地更改它们。例如,您可以更改壁板颜色(黄色看起来怎么样?),但保持相同的纹理。您还可以编辑材质的不透明度,这控制了材质的不透明或透明程度。Calculate how much material you need:计算你需要多少材料:SketchUp can tell you the area of all the shingles or the siding. Of course, for this calculation to mean anything, you need to create a precise model so that the numbers reflect your model’s actual size.SketchUp可以告诉你所有木瓦或墙板的面积。当然,要使此计算具有任何意义,您需要创建一个精确的模型,以便数字反映模型的实际大小。
In the SketchUp interface, you model materials with the Paint Bucket tool (在SketchUp界面中,您可以使用“油漆桶”工具(![]() ) and the Materials panel (Microsoft Windows) or the Colors panel (macOS).
) and the Materials panel (Microsoft Windows) or the Colors panel (macOS). ![]() )和“材质”面板(Microsoft Windows)或“颜色”面板(macOS)对材质进行建模。
)和“材质”面板(Microsoft Windows)或“颜色”面板(macOS)对材质进行建模。The Materials or Colors panel also enables you to view, manage, and organize the materials. The Materials or Colors panel keeps track of the materials in your model, and it's where you can create custom materials collections specific to your projects or workflows.“材质”或“颜色”面板还允许您查看、管理和组织材质。“材质”或“颜色”面板跟踪模型中的材质,您可以在其中创建特定于项目或工作流的自定义材质集合。
In the following video, you see how to apply materials and make a few common changes, such as replacing one material for another. For steps that walk you through how to use materials in detail, check out the following sections.在以下视频中,您将看到如何应用材质并进行一些常见更改,例如用一种材质替换另一种材质。有关如何详细使用材质的步骤,请查看以下部分。
Table of Contents目录
Applying materials应用材料
Applying materials to your model is pretty simple: Select a face or faces and then select your desired material. If you’re painting groups or components, check out the tips at the end of this section, which can make applying materials even easier.将材质应用于模型非常简单:选择一个或多个面,然后选择所需的材质。如果你正在绘制组或组件,请查看本节末尾的提示,这可以使应用材料变得更加容易。
You apply materials to your model with the Paint Bucket tool (您可以使用“油漆桶”工具(![]() ), which you find in the following parts of SketchUp’s interface:
), which you find in the following parts of SketchUp’s interface:![]() )将材质应用于模型,该工具位于SketchUp界面的以下部分:
)将材质应用于模型,该工具位于SketchUp界面的以下部分:
Windows
Getting Started toolbar入门工具栏Large Tool Set toolbar大工具集工具栏Principal toolbar主工具栏Tools > Paint Bucket on the menu bar菜单栏上的“工具”>“油漆桶”
To start applying materials to your model, follow these steps:要开始将材质应用于模型,请执行以下步骤:
Select the Paint Bucket tool (选择“油漆桶”工具( ).)。
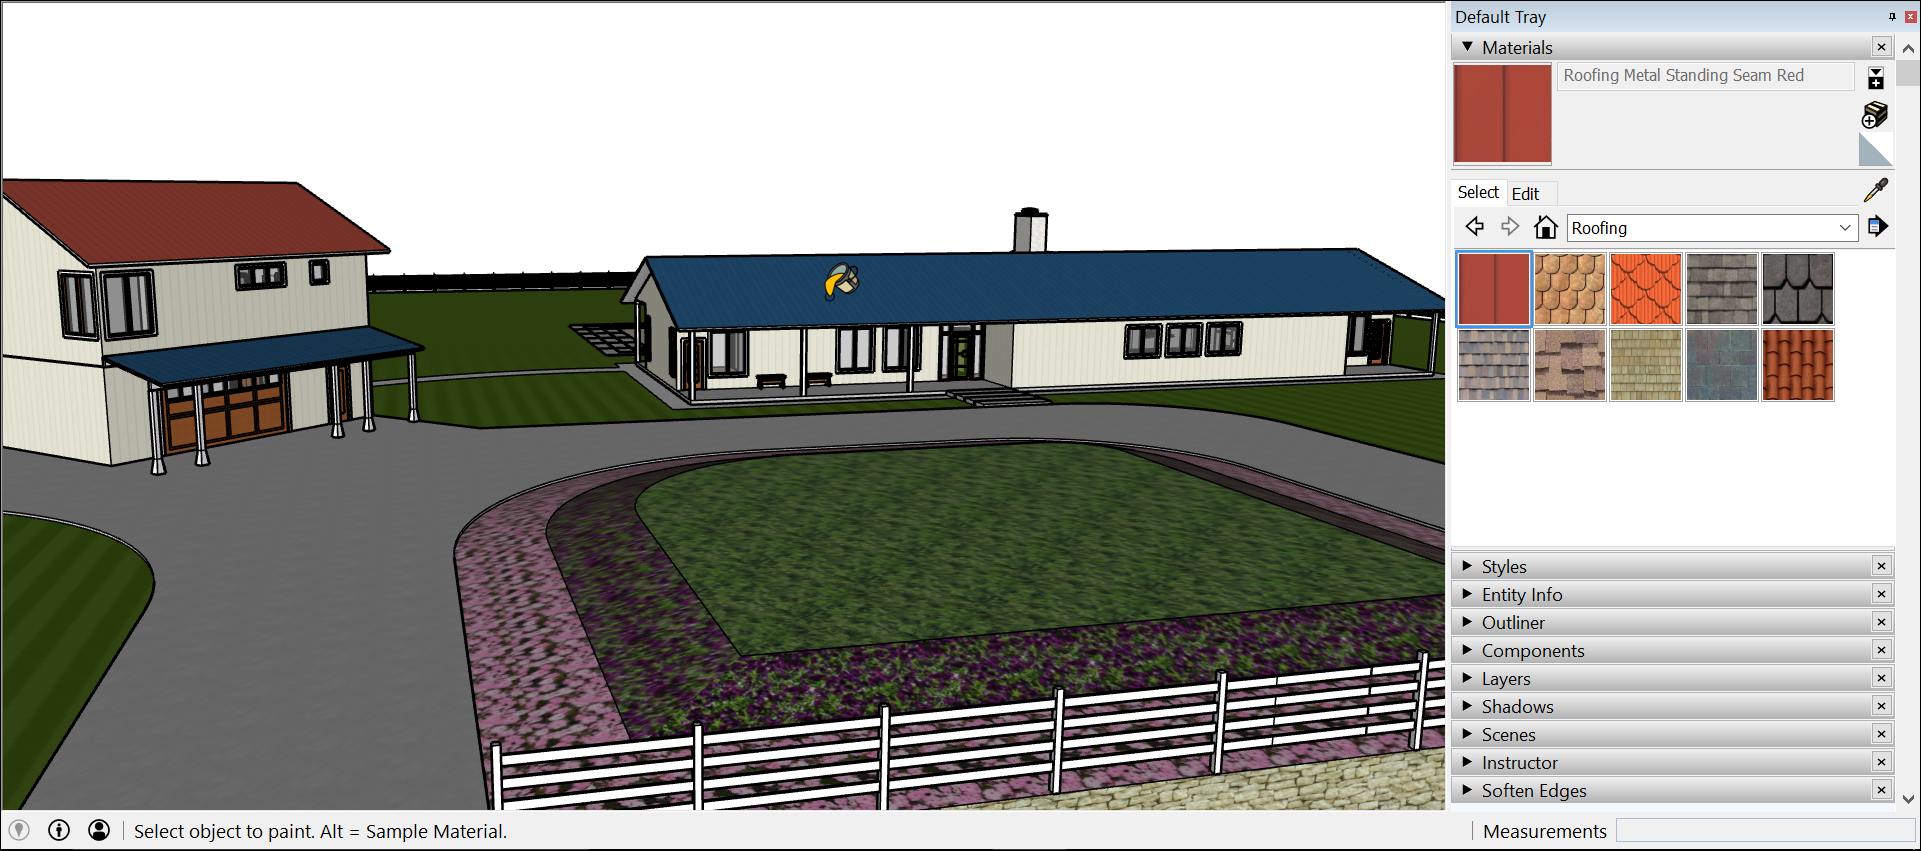
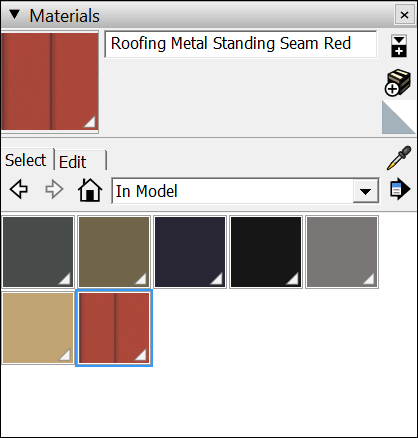
).)。In the Materials panel that opens, click the Select tab. If the Materials panel does not open in the tray, the dialog box may be in a hidden tray. In this case, hover your cursor over the hidden tray tab. This will expand the tray.在打开的“材质”面板中,单击“选择”选项卡。如果托盘中未打开“材质”板,则对话框可能位于隐藏的托盘中。在这种情况下,将游标悬停在隐藏的托盘选项卡上。这将展开托盘。You can then open the Materials panel in the tray.然后,您可以打开托盘中的“材质”面板。From the drop-down list, select a materials collection.从下拉列表中选择一个材质集合。Click the material you want to use.单击要使用的材质。Tip:To sample a material that’s already in your model, tap the Alt key to switch temporarily to a Sample tool. With the Sample tool’s eyedropper cursor, click the face whose material you want to sample.要对模型中已有的材质进行采样,请点击Alt键暂时切换到采样工具。使用“采样”工具的吸管游标,单击要采样其材质的面。Once you click a material to sample, the Paint Bucket will return to it's default state with your sampled material active.单击要采样的材质后,Paint 桶将返回默认状态,采样的材质处于活动状态。If you prefer, you can press and hold the Sample modifier key, to keep the Sample tool active until you release the key.如果愿意,可以按住“采样”修改器键,以保持“采样”工具处于活动状态,直到松开该键。Back in the drawing area, click a face or faces to apply the material.回到绘图区域,单击一个或多个面以应用材质。
MacOS
Large Tool Set toolbar大工具集工具栏Tools > Paint Bucket on the menu bar菜单栏上的工具>油漆桶Tool palette工具选项板
To start applying materials to your model, follow these steps:要开始将材质应用于模型,请执行以下步骤:
Select the Paint Bucket tool (选择“油漆桶”工具(
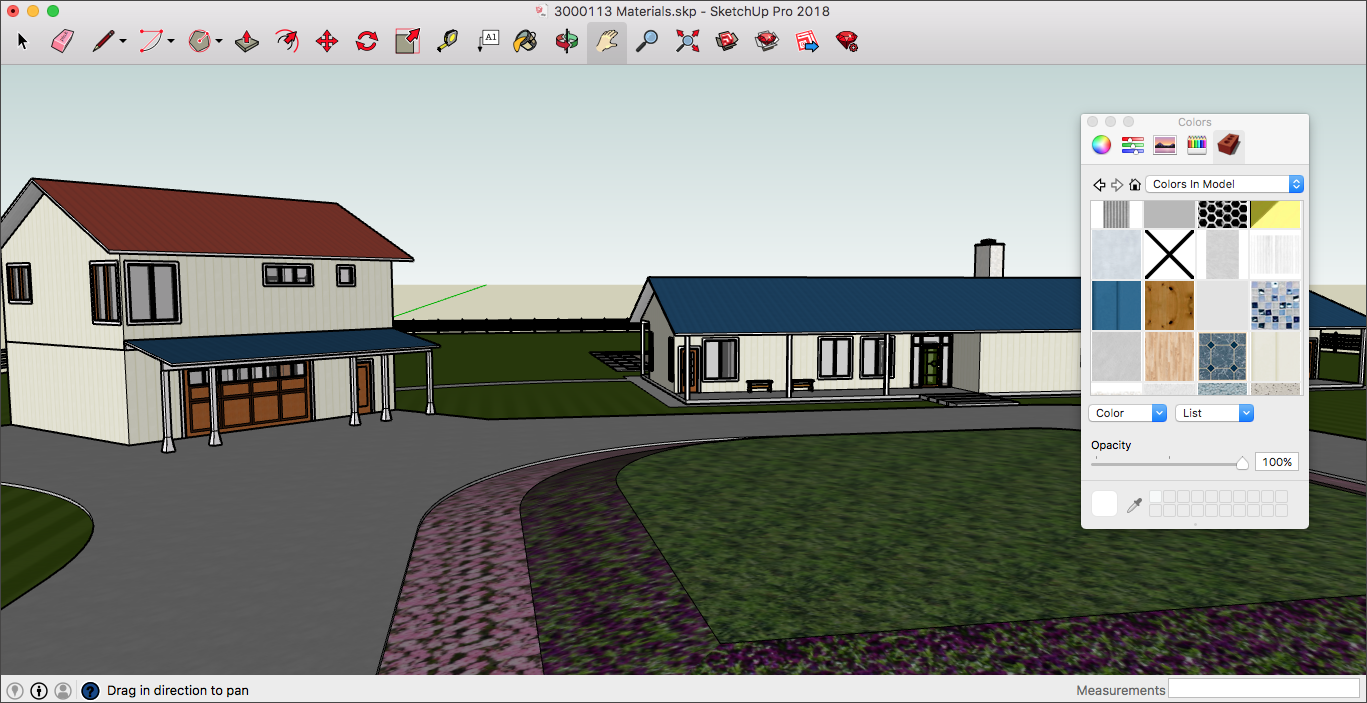
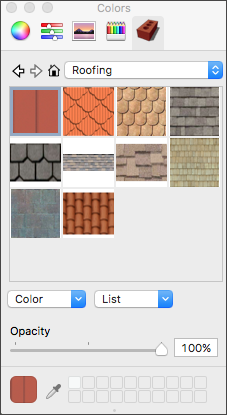
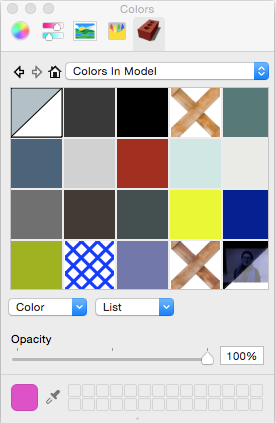
). )。In the Colors panel that appears, you can select a color in on one of the four color picker tabs or use the materials collections.在出现的“颜色”面板中,您可以在四个颜色选择器选项卡之一上选择一种颜色,或使用材质集合。To browse the materials collections, click the Texture Palettes tab, which has a brick icon. (See Mixing Colors in the Color Picker for details about using the other tabs, which are for selecting colors.)要浏览材质集合,请单击“纹理选项板”选项卡,该选项卡有一个砖形图标。(有关使用用于选择颜色的其他选项卡的详细信息,请参阅颜色选择器中的混合颜色。)From the drop-down list, select a materials collection. In the following figure, the Roofing collection is selected.从下拉列表中选择一个材质集合。在下图中,选择了Roofing集合。Click the material you want to apply to your model.单击要应用于模型的材质。Tip:To sample a material that’s already in your model, click the Eyedropper tool at the bottom of the Texture Palettes tab.要对模型中已有的材质进行采样,请单击“纹理选项板”选项卡底部的“滴管”工具。With the big circle cursor, click the face whose material you want to sample. This loads the material onto the sample swatch, and you see the Paint Bucket cursor again.使用大圆游标,单击要采样其材质的面。这将把材质加载到样例上,然后您将再次看到“绘制桶”游标。Back in the drawing area, click a face or faces to apply the material.回到绘图区域,单击一个或多个面以应用材质。
Alternatively, click and drag a material swatch from the main area of the Texture Palettes tab to a face in your model. (You cannot drag a swatch from the palette at the bottom of the macOS Colors panel. 或者,从“纹理选项板”选项卡的主区域单击材质样例并将其拖动到模型中的面上。(您无法从macOS颜色面板底部的调色板拖动样例。For details about using these saved swatches, see Mixing Colors in the Color Picker.)有关使用这些保存的色样的详细信息,请参阅颜色选择器中的混合颜色。)
If your styles are showing textures, your computer may have insufficient memory to display materials in your model.
You can paint multiple faces and edges at once.您可以一次绘制多个面和边。 To do so, use the Select tool (为此,请使用“选择”工具(![]() ) to select the edges and faces that you want to paint .
) to select the edges and faces that you want to paint . ![]() )选择要绘制的边和面。
)选择要绘制的边和面。Then switch to the Paint Bucket tool and apply a material. (Selecting Geometry offers tips for making selections.)然后切换到“油漆桶”工具并应用材料。(选择几何体提供了进行选择的提示。)
When you apply materials to several faces at once, remember the following:当您一次将材质应用于多个面时,请记住以下几点:
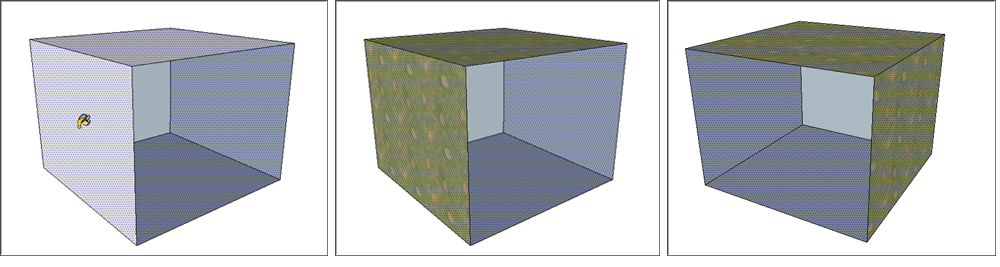
Faces have two sides:面有两侧:a front and a back. You can paint the front or the back of all the selected faces, but not a combination. The side you paint is determined by the side you click with the Paint Bucket cursor.正面和背面。您可以绘制所有选定面的正面或背面,但不能组合绘制。您绘制的边由您用“绘制桶”游标单击的边决定。In the following figure, clicking the front of a face paints all the front faces in the selection, even though you see two front faces and two back faces.在下图中,单击一个面的正面会绘制选择中的所有正面,即使您看到两个正面和两个背面。Control how the back edges look with a style.使用样式控制后边缘的外观。When you select a face and all edges and paint the front of the face, all the selected edges are painted. Paint the back faces, however, and none of the edges are painted.当您选择一个面和所有边并绘制该面的正面时,所有选定的边都会被绘制。然而,画背面,却没有画任何边缘。To blend back edges with materials, open the Styles panel, click the Edit tab, click the Edge Settings icon, and select By Material from the Color drop-down list.要将后边缘与材质混合,请打开“样式”面板,单击“编辑”选项卡,单击“边缘设置”图标,然后从“颜色”下拉列表中选择“按材质”。
You can apply materials to a group or component as whole or to specific geometry within the group or component:您可以将材质应用于整个组或组件,也可以应用于组或组件中的特定几何图形:
To paint a whole group or component,若要绘制整个组或组件,select it and apply a material. When you select a group or component and apply a material, only faces in the default material are painted.请选择它并应用材质。选择组或零部件并应用材质时,仅绘制默认材质中的面。To paint geometry within the group or component,为了绘制组或组件内的几何图形,double-click it to open its context. Then select the faces you want to paint with a material.请双击它以打开其上下文。然后选择要使用材质绘制的面。
The following video demonstrates several tips and tricks for applying materials to components. Or read on for steps that walk you through how to paint all or part of your components.以下视频演示了将材料应用于组件的几个技巧和窍门。或者继续阅读,了解如何绘制全部或部分组件的步骤。
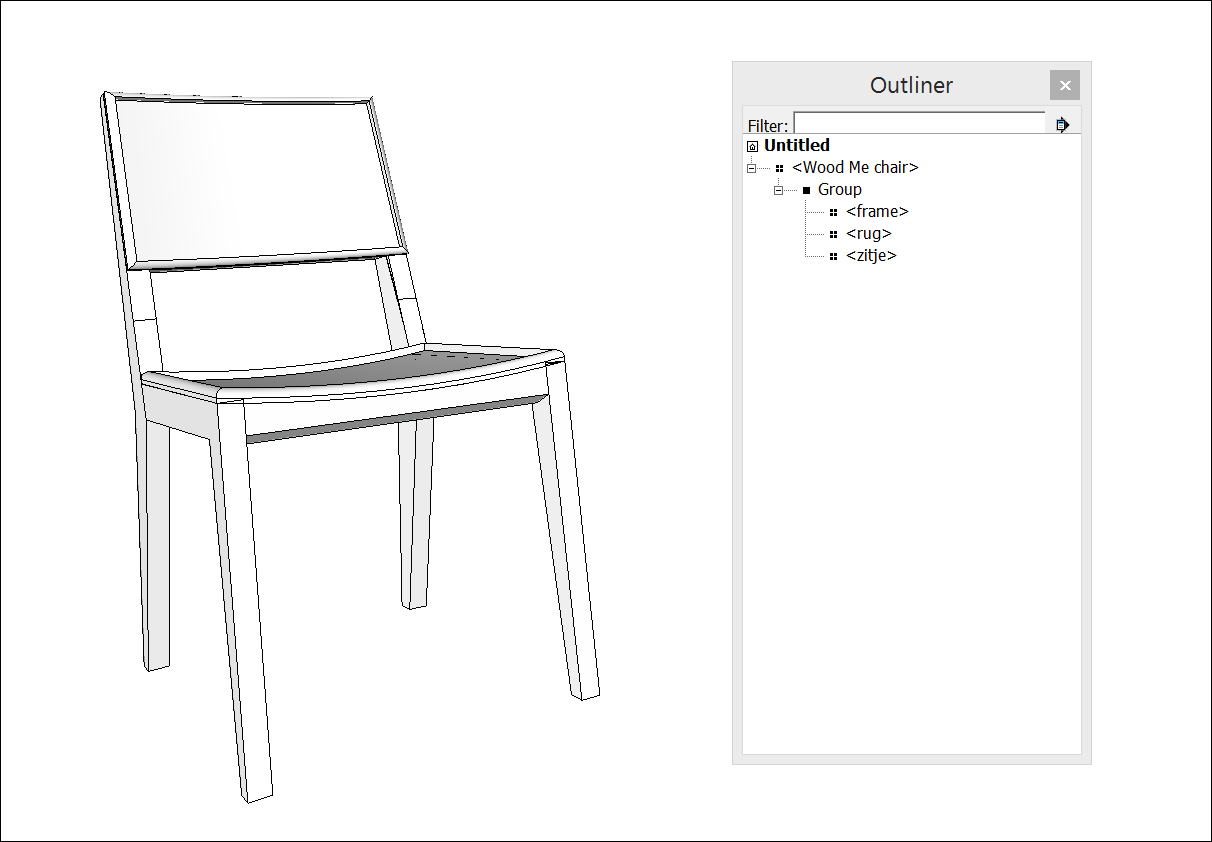
To see how this tip works, say you’re modeling a chair with a wood frame and two cushions, and you want to show four cushion colors. The Outliner, shown here, shows that each chair element (the frame and two cushions) is a group, all of which are nested within a group, which is then nested in a component. 要了解这个技巧是如何工作的,假设你正在为一把有木框架和两个垫子的椅子建模,你想展示四种垫子颜色。此处显示的大纲视图显示,每个椅子元素(框架和两个靠垫)都是一个组,所有这些元素都嵌套在一个组中,然后再嵌套在组件中。(See Organizing a Model for more about the Outliner.)(有关大纲视图的更多信息,请参阅组织模型。)
The following steps explain the easiest way to apply materials and show the four color options:以下步骤解释了应用材质的最简单方法,并显示了四种颜色选项:
Because the frame is the same on every chair, select the frame’s group and apply the wood material, as shown here.因为每把椅子的框架都是一样的,所以选择框架的组并应用木质材料,如图所示。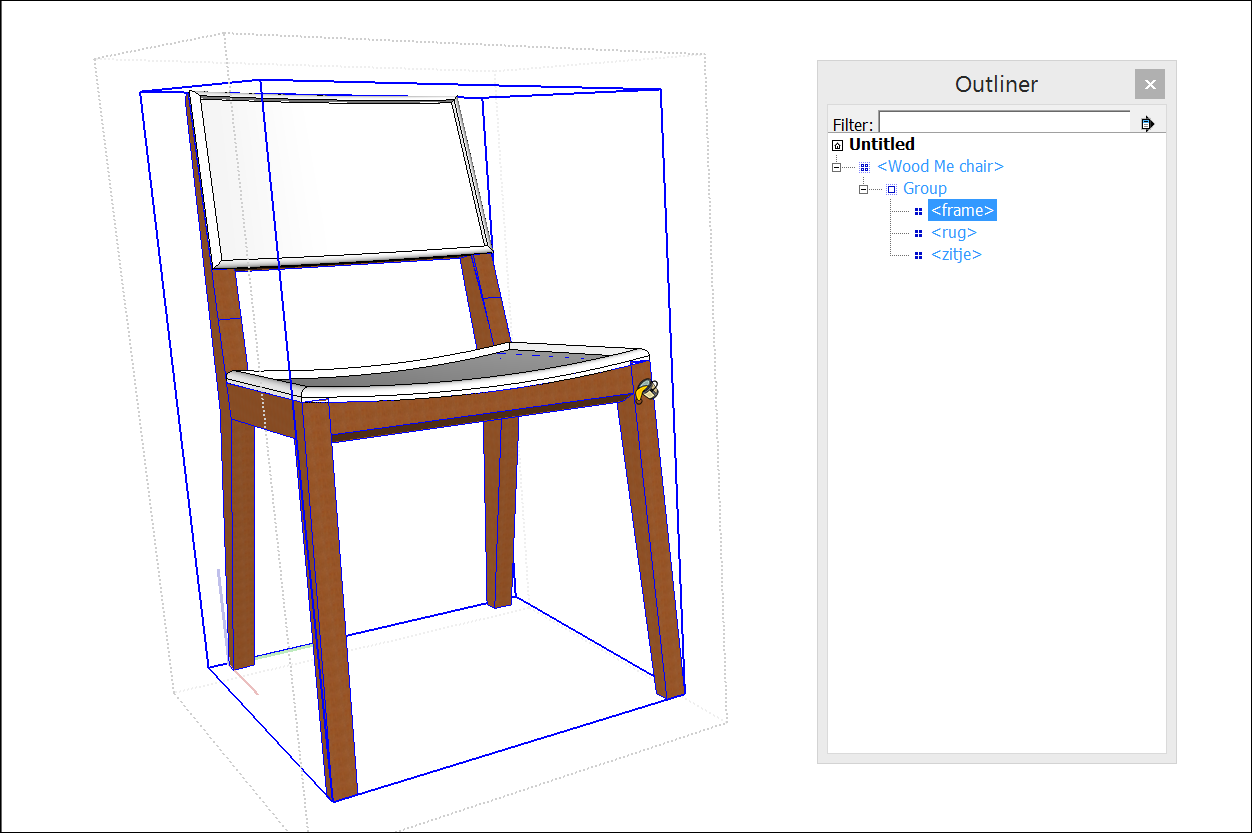
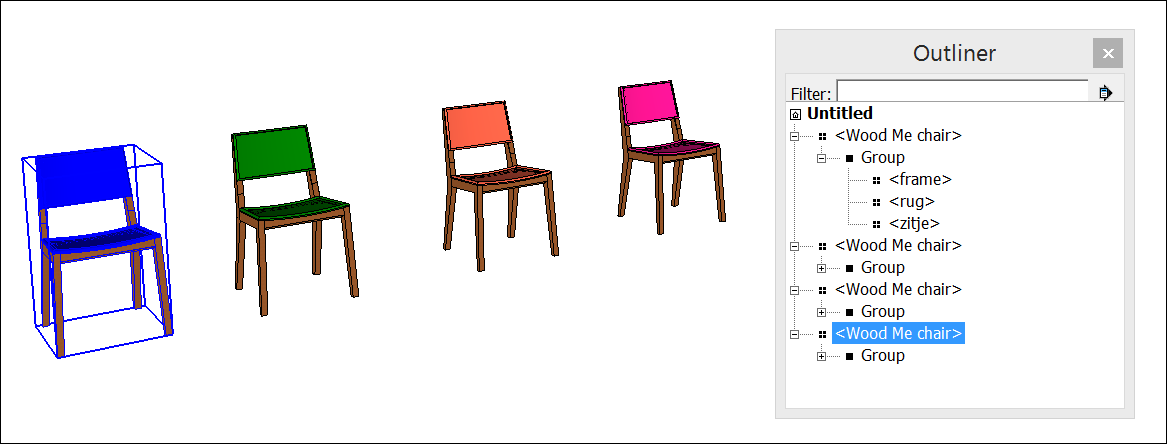
Create a copy for each cushion color. (Copying What You’ve Already Drawn explains how.)为每种靠垫颜色创建一个副本。(复制您已经绘制的内容解释了如何操作。)Select a component and apply a cushion color material. Because the frame is already painted but the cushions are still the default color, only the cushions are painted with the color material. The frame keeps the wood material.选择一个组件并应用垫层颜色材质。因为框架已经涂漆,但垫子仍然是默认颜色,所以只有垫子涂上了颜色材料。框架保留了木质材料。Repeat the preceding step for each color option. You see the result in the following figure.对每个颜色选项重复上述步骤。您可以在下图中看到结果。
Replacing one material with another用一种材料替换另一种材料
Because SketchUp enables you to replace one material with another, you can experiment with materials quickly and easily. In a kitchen, preview different countertop materials, such as black granite, blue tile, and white composite. 因为SketchUp允许您用一种材质替换另一种材质,所以您可以快速轻松地尝试材质。在厨房里,预览不同的台面材料,如黑色花岗岩、蓝色瓷砖和白色复合材料。If you’re picking out house paint colors, compare yellow siding and dark green trim with navy siding and cream trim. When you know the keyboard modifiers, the process is a cinch. Check them out in the following table.如果你正在挑选房屋的油漆颜色,可以将黄色墙板和深绿色镶边与海军蓝墙板和奶油色镶边进行比较。当你知道键盘修饰语时,这个过程就很容易了。请在下表中查看它们。
| To Replace One Material with Another … | Modifier Key (Microsoft Windows) | Modifier Key (macOS) |
|---|---|---|
| Ctrl | Option | |
| Shift | Shift | |
| Ctrl+Shift | Option+Shift |
Here’s an example help you visualize how each shortcut works. Say you’re trying to figure out the colors for an abstract mural on two separate walls. The following figure shows the mural mocked up with materials from the Colors-Named collection.这里有一个示例,可以帮助您直观地了解每个快捷方式的工作原理。假设你正试图找出两堵独立墙上的抽象壁画的颜色。下图显示了用Colors Named系列材料制作的壁画。
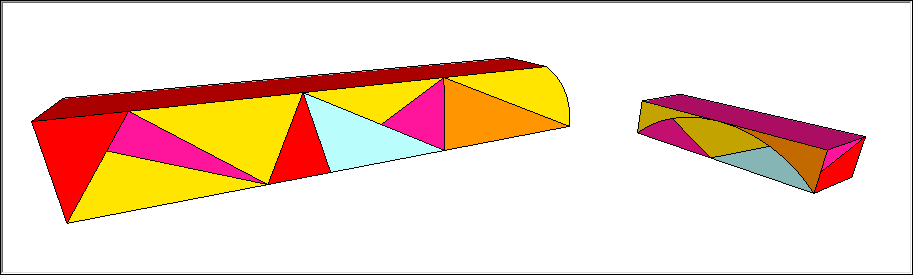
To see how replacing the red with green might look, select the Paint Bucket tool and then select a green from the Materials panel (Microsoft Windows) or Colors panel (macOS). If you Ctrl- or Option-click the red triangle in the upper left, only the adjacent faces with the red material are replaced with green, as shown in the following figure.要查看用绿色替换红色的效果,请选择Paint 桶工具,然后从“材质”面板(Microsoft Windows)或“颜色”面板(macOS)中选择绿色。如果按住Ctrl键或Option键单击左上角的红色三角形,则只有具有红色材质的相邻面会被替换为绿色,如下图所示。
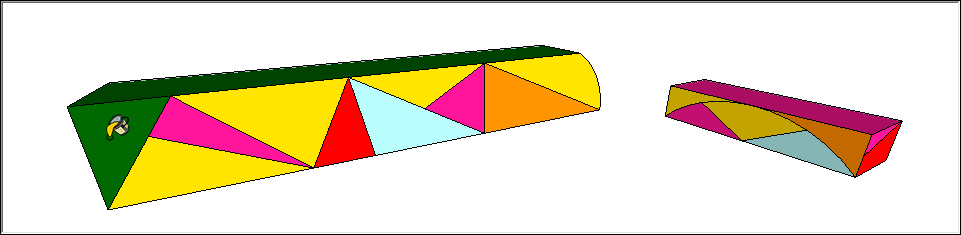
If you Shift-click instead, all the red faces become green:如果改为按住Shift键并单击,则所有红色面都将变为绿色:

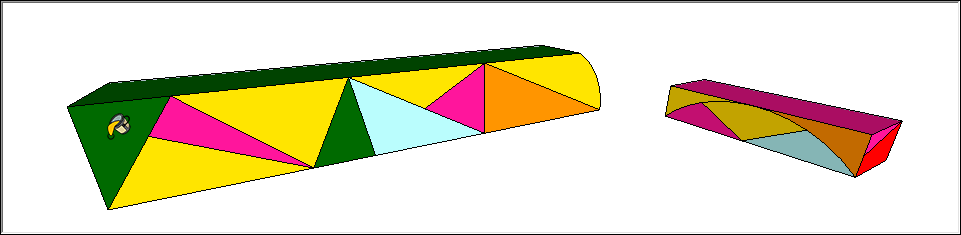
But if you Ctrl+Shift-click or Option+Shift-click, the red faces turn green only on the left wall:但是,如果按住Ctrl+Shift单击或按住Option+Shift单击,则红色面仅在左侧墙上变为绿色:
Editing materials编辑材料
SketchUp enables you to edit materials. As you make changes, any faces painted with the material that you’re editing are updated automatically. Because each material has a color and an optional texture, you can edit the color and texture independently of each other.SketchUp允许您编辑材质。当您进行更改时,使用您正在编辑的材质绘制的任何面都会自动更新。因为每种材质都有一种颜色和一种可选纹理,所以您可以彼此独立地编辑颜色和纹理。
SketchUp for WebSketchUp for Web
Material editing in SketchUp is especially useful when you have one material applied to many faces. By editing the material -- instead of just swapping it out on one face -- any faces painted with the material you’re editing are updated automatically. Because each material has a color and an optional texture, you can edit the color and texture independently of each other.当您将一种材质应用于多个面时,SketchUp中的材质编辑特别有用。通过编辑材质,而不仅仅是将其交换到一个面上,使用您正在编辑的材质绘制的任何面都会自动更新。因为每种材质都有一种颜色和一种可选纹理,所以您可以彼此独立地编辑颜色和纹理。
A material needs to be saved with your model before you can edit it. To see the materials saved with your model, open the Materials panel in the utility tray on the right side of your screen.在编辑之前,需要将材质与模型一起保存。要查看与模型一起存储的材质,请打开屏幕右侧实用程序托盘中的“材质”面板。
To edit a material, select it from your In Model materials (under the Home icon), or sample it from the modeling window using the Eyedropper tool, which will automatically select the material in the Materials panel. Once you’ve selected your material, click the Edit icon next to the material thumbnail.要编辑材质,请从“模型内”材质(在“主页”图标下)中选择它,或使用“滴管”工具从建模窗口中采样,该工具将在“材质”面板中自动选择材质。选择材质后,单击材质缩略图旁边的“编辑”图标。
While editing materials you can configure:编辑材料时,您可以配置:
Material Name:材料名称:Enter a new name for a material to change the name of the material being edited.输入材质的新名称以更改正在编辑的材质的名称。Color:颜色:You can customize the color of your material using SketchUp’s color picker manually, or by entering specific RGB, HSL, or HEX values. As you manipulate color changes, you’ll see your edits happen in real time.您可以使用SketchUp的颜色选择器手动或通过输入特定的RGB、HSL或HEX值来自定义材质的颜色。当你操纵颜色变化时,你会看到你的编辑是实时发生的。Image:图片:Add or change an image texture to associate with your material. Adding or changing image textures may override your color choice for the material. You can also remove an image texture from a material entirely by clicking “X”.添加或更改图像纹理以与材质相关联。添加或更改图像纹理可能会覆盖材质的颜色选择。您还可以通过单击“X”完全从材质中删除图像纹理。Material Size:材料尺寸:When you apply an image texture to a face, the texture image is tiled to fill the face. Type a value in the Width or Height box to change the size of the texture tile. By default, the image’s aspect ratio is maintained.当您将图像纹理应用于面部时,纹理图像会平铺以填充面部。在“宽度”或“高度”框中键入一个值以更改纹理图块的大小。默认情况下,图像的纵横比保持不变。So, if you type 2 in the width dimension box, the height box automatically updates to maintain the aspect ratio. Click the chain icon to break the chain (sorry, Fleetwood Mac), and you can distort the aspect ratio to your heart’s content.因此,如果在宽度标注框中键入2,高度框会自动更新以保持纵横比。点击链图标以断开链(抱歉,Fleetwood Mac),您可以根据自己的喜好扭曲纵横比。If you don’t love the results (and will never love them again), you can click Cancel at the bottom of the menu, or undo your changes by clicking CTRL/Command + Z.如果你不喜欢这些结果(并且永远不会再喜欢它们),你可以单击菜单底部的“取消”,或者通过单击CTRL/Command+Z撤消你的更改。Opacity:不透明度:You can also edit how transparent or opaque your material is. Sliding the opacity slider to the right increases the opacity, where 100 is totally opaque. Move the slider left to increase transparency, where 0 is fully transparent. Alternatively, type a number from 0 to 100 in the Opacity field.您还可以编辑材质的透明或不透明程度。将不透明度滑块向右滑动会增加不透明度,其中100是完全不透明的。向左移动滑块以增加透明度,其中0是完全透明的。或者,在“不透明度”字段中键入一个0到100之间的数字。
Windows
A material needs to be saved with your model before you can edit it. 在编辑之前,需要将材质与模型一起保存。To see the materials saved with your model, open the Materials panel, and click the In Model icon (要查看与模型一起保存的材质,请打开“材质”面板,然后单击“模型内”图标(![]() ) to display your In Model collection, as shown in the following figure.
) to display your In Model collection, as shown in the following figure.![]() )以显示您的模型内集合,如下图所示。
)以显示您的模型内集合,如下图所示。
If the material you want to edit doesn’t appear in your In Model collection, you can save a material with your In Model collection whether or not the material is currently applied to faces in your model. 如果要编辑的材质未出现在“模型内”集合中,则无论该材质当前是否应用于模型中的面,都可以将其保存在“模型外”集合中。To add a material to your In Model collection, follow these steps:要将材质添加到“模型内”集合中,请执行以下步骤:
Click the Display Secondary Selection Pane icon (单击“材质”面板右上角的“显示次选择窗格”图标( ) in the upper right of the Materials panel.)。
In the secondary pane at the bottom, browse the collections for the material you want to edit.在底部的辅助窗格中,浏览要编辑的材料的集合。Drag the material swatch into your In Model collection.将材质样例拖动到“模型内”集合中。
To edit the material, select it in the In Model collection and click the Edit tab, shown in the following figure.要编辑材质,请在“模型内”集合中选择它,然后单击“编辑”选项卡,如下图所示。

Here’s a brief introduction to all the tools for editing a material’s color:以下是对编辑材质颜色的所有工具的简要介绍:
Picker drop-down list:选择器下拉列表:Use the Picker drop-down list to select between the HLS, (Hue, Light, Saturation), HSB (Hue, Saturation, and Brightness), RGB, (Red, Green, Blue), and Color Wheel color pickers.使用选择器下拉列表在HLS、(色调、光、饱和度)、HSB(色调、饱和度和亮度)、RGB、(红、绿、蓝)和色轮颜色选择器之间进行选择。See Mixing Colors in the Color Picker for details about the color picker.有关颜色选择器的详细信息,请参阅颜色选择器中的混合颜色。Undo Color Changes swatch:撤消颜色更改样例:Click this swatch to undo all the color changes you make during an edit session.单击此样例可撤消在编辑会话期间所做的所有颜色更改。Match Color of Object In Model button:“匹配模型中对象的颜色”按钮:Click this button to turn the cursor into an eyedropper. With the eyedropper cursor, click an entity to sample its color and apply that color to the material that you’re editing.单击此按钮可将游标变成吸管。使用吸管游标,单击一个实体以采样其颜色,并将该颜色应用于您正在编辑的材质。Tip:If you sample a textured material, the texture variations can disguise the material’s color a bit. To sample a specific color from a texture, use the Match Color on Screen button for better results.如果对纹理材质进行采样,纹理变化可能会稍微掩盖材质的颜色。要从纹理中采样特定颜色,请使用“在屏幕上匹配颜色”按钮以获得更好的结果。Match Color on Screen button:“匹配屏幕颜色”按钮:Click this button and then click anywhere on the screen with the eyedropper cursor to sample a pixel color. SketchUp then applies that color to the currently selected material.单击此按钮,然后用吸管游标单击屏幕上的任何位置以采样像素颜色。然后,SketchUp将该颜色应用于当前选定的材质。
The following tools enable you to tinker with a material’s texture:以下工具使您能够修改材质的纹理:
Use Texture Image checkbox:使用纹理图像复选框:When this checkbox is selected, you can include an image file that represents a texture. Clearing the checkbox removes the texture image file. (Note that selecting the checkbox again doesn’t restore the image file. Instead, you’re prompted to select a new image file.)选中此复选框后,可以包含表示纹理的图像文件。清除复选框会删除纹理图像文件。(请注意,再次选中复选框不会还原图像文件。相反,系统会提示您选择一个新的图像文件。)Texture image file and Browse button:纹理图像文件和浏览按钮:The texture file field contains the name of an image file (representing a texture), if any, associated with the current material.纹理文件字段包含与当前材质关联的图像文件(表示纹理)的名称(如果有的话)。To change the texture, drag an image file to this field or click the Browse button to display the Choose Image dialog box, where you can browse for an image file on your hard drive.要更改纹理,请将图像文件拖动到此字段,或单击“浏览”按钮显示“选择图像”对话框,您可以在其中浏览硬盘上的图像文件。After you apply a texture, you can also adjust how the texture tiles on your model. See the upcoming section, Repositioning textures for details.应用纹理后,还可以调整纹理在模型上的平铺方式。有关详细信息,请参阅下一节,“重新定位纹理”。Edit Texture Image in External Editor button:在外部编辑器中编辑纹理图像按钮:When you click this button, SketchUp opens the texture image file in your default image editor.单击此按钮时,SketchUp将在默认图像编辑器中打开纹理图像文件。Note:Your image editor is defined in the SketchUp Preferences dialog box, on the Applications panel.您的图像编辑器是在“SketchUp首选项”对话框的“应用程序”面板上定义的。See Customizing Your Workspace for details about setting this preference.有关设置此首选项的详细信息,请参阅自定义工作区。If you haven’t specified an image editor, SketchUp launches your operating system’s default editor or image display application.如果您没有指定图像编辑器,SketchUp将启动操作系统的默认编辑器或图像显示应用程序。Colorize checkbox:着色复选框:Select this checkbox to apply the same hue to the whole texture. The color is defined in the Edit tab’s Color area. This option is useful for files that are not displaying proper colors.选中此复选框可将相同的色调应用于整个纹理。颜色在“编辑”选项卡的“颜色”区域中定义。此选项对于未显示正确颜色的文件很有用。Reset Color swatch:重置色样:Click this color swatch to reset the material to the color in the texture image file.单击此色样可将材质重置为纹理图像文件中的颜色。Dimension fields:维度字段:When you paint a texture on a face, the texture image is tiled to fill the face. Type a value in the width or height box to change the size of the texture tile.在面上绘制纹理时,纹理图像会平铺以填充该面。在宽度或高度框中键入值以更改纹理平铺的大小。By default, the image’s aspect ratio is maintained. So, if you type 2 in the width dimension box, the height box automatically updates to maintain the aspect ratio.默认情况下,图像的纵横比保持不变。因此,如果在宽度标注框中键入2,高度框会自动更新以保持纵横比。Click the chain icon to break the chain (sorry, Fleetwood Mac), and you can distort the aspect ratio.点击链图标以断开链(抱歉,Fleetwood Mac),您可以扭曲纵横比。If you don’t love the results (and will never love them again), click the horizontal and vertical arrow buttons to revert to the previous width and height settings.如果您不喜欢这些结果(并且永远不会再喜欢它们),请单击水平和垂直箭头按钮以恢复到之前的宽度和高度设置。Opacity slider:不透明度滑块:Opacity refers to how transparent or opaque your image is.不透明度是指图像的透明或不透明程度。Sliding the opacity slider to the right increases the opacity of the texture, where 100 is totally opaque. Move the slider left to increase the transparency of the texture, where 0 is fully transparent.将不透明度滑块向右滑动会增加纹理的不透明度,其中100是完全不透明的。向左移动滑块以增加纹理的透明度,其中0是完全透明的。Alternatively, type a number from 0 to 100 in the Opacity field.或者,在“不透明度”字段中键入一个0到100之间的数字。
MacOS
A material needs to be saved with your model before you can edit it. To see the materials saved with your model, select Window > Materials to open the Colors panel. 在编辑之前,需要将材质与模型一起保存。要查看与模型一起存储的材质,请选择“窗口”>“材质”打开“颜色”面板。On the Texture Palettes tab (the brick icon), click the Colors In Model icon (在“纹理选项板”选项卡(砖图标)上,单击“模型中的颜色”图标(![]() ) or select Colors In Model from the drop-down list to display your Colors In Model collection, as shown in the following figure.
) or select Colors In Model from the drop-down list to display your Colors In Model collection, as shown in the following figure.![]() )或从下拉列表中选择“模型中颜色”,以显示“模型中色彩”集合,如下图所示。
)或从下拉列表中选择“模型中颜色”,以显示“模型中色彩”集合,如下图所示。
If the material you want to edit doesn’t appear in your Colors In Model collection, apply the material to a face in your model. (Note that if you later replace one material with another, the original material still remains in your Colors In Model collection until you purge unused materials.)如果要编辑的材质未出现在“模型中的颜色”集合中,请将该材质应用于模型中的面。(请注意,如果稍后用另一种材质替换一种材质,则原始材质仍将保留在“模型中的颜色”集合中,直到清除未使用的材质为止。)
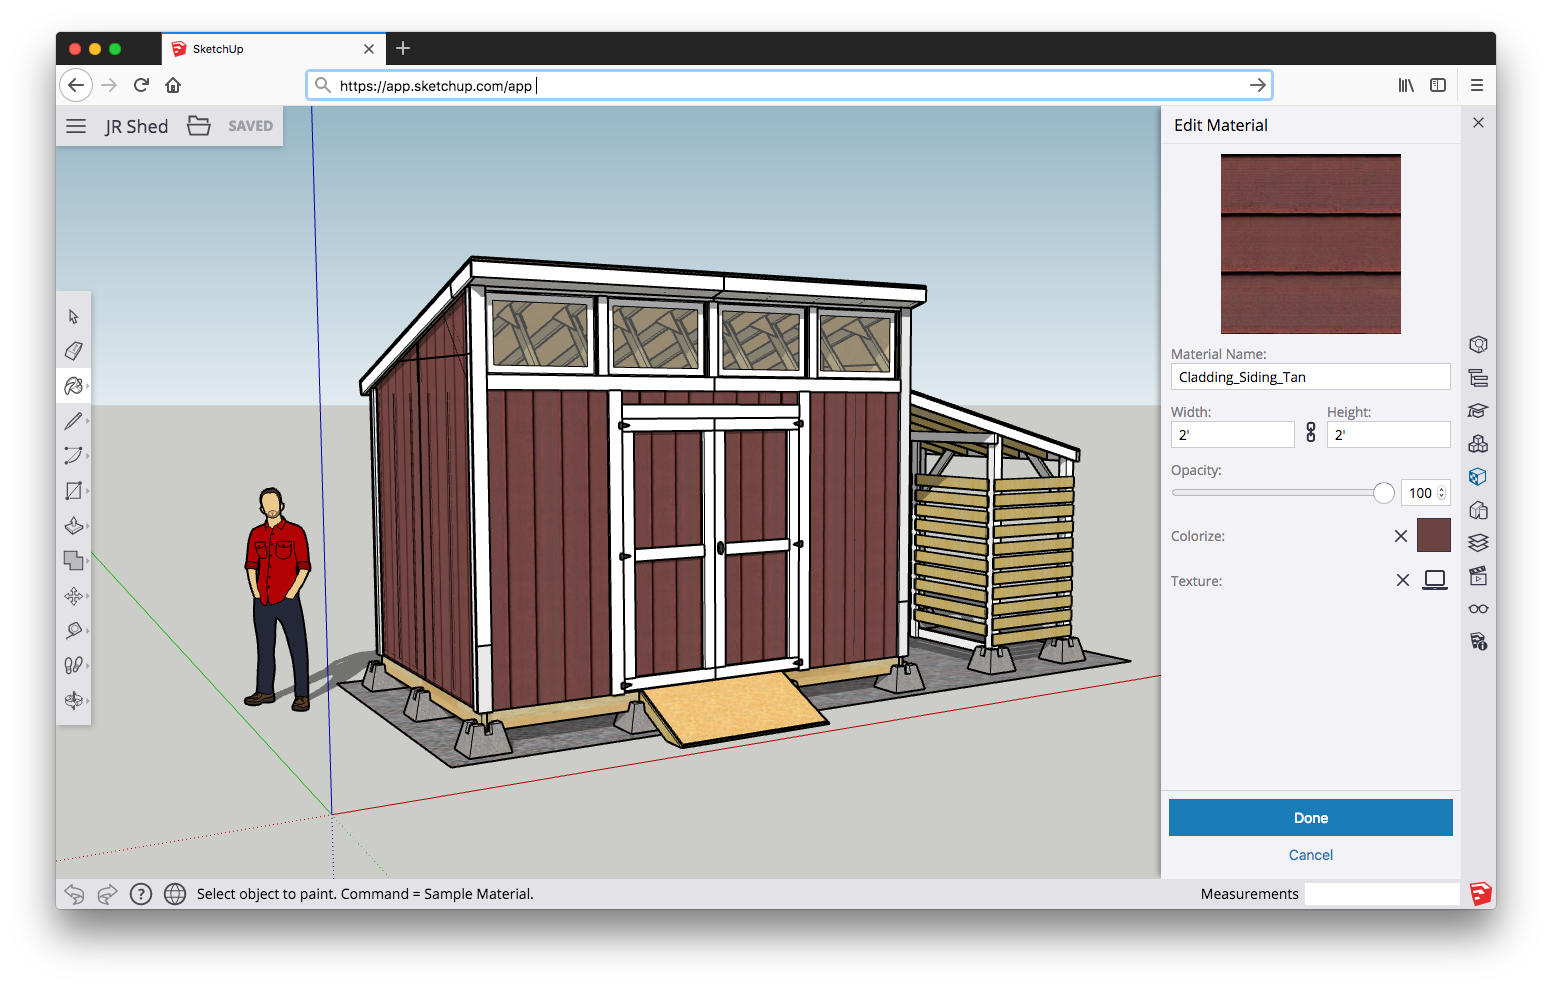
When you’re ready to edit a material, follow these steps:当您准备编辑材料时,请按照以下步骤操作:
On the Textures Palette tab (the brick icon), open your Colors In Model collection.在“纹理调色板”选项卡(砖图标)上,打开“模型中的颜色”集合。Select the material you want to edit.选择要编辑的材质。From the Color drop-down list, select Edit. Or Control-click the material and select Edit from the menu that appears.从“颜色”下拉列表中,选择“编辑”。或者单击材质并从显示的菜单中选择“编辑”。On the Edit Material panel that appears, as shown in the figure, choose your desired edits.在出现的“编辑材质”面板上,如图所示,选择所需的编辑。Click the Close button when you’re done.完成后单击“关闭”按钮。
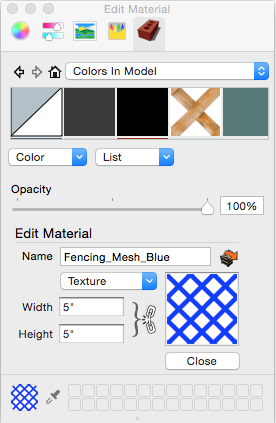
Here’s an introduction to the options on the Edit Material panel:以下是对“编辑材质”面板上选项的介绍:
Name:名称:Enter a new name for a material to change the name of the material being edited.输入材质的新名称以更改正在编辑的材质的名称。Edit Texture Image in an External Editor:在外部编辑器中编辑纹理图像:Click this button and the texture’s image file opens in your default image editor or preview program. Make and save your edits to the file and the changes are reflected in the material.单击此按钮,纹理的图像文件将在默认图像编辑器或预览程序中打开。对文件进行编辑并保存,更改将反映在材质中。Texture drop-down menu:纹理下拉菜单:The options on this drop-down menu enable you to edit the texture within SketchUp. Choose Load select a new image file for the texture.此下拉菜单上的选项允许您在SketchUp中编辑纹理。选择“加载”为纹理选择一个新的图像文件。Choose Remove to delete the texture image file. (A flat color approximation of the removed image appears when the texture image is removed.)选择“删除”以删除纹理图像文件。(当去除纹理图像时,会出现去除图像的平坦颜色近似值。)If you’ve colorized the texture, choose Reset Color remove the colorization.如果已对纹理着色,请选择“重置颜色”以删除着色。Choosing Edit opens the texture image file in your default image editor or preview program.选择“编辑”将在默认图像编辑器或预览程序中打开纹理图像文件。After you apply a texture, you can also adjust how the texture tiles on your model. See the upcoming section, Repositioning textures for details.应用纹理后,还可以调整纹理在模型上的平铺方式。有关详细信息,请参阅下一节,“重新定位纹理”。Width and Height:宽度和高度:When you paint a texture on a face, the texture image is tiled to fill the face. Type a value in the Width or Height box to change the size of the texture tile.在面上绘制纹理时,纹理图像会平铺以填充该面。在“宽度”或“高度”框中键入一个值以更改纹理图块的大小。By default, the image’s aspect ratio is maintained. So, if you type 2 in the width dimension box, the height box automatically updates to maintain the aspect ratio.默认情况下,图像的纵横比保持不变。因此,如果在宽度标注框中键入2,高度框会自动更新以保持纵横比。Click the chain icon to break the chain (sorry, Fleetwood Mac), and you can distort the aspect ratio to your heart’s content.点击链图标以断开链(抱歉,Fleetwood Mac),您可以根据自己的喜好扭曲纵横比。If you don’t love the results (and will never love them again), you have to remember the original dimensions and enter them manually to revert to the original image dimensions.如果你不喜欢这些结果(而且永远不会再喜欢它们),你必须记住原始尺寸并手动输入它们以恢复到原始图像尺寸。Colorize:着色:When the Edit Material panel is open, you can colorize a texture file. Use any of the color tabs to select a color and apply it to your material preview on the Edit Material panel.打开“编辑材质”面板后,可以为纹理文件着色。使用任何颜色选项卡选择一种颜色,并将其应用于“编辑材质”面板上的材质预览。Or click the Eyedropper tool at the bottom of the Colors panel and click any material in your model or on the Textures Palettes (brick) tab.或者单击“颜色”面板底部的“滴管”工具,然后单击模型中或“纹理选项板(砖)”选项卡上的任何材质。Tip:Colorizing is a great way to experiment with variations in material color.着色是实验材料颜色变化的好方法。Opacity:不透明度:When the Edit Material panel is open, you can also edit a material’s opacity, which refers to how transparent or opaque your image is. Sliding the opacity slider to the right increases the opacity of the texture, where 100 is totally opaque.当“编辑材质”面板打开时,您还可以编辑材质的不透明度,即图像的透明度或不透明程度。将不透明度滑块向右滑动会增加纹理的不透明性,其中100是完全不透明的。Move the slider left to increase the transparency of the texture, where 0 is fully transparent. Alternatively, type a number from 0 to 100 in the Opacity field.向左移动滑块以增加纹理的透明度,其中0是完全透明的。或者,在“不透明度”字段中键入一个0到100之间的数字。
Repositioning textures重新定位纹理
After you apply a texture to one or more faces in a 3D model, you can adjust how the texture tiles across a face. To do so, you use the Position Texture tool, which has two modes:将纹理应用于3D模型中的一个或多个面后,可以调整纹理在面上的平铺方式。为此,您可以使用“位置纹理”工具,该工具有两种模式:
Fixed Pin mode:固定引脚模式:In this mode, you can move, rotate, scale, or distort a texture. For example, in this mode, you can adjust a texture on one face so that it lines up with the same texture on another face, such as siding on two faces of a building.在此模式下,您可以移动、旋转、缩放或扭曲纹理。例如,在此模式下,您可以调整一个面的纹理,使其与另一个面上的相同纹理对齐,例如建筑物的两面。Free Pin mode:自由引脚模式:If you need to stretch or shrink a texture, use Free Pin mode.如果需要拉伸或收缩纹理,请使用“自由固定”模式。
Here’s how to adjust a texture in Fixed Pin mode:以下是如何在固定固定固定模式下调整纹理:
Context-click the material and select Texture > Position from the menu that appears.右键单击材质,然后从显示的菜单中选择“纹理>位置”。You see a matrix of dotted lines that represents the texture’s individual tiles. The cursor also changes to a hand and four pins are displayed.您会看到一个虚线矩阵,表示纹理的各个图块。游标也会变为游标,并显示四个引脚。If you see the four colored pins, as shown in the following figure, move to the next step. If you don’t, context-click the material and select Fixed Pins.如果您看到四个彩色引脚,如下图所示,请转到下一步。如果没有,请右键单击材质并选择“固定接点”。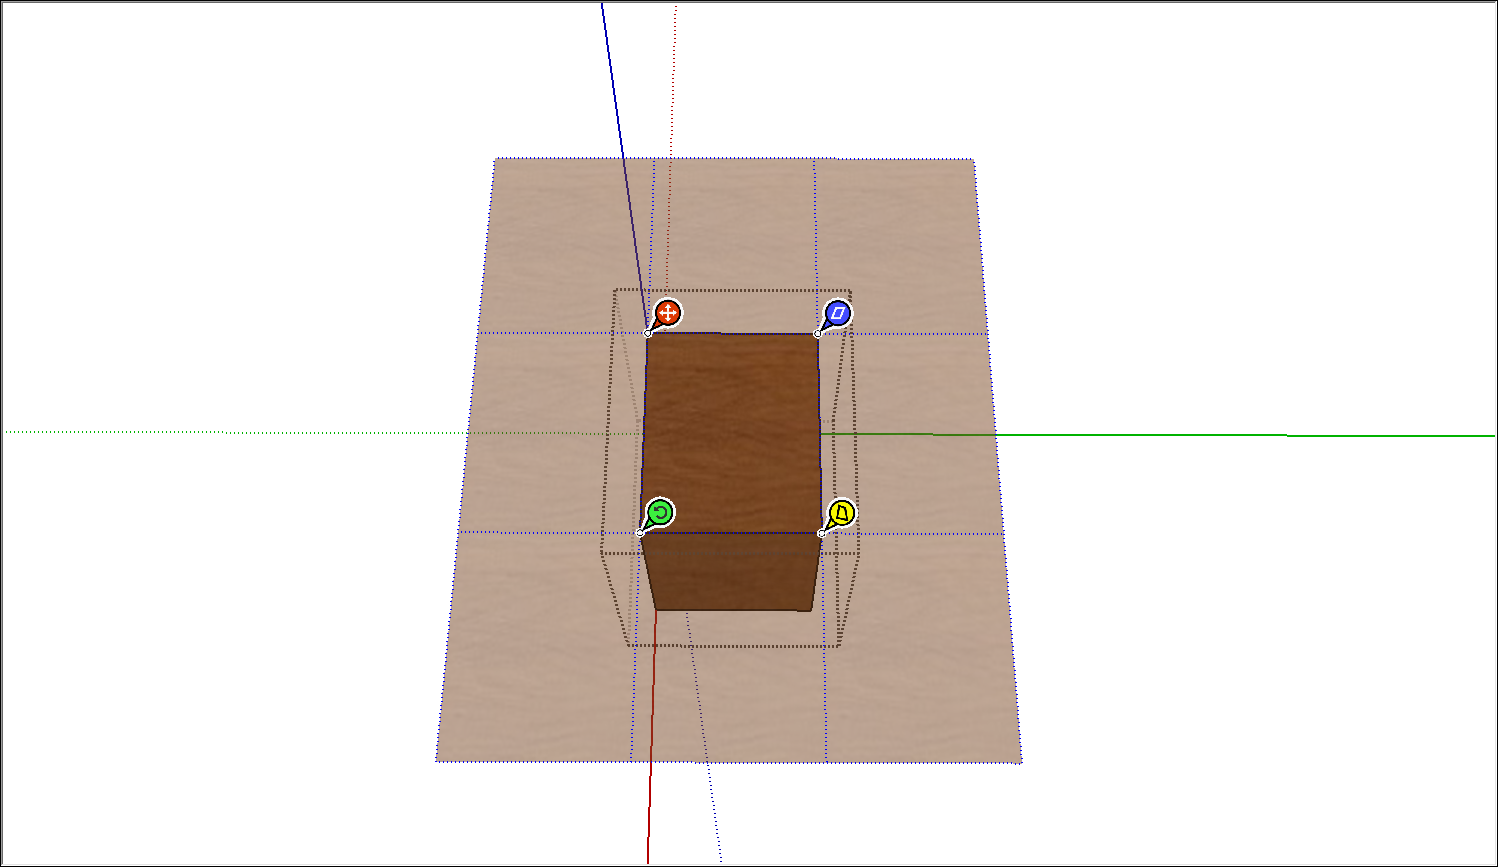
Use the hand cursor and/or the pins to adjust your texture. In this example, the goal is to move the green pin so that the direction of the wood on the top of the cabinet matches the side. Here’s a quick rundown of all your options:使用手游标和/或图钉调整纹理。在这个例子中,目标是移动绿色销钉,使橱柜顶部的木材方向与侧面相匹配。以下是您所有选项的简要概述:Click and drag the material with the hand cursor to reposition the texture as a whole.用手游标单击并拖动材质,以将纹理整体重新定位。Click a pin to pick it up and click again to drop the pin elsewhere on the texture.单击一个图钉将其拾取,然后再次单击将图钉放置在纹理上的其他位置。Drag a pin to alter the texture. Dragging the blue pin scales or shears the texture.拖动图钉以更改纹理。拖动蓝色图钉可缩放或剪切纹理。Dragging the yellow pin distorts the texture.拖动黄色图钉会扭曲纹理。Dragging the green pin scales the texture or rotates it around the Move pin’s axis. Dragging the red pin, which is the move pin, moves the texture.拖动绿色图钉可缩放纹理或围绕“移动”图钉的轴旋转纹理。拖动红色图钉(即移动图钉)会移动纹理。
Tip:In Fixed Pin mode, you can also context-click the texture to see additional options: flip the texture to the left or right or up or down, rotate the texture in increments of 90 degrees.在固定固定固定模式下,您还可以右键单击纹理以查看其他选项:将纹理向左或向右或向上或向下翻转,以90度为增量旋转纹理。The reset option reverts the texture to its original state, whereas the Undo option simply undoes the last command. If you undo an action, Redo also becomes an option.重置选项将纹理恢复到其原始状态,而撤消选项只是撤消最后一个命令。如果撤消操作,“重做”也将成为一个选项。When you’re finished changing the texture, context-click the texture and select Done. Or just click outside the texture to exit Fixed Pin mode.更改完纹理后,右键单击纹理并选择“完成”。或者只需单击纹理外部即可退出固定固定固定模式。
In Free Pin mode, you can set the size of your texture tile relative to your model. Here’s how the process works:在“自由固定”模式下,可以设置纹理图块相对于模型的大小。以下是该过程的工作原理:
Context-click the material and select Texture > Position from the menu that appears. By default, you’re in Fixed Pin mode.右键单击材质,然后从显示的菜单中选择“纹理>位置”。默认情况下,您处于固定接点模式。Switch to Free Pin mode by context-clicking the texture and clearing the Fixed Pins option. In Free Pin mode, you see four white pins, as shown in the following figure.通过上下文单击纹理并清除“固定接点”选项,切换到“自由接点”模式。在自由引脚模式下,您会看到四个白色引脚,如下图所示。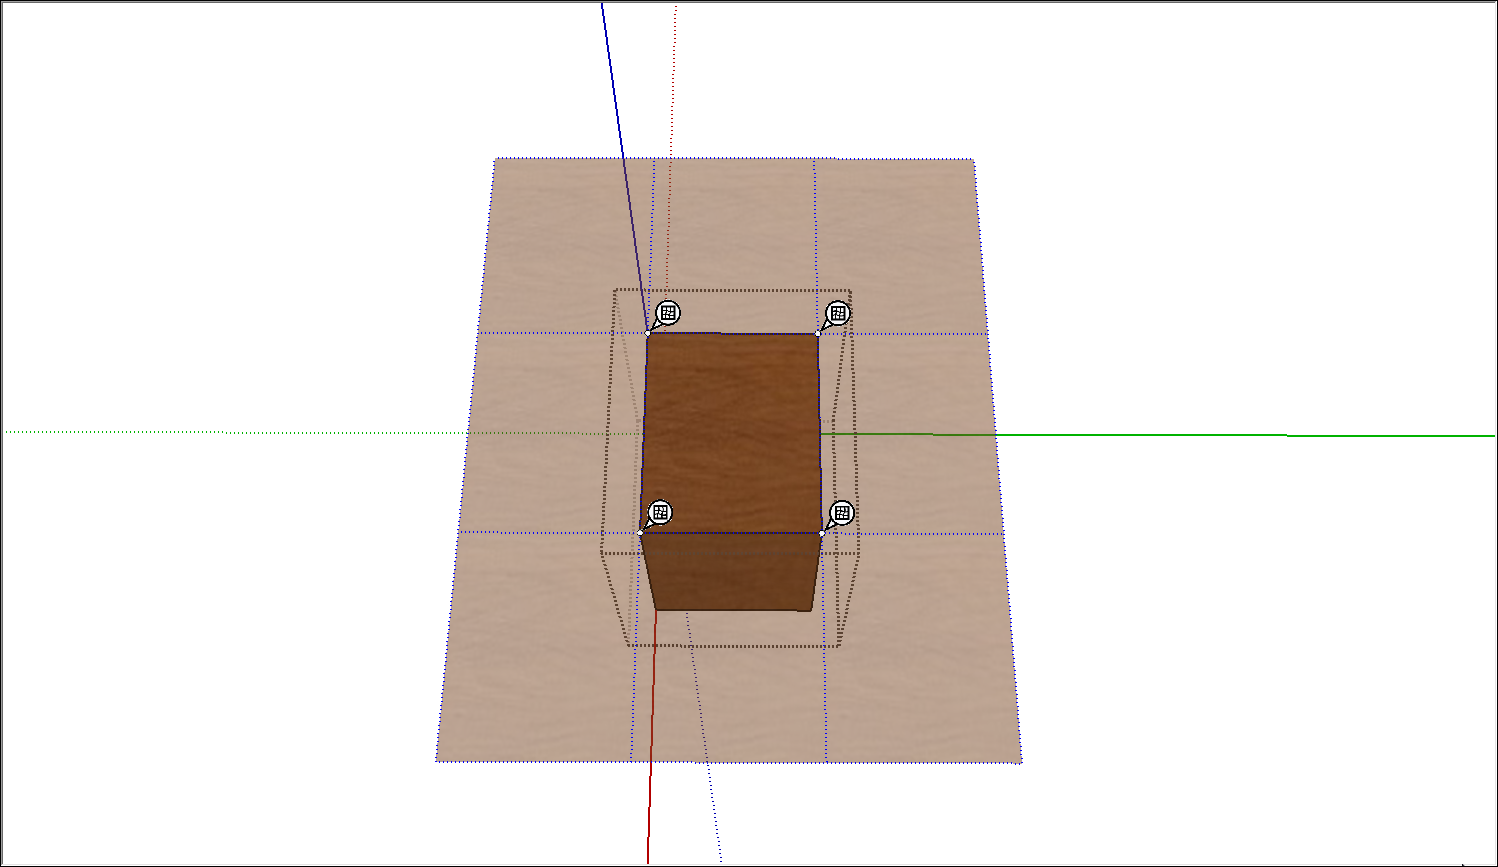
Click a pin to pick it up and click again to place the pin in its new location. Do this for all four pins to set where the corners of the texture tile appear. If you place the pins in a configuration that isn’t rectangular, you distort the texture.单击一个图钉将其拾取,然后再次单击将图钉放置在新位置。对所有四个引脚执行此操作,以设置纹理图块的角出现的位置。如果将图钉放置在非矩形的配置中,则会扭曲纹理。When you're finished, context-click the texture and select Done. Or simply click outside the texture to exit Free Pin mode.完成后,右键单击纹理并选择“完成”。或者只需单击纹理外部即可退出“自由固定”模式。
Calculating material area automatically自动计算物料面积
If you want SketchUp to calculate the surface area painted with a material, you can context-click the material and select Area > Material. 如果希望SketchUp计算用材质绘制的表面积,可以右键单击材质并选择“区域”>“材质”。In Windows, you can also context-click the material in the Materials panel, and select Area from the menu. (If the Area menu item is grey, the material isn’t applied to any faces.)在Windows中,您还可以在“材质”面板中右键单击材质,然后从菜单中选择“区域”。(如果“区域”菜单项为灰色,则材质不会应用于任何面。)
Either way, an Area dialog box shows the total area of faces to which the selected material is applied. The units (such as square feet or square meters) depends on the units specified in your template. 无论哪种方式,“面积”对话框都会显示应用选定材质的面的总面积。单位(如平方英尺或平方米)取决于模板中指定的单位。See Setting Up Templates for details about changing your default units.有关更改默认单位的详细信息,请参阅设置模板。
If you use IFC classifications, you can generate a report on materials in your whole model. See Classifiying Objects (and specifically the section on generating a report) for details.如果使用IFC分类,则可以生成整个模型中材质的报告。有关详细信息,请参阅对对象进行分类(特别是关于生成报告的部分)。
Managing and organizing materials管理和组织材料
The Materials panel (Microsoft Windows) or Colors panel (macOS) helps you find and organize materials. The following list explains how you can manage materials with the operating system you've selected in the Help Center.“材质”面板(Microsoft Windows)或“颜色”面板(macOS)可帮助您查找和组织材质。以下列表解释了如何使用在帮助中心中选择的操作系统管理材料。
Windows
Browse the included collections:浏览包含的集合:On the Select tab, choose a collection from the drop-down list to see the materials.在“选择”选项卡上,从下拉列表中选择一个集合以查看材质。Keep track of the materials in your model:跟踪模型中的材质:Click the In Model icon (单击“模型内”图标( ) to see all the materials you’ve applied to your model.)查看已应用于模型的所有材质。
Clear out unneeded materials:清除不需要的材料:Even if you replace a material with another, so that the original material no longer appears in your model, the original material still remains in your In Model collection until you delete it by context-clicking and selecting Delete.即使将一种材质替换为另一种材质,使原始材质不再出现在模型中,原始材质仍将保留在“模型内”集合中,直到您通过上下文单击并选择“删除”将其删除。To remove all the unused materials in a model, make sure your In Model collection is selected. Then click the Details arrow (要删除模型中所有未使用的材质,请确保已选择“模型内”集合。然后单击详细信息箭头( ) and select Purge Unused. )并选择清除未使用项。
Alternately, you can select Delete All to remove all the materials from your model and In Model collection.或者,您可以选择“全部删除”以从模型和“模型内”集合中删除所有材质。Create your own collections:创建自己的集合:You can create a collection for a specific project, or create a collection for materials that you create, such as a specific color scheme, fabric swatches, landscaping options, or anything else you use repeatedly.您可以为特定项目创建集合,也可以为您创建的材质创建集合,例如特定的配色方案、织物样本、景观选项或您重复使用的任何其他内容。On the Select tab, click the Details arrow (在“选择”选项卡上,单击“详细信息”箭头() and choose Open or Create a Collection. ),然后选择“打开”或“创建集合”。In the Select a collection folder or create a new one dialog box, navigate to the folder where you want to save your collection. Click the New Folder button, give your folder a name (which will become the name of your collection), and click Select Folder.在“选择集合文件夹或创建新文件夹”对话框中,导航到要保存集合的文件夹。单击“新建文件夹”按钮,为文件夹命名(这将成为集合的名称),然后单击“选择文件夹”。After you create the collection, you can navigate to the folder to open the collection. To add materials to a collection, drag them from the secondary selection pane into your collection, or save materials that you create to your collection.创建集合后,可以导航到该文件夹以打开集合。若要向集合中添加材质,请将它们从辅助选择窗格拖动到集合中,或将创建的材质保存到集合中。Add frequently used collections to your favorites:将常用集合添加到收藏夹:On the Select tab, click the Details arrow and choose Add Collection to Favorites. The currently selected collection then appears in a favorites list at the bottom of the drop-down list.在“选择”选项卡上,单击“详细信息”箭头,然后选择“将集合添加到收藏夹”。然后,当前选定的集合将显示在下拉列表底部的收藏夹列表中。You can select the collection, click the Details arrow, and choose Remove Collection from Favorites if you no longer need the collection on your favorites list.如果您不再需要集合列表中的集合,可以选择集合,单击“详细信息”箭头,然后选择“从收藏夹中删除集合”。Note:Click the Details arrow, and you can choose to view materials as small, medium, large, or extra-large tiles. Choose the List option to see the materials names instead of the preview swatches.单击“详细信息”箭头,您可以选择将材质查看为小、中、大或超大瓷砖。选择“列表”选项以查看材质名称,而不是预览样例。
MacOS
Browse included collections:浏览包含的集合:To see the materials included with SketchUp, click the Texture Palettes icon (the brick) and choose from the collections in the drop-down menu, such as Brick and Cladding, Fencing, Roofing, Translucent, or Wood. Each material in a collection appears as a swatch that you can click with the Paint Bucket cursor and apply to your model.要查看SketchUp中包含的材质,请单击“纹理选项板”图标(砖),然后从下拉菜单中的集合中选择,如砖和覆层、围栏、屋顶、半透明或木材。集合中的每种材质都显示为样例,您可以使用“绘制桶”游标单击该样例并将其应用于模型。Keep track of materials in a model:跟踪模型中的材料:The Colors panel includes a special material collection called Colors In Model, which contains all materials currently used in your model.“颜色”面板包括一个名为“模型中的颜色”的特殊材质集合,其中包含模型中当前使用的所有材质。The contents of this collection are generated automatically as you add materials to your SketchUp model.当您向SketchUp模型添加材质时,此集合的内容会自动生成。To see this collection, select Colors In Model from the materials collection drop-down menu, or simply click the Colors In Model icon (要查看此集合,请从材质集合下拉菜单中选择“模型中的颜色”,或只需单击“模型中颜色”图标(
).)。Clear out unneeded materials:清除不需要的材料:Even if you replace a material with another, so that the original material no longer appears in your model, the original material still remains in your Colors In Model collection until you delete it by context-clicking and selecting Remove.即使用另一种材质替换了一种材质,使原始材质不再出现在模型中,原始材质仍将保留在“模型中的颜色”集合中,直到您通过上下文单击并选择“删除”将其删除。To remove all the unused materials in a model, make sure your Colors In Model collection is selected. Then select List > Purge Unused.要删除模型中所有未使用的材质,请确保已选择“模型中的颜色”集合。然后选择“列表>清除未使用项”。Alternately, you can select Delete All to remove all the materials from your model and the Colors In Model collection.或者,您可以选择“全部删除”以从模型和“模型中的颜色”集合中删除所有材质。Creating your own collections:创建自己的集合:You can create a collection for a specific project, or create a collection for materials that you create, such as a specific color scheme, fabric swatches, landscaping options, or anything else you use repeatedly.您可以为特定项目创建集合,也可以为您创建的材质创建集合,例如特定的配色方案、织物样本、景观选项或您重复使用的任何其他内容。Select List > New. In the List Name box that appears, type a name and click OK. You now see the name you entered in the drop-down list of collections.选择“列表”>“新建”。在出现的“列表名称”框中,键入名称并单击“确定”。现在,您可以在集合的下拉列表中看到您输入的名称。To add materials to a new collection, you can drag the swatch next to the Eyedropper at the bottom of the Colors panel into the new collection’s swatches pane.要将材质添加到新集合中,可以将“颜色”面板底部“滴管”旁边的样例拖动到新集合的样例窗格中。Or create new textures and save them to the collection. To remove the collection, select List > Remove.或者创建新纹理并将其保存到集合中。要删除集合,请选择“列表”>“删除”。
Creating your own materials创建自己的材料
The materials included in SketchUp help you start using materials and explore how they work. To apply materials specific to your own design or building, you probably need to create your own materials. SketchUp中包含的材质可帮助您开始使用材质并探索它们的工作原理。要应用特定于您自己的设计或建筑的材质,您可能需要创建自己的材质。The process is pretty easy: Start with an image to create a texture tile and then specify a color if needed.这个过程非常简单:从一个图像开始创建一个纹理图块,然后根据需要指定一种颜色。
Windows
To create a new material from your own files or color codes, follow these steps:要从自己的文件或颜色代码创建新材质,请执行以下步骤:
In the Materials panel, click the Create Material icon (在“材质”面板中,单击右上角的“创建材质”图标( ) in the upper right.)。
In the Create Material dialog box that opens, type a name for the new material in the text field at the top.在打开的“创建材质”对话框中,在顶部的文本字段中键入新材质的名称。Choose the color, texture, and opacity options for your new material. The options work just like those in the Edit panel. Refer to the earlier section, Editing materials, for details.为新材质选择颜色、纹理和不透明度选项。这些选项的工作方式与“编辑”面板中的选项相同。有关详细信息,请参阅前面的“编辑材料”一节。Or, for help understanding the color options, see Mixing Colors in the Color Picker.或者,如需了解颜色选项的帮助,请参阅颜色选择器中的混合颜色。Click OK. Your new material appears selected in the In Model collection.单击“确定”。您的新材质将在“模型内”集合中显示为已选中。
MacOS
To create a new material that’s a texture, follow these steps:要创建作为纹理的新材质,请执行以下步骤:
In the Colors panel, click the Textures Palette tab (the one with the brick icon).在“颜色”面板中,单击“纹理调色板”选项卡(带有砖块图标的选项卡)。Select the collection where you want the new material to appear.选择要在其中显示新材质的集合。Select Color > New Texture.选择“颜色>新纹理”。In the dialog box that appears, select an image file for your texture.在出现的对话框中,为纹理选择一个图像文件。In the panel that appears, type a name for the texture, set the width and height for the tile size, and click OK. If you want to colorize the texture, follow the steps in the earlier section, Editing materials.在出现的面板中,键入纹理的名称,设置平铺大小的宽度和高度,然后单击“确定”。如果要为纹理着色,请按照前面“编辑材质”一节中的步骤进行操作。
And here’s how to save a specific color as a material:以下是如何将特定颜色保存为材质:
Use any of the color tabs to create your desired color, which appears in the color swatch at the bottom of the Colors panel. See Mixing Colors in the Color Picker for details.使用任何颜色选项卡创建所需的颜色,该颜色显示在“颜色”面板底部的色样中。有关详细信息,请参阅颜色选择器中的混合颜色。Select the Textures Palette tab (also known as the brick icon).选择“纹理调色板”选项卡(也称为砖图标)。Navigate to the collection where you want to save the color.导航到要保存颜色的集合。Drag the color swatch from the bottom of the Colors panel into the collection’s swatches area.将色样从“颜色”面板的底部拖动到集合的色样区域。