Modeling Specific Shapes, Objects, and Building Features in 3D在3D中建模特定形状、对象和建筑特征
To create a 3D model in SketchUp, you're constantly switching among the drawing tools, views, components, and organizational tools. In this article, you find several examples that illustrate ways you can use these tools together to model a specific shape or object.要在SketchUp中创建三维模型,您需要在绘图工具、视图、组件和组织工具之间不断切换。在本文中,您将找到几个示例,说明如何将这些工具一起用于对特定形状或对象进行建模。
The examples illustrate a few of the different applications for creating 3D models in SketchUp: woodworking, modeling parts or abstract objects, and creating buildings. The examples are loosely ordered from the simple to the complex.这些示例说明了在SketchUp中创建3D模型的几个不同应用程序:木工、建模零件或抽象对象以及创建建筑物。这些例子从简单到复杂的顺序很松散。
Table of Contents目录
Drawing a bowl, dome, or sphere画碗、圆顶或球体
In this example, you look at one way to draw a bowl and how to apply the technique for creating a bowl to a dome or sphere.在这个例子中,您将了解绘制碗的一种方法,以及如何将创建碗的技术应用于圆顶或球体。
In a nutshell, to create bowl, you draw a circle on the ground plane and a profile of the bowl's shape directly above the circle. Then you use the Follow Me tool to turn the outline into a bowl by having it follow the original circle on the ground plane.简而言之,要创建碗,您需要在地平面上绘制一个圆,并在圆的正上方绘制碗的形状轮廓。然后,您可以使用“跟随我”工具将轮廓变成一个碗,让它沿着地平面上的原始圆。
Here's how the process works, step-by-step:以下是该过程的工作原理,一步一步:
With the Circle tool (使用“圆”工具( ), draw a circle on the ground plane. ),在地平面上绘制一个圆。
These steps are easier if you start from the drawing axes origin point. The size of this circle doesn't matter.如果从图形轴原点开始,这些步骤会更容易。这个圆圈的大小并不重要。Hover the mouse cursor over the origin so that the cursor snaps to the origin and then move the cursor up the blue axis.将鼠标游标悬停在原点上,使游标捕捉到原点,然后沿蓝色轴向上移动游标。Starting from the blue axis, draw a circle perpendicular to the circle on the ground plane (that is, locked to the red or green axis).从蓝色轴开始,在地平面上画一个垂直于圆的圆(即锁定到红色或绿色轴)。To encourage the inference, orbit so that the green or red axis runs approximately left to right along the screen.为了促进推理,请进行轨道运动,使绿色或红色轴沿着屏幕大致从左向右延伸。If the Circle tool doesn't stay in the green or red inference direction, press and hold the Shift key to lock the inference.如果“圆”工具未保持在绿色或红色推理方向,请按住Shift键锁定推理。The radius of this second circle represents the outside radius of your bowl.第二个圆的半径代表碗的外半径。With the Offset tool (使用“偏移”工具( ), create an offset of this second circle. ),创建第二个圆的偏移。
The offset distance represents the bowl thickness. Check out the following figure to see how your model looks at this point.偏移距离表示碗厚度。看看下图,看看你的模型在这一点上是什么样子的。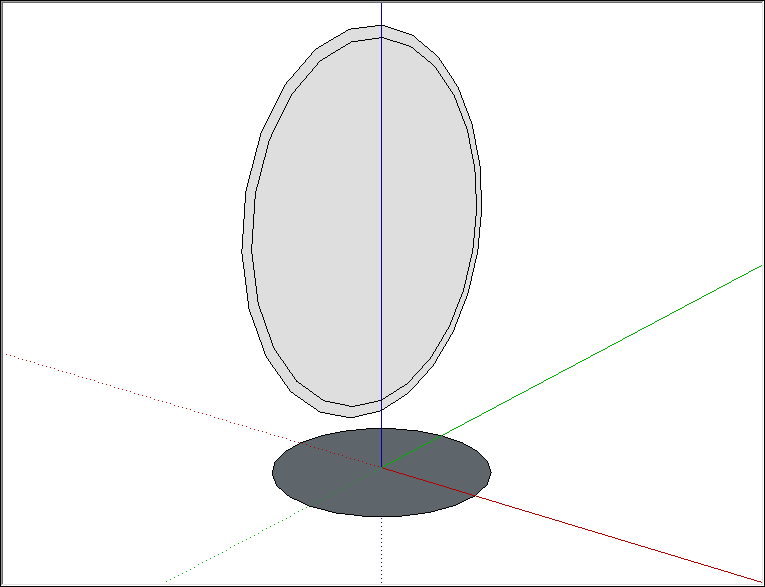
With the Line tool (使用“直线”工具( ), draw two lines: one that divides the outer circle in half and one that divides the inner circle that you created with the Offset tool.)绘制两条线:一条将外圈一分为二,另一条将使用“偏移”工具创建的内圈一分为二。
With the Eraser tool (使用“橡皮擦”工具( ), erase the top half of the second circle and the face that represents the inside of the bowl. When you're done, you have a profile of the bowl.)擦除第二个圆的上半部分和代表碗内侧的面。当你完成时,你就有了碗的轮廓。
With the Select tool (使用“选择”工具( ), select the edge of the circle on the ground plane. ),在地平面上选择圆的边。
This is the path the Follow Me tool will use to complete the bowl.这是“跟我来”工具完成碗的路径。With the Follow Me tool (使用“跟随我”工具( ), click the profile of the bowl. Your bowl is complete and you can delete the circle on the ground plane. ),单击碗的轮廓。您的碗已完成,您可以删除地平面上的圆。
The following figure shows the bowl profile on the left and the bowl on the right.下图显示了左侧的碗轮廓和右侧的碗。
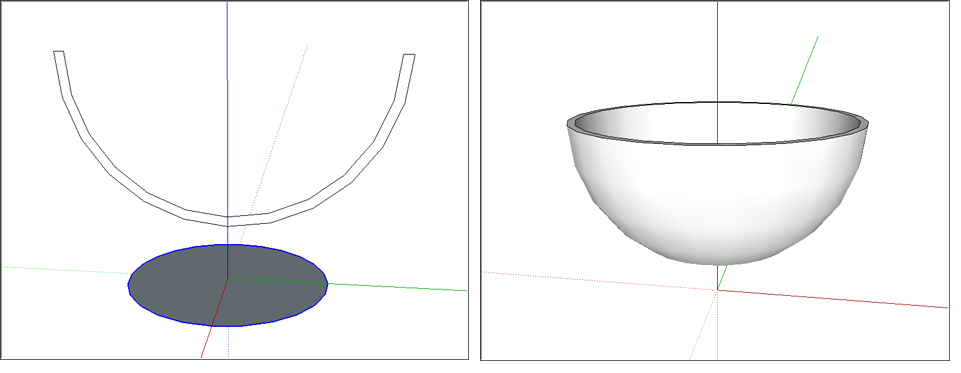
You can use these same steps to create a dome by simply drawing your profile upside down. To create a sphere, you don't need to modify the second circle to create a profile at all. Check out the following video see how to create a sphere.您可以使用这些相同的步骤,通过简单地将轮廓倒置来创建圆顶。要创建球体,您根本不需要修改第二个圆来创建轮廓。观看以下视频,了解如何创建球体。
Creating a cone创建圆锥体
In SketchUp, you can create a cone by resizing a cylinder face or by extruding a triangle along a circular path with the Follow Me tool.在SketchUp中,可以通过调整圆柱面的大小或使用“跟随我”工具沿圆形路径挤出三角形来创建圆锥体。
To create a cone from a cylinder, follow these steps:要从圆柱体创建圆锥体,请执行以下步骤:
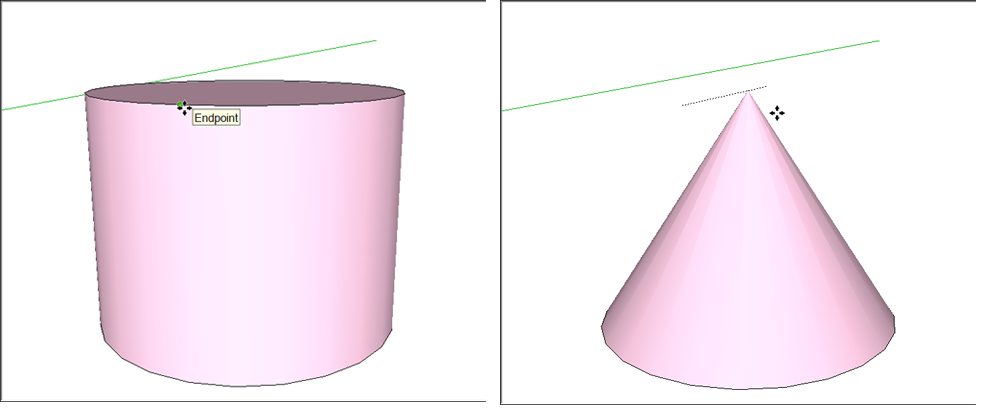
With the Circle tool, draw a circle.使用“圆”工具,绘制一个圆。Use the Push/Pull tool to extrude the circle into a cylinder.使用推/拉工具将圆挤出到圆柱体中。Select the Move tool (选择“移动”工具( ).)。
).)。Click a cardinal point on the top edge of the cylinder, as shown on the left in the figure. A cardinal point is aligned with the red or green axis and acts as a resize handle. To find a cardinal point, hover the Move tool cursor around the edge of the top cylinder; when the circle edge highlighting disappears, this indicates a cardinal point.单击圆柱体顶部边缘上的基点,如图左侧所示。基点与红色或绿色轴对齐,并充当调整大小手柄。要查找基点,请将“移动”工具游标悬停在顶部圆柱体的边缘;当圆边高亮显示消失时,这表示一个基点。Move the edge to its center until it shrinks into the point of a cone.将边移动到中心,直到它收缩到圆锥体的顶点。Click at the center to complete the cone, as shown on the left in the figure.单击中心以完成圆锥体,如图左侧所示。
Here are the steps to model a cone by extruding a triangle along a circular path:以下是通过沿圆形路径挤出三角形来建模圆锥体的步骤:
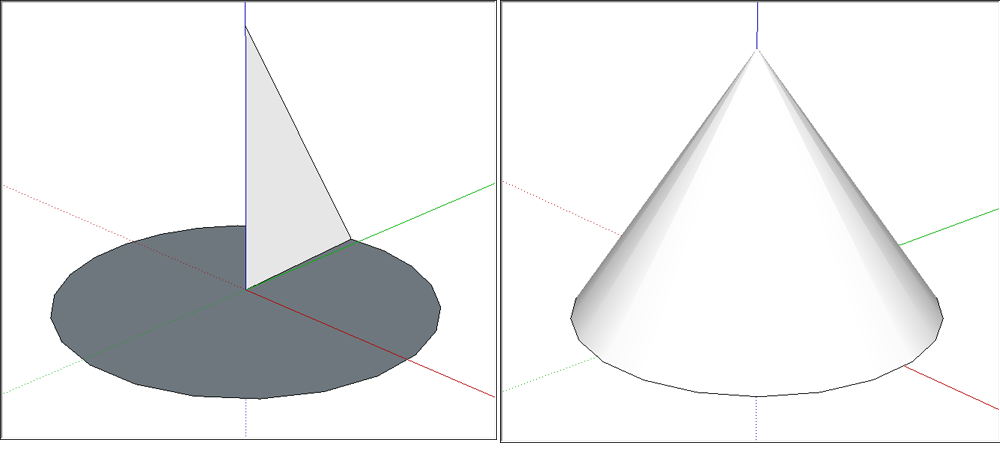
Draw a circle on the ground plane. You'll find it's easier to align your triangle with the circle's center if you start drawing the circle from the axes origin.在地平面上画一个圆。您会发现,如果从轴原点开始绘制圆,则更容易将三角形与圆心对齐。With the Line tool (使用直线工具(),绘制一个垂直于圆的三角形。(见下图左图。
), draw a triangle that's perpendicular to the circle. (See the left image in the following figure.With the Select tool (使用“选择”工具(), select the face of the circle.),选择圆的面。Select the Follow Me tool (选择“跟随我”工具(
) and click the triangle face, which creates a cone almost instantaneously (as long as your computer has the sufficient memory). You can see the cone on the right in the following figure.),然后单击三角形面,这几乎会立即创建一个圆锥体(只要您的计算机有足够的内存)。您可以在下图中看到右侧的圆锥体。
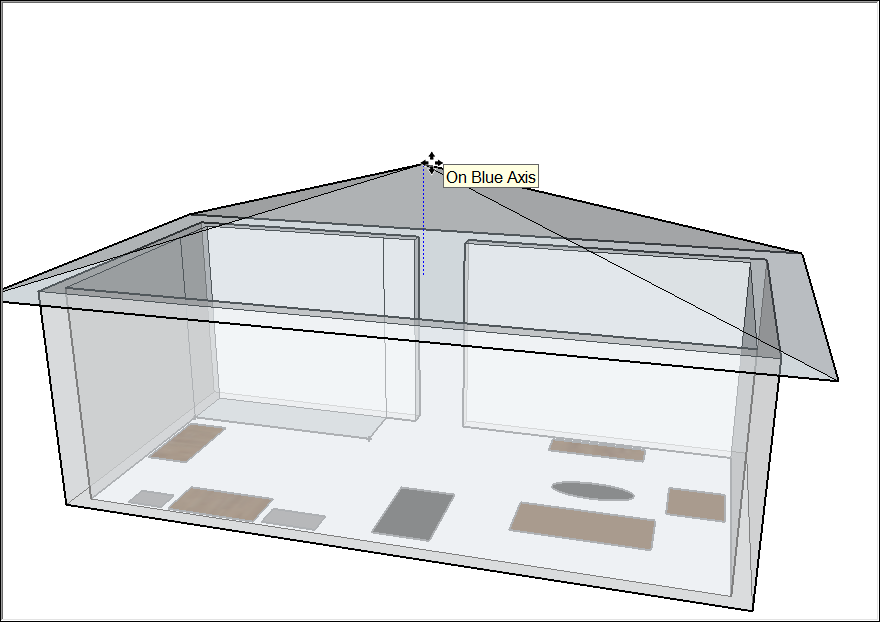
Creating a pyramidal hipped roof创建金字塔形坡屋顶
In SketchUp, you can easily draw a hipped roof, which is just a simple pyramid. For this example, you see how to add the roof to a simple one-room house, too.在SketchUp中,您可以轻松地绘制一个坡屋顶,这只是一个简单的金字塔。对于这个例子,您也将看到如何将屋顶添加到一个简单的单间房子中。
To draw a pyramid (pull up a pyramidal hipped roof):绘制金字塔(拉起金字塔坡屋顶):
With the Rectangle tool (使用“矩形”工具( ), draw a rectangle large enough to cover your building. ),绘制一个足够大的矩形来覆盖您的建筑。
To create a true pyramid, create a square instead of a rectangle. The SketchUp inference engine tells you when you're rectangle is a square or a golden section.要创建真正的金字塔,请创建正方形而不是矩形。SketchUp推理引擎告诉当你是矩形时是正方形或黄金分割。With the Line tool (使用“直线”工具(
), draw a diagonal line from one corner to its opposite corner.),从一个角到另一个角绘制一条对角线。Draw another diagonal line from one corner to another. In the figure, you see how the lines create an X. The example shows the faces in X-Ray view so you can see how the rectangle covers the floor plan.从一个角到另一个角再画一条对角线。在图中,您可以看到线条如何创建X。该示例显示了X射线视图中的面,因此您可以看到矩形如何覆盖平面图。
Select the Move tool (选择“移动”工具(
) and hover over the center point until a green inference point is displayed.)并将鼠标悬停在中心点上,直到显示绿色推理点。Click the center point.单击中心点。Move the cursor in the blue direction (up) to pull up the roof or pyramid, as shown in the figure. If you need to lock the move in the blue direction, press the Up Arrow key as you move the cursor.沿蓝色方向(向上)移动游标以拉起屋顶或金字塔,如图所示。如果需要锁定沿蓝色方向的移动,请在移动游标时按向上箭头键。When your roof or pyramid is at the desired height, click to finish the move.当屋顶或金字塔达到所需高度时,单击以完成移动。
Modeling a building from a footprint从足迹建模建筑
In SketchUp, the easiest way to start a 3D building model is with its footprint. After you have a footprint, you can subdivide the footprint and extrude each section to the correct height.在SketchUp中,启动3D建筑模型的最简单方法是使用其足迹。在获得足迹后,您可以细分足迹并将每个部分拉伸到正确的高度。
Here are a few tips for finding a building's footprint:以下是查找建筑物足迹的一些提示:
If you're modeling an existing building, trace the outline of the building with the drawing tools. Unless the building is obscured by trees, you can find an aerial photo on Google Maps and trace a snapshot.如果要对现有建筑进行建模,请使用绘图工具跟踪建筑的轮廓。除非建筑物被树木遮挡,否则您可以在谷歌地图上找到航拍照片并追踪快照。From within SketchUp, you can capture images from Google and load them directly into a model, as shown in the following figure.在SketchUp中,您可以从Google捕获图像并将其直接加载到模型中,如下图所示。If you don't have an aerial photo of the existing building you want to model, you may need to try the old fashioned route: measuring the exterior to create the footprint and drawing the footprint from scratch.如果你没有想要建模的现有建筑的航拍照片,你可能需要尝试老式的路线:测量外部以创建足迹,并从头开始绘制足迹。If literally taking measurements of an entire building is impractical, you can employ tricks such as using the measurement of a single brick to estimate overall dimensions or taking a photo with an object or person whose length you do know.如果从字面上测量整个建筑是不切实际的,你可以采用技巧,例如使用单个砖块的测量来估计整体尺寸,或者与你知道长度的物体或人合影。See Measuring Angles and Distances to Model Precisely for more details.有关更多详细信息,请参阅精确测量模型的角度和距离。
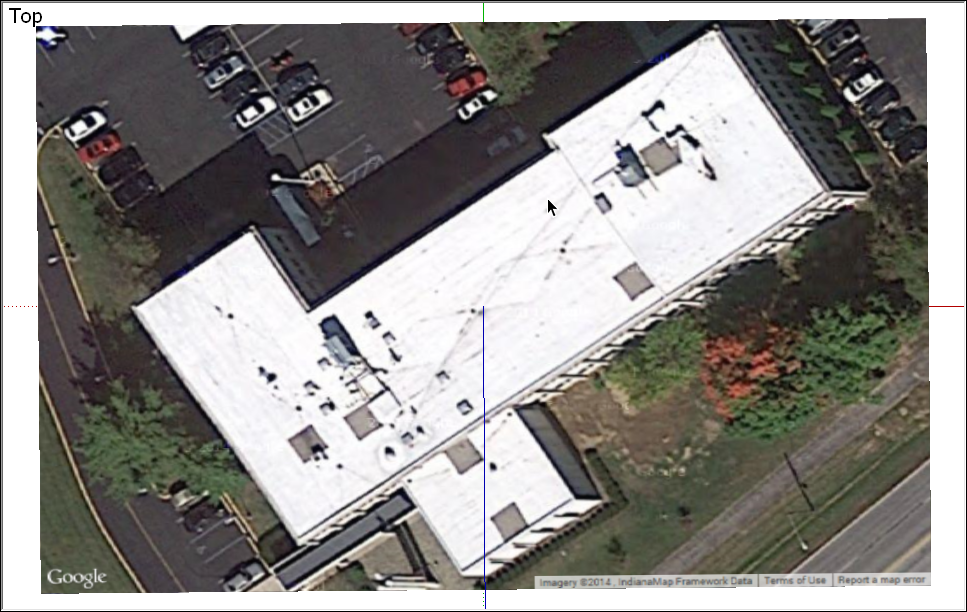
If you're able to start with a snapshot of your footprint, the following steps guide you through the process of tracing that footprint. First, set up your view of the snapshot:如果您能够从足迹的快照开始,以下步骤将指导您完成跟踪足迹的过程。首先,设置快照视图:
Select Camera > Standard Views > Top from the menu bar.从菜单栏中选择“摄影机>标准视图>顶部”。Select Camera > Zoom Extents to make sure you can see everything in your file.选择“摄影机>最大化显示”以确保可以看到文件中的所有内容。Use the Pan and Zoom tools to frame a good view of top of the building that you want to model. You need to be able to see the building clearly in order to trace its footprint.使用“平移”和“缩放”工具来构建要建模的建筑顶部的良好视图。您需要能够清楚地看到建筑物,以便追踪其足迹。See Viewing a Model for details about using these tools.有关使用这些工具的详细信息,请参阅查看模型。Choose View > Face Style > X-Ray from the menu bar. In X-Ray view, you can see the top view of the building through the faces that you draw to create the footprint.从菜单栏中选择“视图”>“面部样式”>“X射线”。在X射线视图中,您可以通过绘制以创建足迹的面看到建筑的俯视图。
After you set up your snapshot, try the techniques in the following steps to trace the building footprint:设置快照后,尝试以下步骤中的技术来跟踪建筑足迹:
Set the drawing axes to a corner of your building. See Adjusting the Drawing Axes for details.将绘图轴设置为建筑物的一角。有关详细信息,请参阅调整图形轴。With the Rectangle tool (使用“矩形”工具(
), draw a rectangle that defines part of your building. ),绘制一个定义建筑部分的矩形。Click a corner and then click an opposite corner to draw the rectangle. If your building outline includes non-90-degree corners, curves or other shapes that you can't trace with the Rectangle tool, use whichever other drawing tools you need to trace your building's footprint.单击一个角,然后单击另一个角来绘制矩形。如果您的建筑轮廓包含非90度角、曲线或其他无法使用矩形工具追踪的形状,请使用您需要的任何其他绘图工具来追踪建筑的足迹。Continue drawing rectangles (or lines and arcs) until the entire building footprint is defined by overlapping or adjacent rectangles, as shown on the left in the following figure. Make sure there aren't any gaps or holes; if there are, fill them in with more rectangles.继续绘制矩形(或直线和圆弧),直到整个建筑占地面积由重叠或相邻的矩形定义,如下图左侧所示。确保没有任何间隙或孔;如果有的话,用更多的矩形填充它们。With the Eraser tool (使用“橡皮擦”工具(
), delete all the edges in the interior of the building footprint. When you're done, you should have a single face defined by a perimeter of straight edges. ),删除建筑足迹内部的所有边。完成后,您应该有一个由直边周长定义的面。You may want to turn off X-Ray view, as shown on the right in the following figure, in order to see your faces and final footprint clearly.您可能希望关闭X射线视图,如下图右侧所示,以便清楚地看到您的面部和最终足迹。
Some simple buildings have a single exterior wall height, but most have more than one. After you complete the footprint, use the Line tool to subdivide your building footprint into multiple faces, each corresponding to a different exterior wall height, as shown in the following figure.一些简单的建筑只有一个外墙高度,但大多数都有多个外墙高度。完成足迹后,使用“直线”工具将建筑足迹细分为多个面,每个面对应不同的外墙高度,如下图所示。Then, you can use the Push/Pull tool (然后,可以使用“推/拉”工具( ) to extrude each area to the correct building height.)将每个区域拉伸到正确的建筑高度。

Creating a polyhedron创建多面体
In this example, you see how to create a polyhedron, which repeats faces aligned around an axis.在这个例子中,您将看到如何创建一个多面体,它重复围绕轴对齐的面。
To illustrate how you can create a complex shape with basic repeating elements, this example shows you how to create a polyhedron called a rhombicosidodecahedron, which is made from pentagons, squares, and triangles, as shown in the figure.为了说明如何使用基本重复元素创建复杂的形状,本例向您展示了如何创建一个称为菱形十面体的多面体,该多面体由五边形、正方形和三角形组成,如图所示。
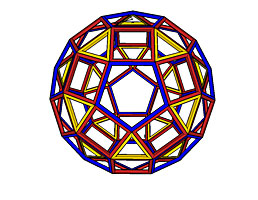
The following steps explain how to create this shape by repeating faces around an axis:以下步骤解释了如何通过围绕轴重复面来创建此形状:
Establish the correct angle between the first square and the pentagon, and between the first triangle and the square. See Measuring Angles and Distances to Model Precisely for details about measuring angles with the Protractor tool.确定第一个正方形和五边形之间以及第一个三角形和正方形之间的正确角度。有关使用量角器工具测量角度的详细信息,请参阅精确测量角度和模型距离。Mark the exact center point of the pentagon, which is shown here on a green surface that has been temporarily added to the pentagon component. This is the axis around which the copies will be aligned.标记五边形的确切中心点,此处显示在临时添加到五边形组件的绿色表面上。这是副本将围绕其对齐的轴。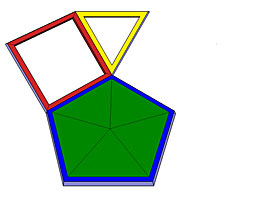
Make the square and triangle components, and then group the two components.制作正方形和三角形组件,然后将这两个组件分组。For details about components, see Developing Components and Dynamic Components.有关组件的详细信息,请参阅开发组件和动态组件。To learn about groups, see Organizing a Model.要了解组,请参阅组织模型。Preselect the objects that you want to copy and rotate (in this case, the group you just created).预选要复制和旋转的对象(在本例中为刚刚创建的组)。Select the Rotate tool (选择“旋转”工具( ).)。
).)。Align the Rotate cursor with the pentagon face and click the center point of the pentagon, as shown in the following figure.将“旋转”游标与五边形面对齐,然后单击五边形的中心点,如下图所示。
Click the Rotate cursor at the point where the tips of the square, triangle, and pentagon come together.在正方形、三角形和五边形的顶点汇合处单击“旋转”游标。Press the Ctrl key to toggle on the Rotate tool's copy function. The Rotate cursor changes to include a plus sign (+).按Ctrl键打开“旋转”工具的复制功能。“旋转”游标将更改为包含加号(+)。Move the cursor to rotate the selection around the axis. If you originally clicked the point where the tips of the square, triangle, and pentagon came together, the new group snaps into its new position, as shown in the following figure.移动游标以围绕轴旋转选择。如果您最初单击了正方形、三角形和五边形的顶点在一起的点,则新组将捕捉到其新位置,如下图所示。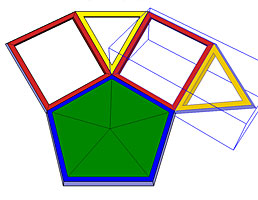
Click to finish the rotate operation.单击以完成旋转操作。Continue rotating copies around the axis until the shape is complete. As you build the rhombicosidodecahedron, you need to group different components together, and rotate copies of those groups around various component faces.继续围绕轴旋转副本,直到形状完成。构建菱形二十面体时,需要将不同的组件组合在一起,并围绕不同的组件面旋转这些组的副本。