Erasing and Undoing擦除和撤消
Everyone makes mistakes. In SketchUp, you can correct mistakes with the Undo command or the Eraser tool.每个人都会犯错。在SketchUp中,可以使用“撤消”命令或“橡皮擦”工具更正错误。
Using the Undo Command使用撤消命令
The Undo command reverses your most recent action. For example:“撤消”命令可撤消您最近的操作。例如:
If you draw a line and then Undo it, the line will disappear.如果你画一条线,然后撤消它,这条线就会消失。If you try to copy a piece of complex geometry with the Move tool and accidentally stretch it instead, Undo can put things back the way they were.如果您尝试使用“移动”工具复制一块复杂的几何图形,但不小心拉伸了它,“撤消”会使事情恢复原状。
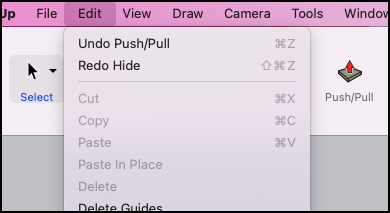
Undo is available under the Edit menu You'll see the word Undo with a description of the last action you performed. For example, if you last used the Push/Pull tool, you'll see Undo Push/Pull in the Edit menu.“撤消”在“编辑”菜单下可用。您将看到“撤消”一词,其中描述了您执行的最后一个操作。例如,如果您上次使用推/拉工具,您将在“编辑”菜单中看到“撤消推/拉”。
The default keyboard shortcut for Undo is Alt+Backspace. However, Ctrl+Z (Microsoft Windows) or Command+Z (macOS) also work.撤消的默认键盘快捷键是Alt+Backspace。但是,Ctrl+Z(Microsoft Windows)或Command+Z(macOS)也可以使用。
Anything you Undo you can Redo. When you Undo an action, the option to Redo that action will appear in the Edit menu.你撤销的任何事情都可以恢复。当您撤消操作时,“编辑”菜单中将显示“恢复该操作”选项。
Erasing Geometry擦除几何图形
You can erase geometry from your model using either the Eraser tool or the Erase context command.您可以使用橡皮擦工具或擦除上下文命令从模型中擦除几何体。
The Eraser tool can help you remove, soften or unsoften, and hide parts of your model no matter when you created it. For now, we'll be focusing on how to remove geometry. See this article for more information on how to use the other functions of the Eraser tool.橡皮擦工具可以帮助您删除、软化或取消软化以及隐藏模型的部分,无论您是在何时创建的。现在,我们将重点介绍如何删除几何体。有关如何使用橡皮擦工具的其他功能的更多信息,请参阅本文。
You can find SketchUp's Eraser (您可以在几个不同的位置找到SketchUp的“橡皮擦”工具(![]() ) tool in a few different locations:
) tool in a few different locations:![]() ):
):
The Getting Started toolbar入门工具栏The Drawing toolbar绘图工具栏The Large Tool Set toolbar大工具集工具栏The Principal toolbar主体工具栏The Tool Palette (macOS only)工具面板(仅限macOS)
When you want to remove parts of your model, here are the ways the Eraser tool can get it done:当你想删除模型的某些部分时,以下是橡皮擦工具可以完成的方法:
Select the Eraser tool from a toolbar and click an edge with the Eraser tool cursor.从工具栏中选择橡皮擦工具,然后用橡皮擦工具游标单击边。You'll erase that edge and any faces it bounds.Tip: The Eraser tool doesn't allow you to erase faces.您将擦除该边缘及其绑定的任何面提示:橡皮擦工具不允许您擦除面。Technically, faces are erased when you erase their bounding edges, opening and reshaping your geometry.从技术上讲,当您擦除面的边界边、打开和重塑几何体时,面会被擦除。See introduction to drawing basics for more information on how this works.有关其工作原理的更多信息,请参阅绘图基础介绍。Click and drag over multiple lines with the Eraser tool. Any line highlighted in blue will be erased once you release your mouse button.使用橡皮擦工具单击并拖动多条线。松开鼠标按钮后,任何以蓝色突出显示的行将被擦除。
The Erase context command helps you remove selected geometry, including faces. To use the Erase context command:“擦除”上下文命令可帮助您删除选定的几何体,包括面。要使用“擦除”上下文命令,请执行以下操作:
Context-click a face or edge and select Erase from the context menu.右键单击面或边,然后从右键菜单中选择“擦除”。To remove multiple edges and faces at the same time, use the Select tool to select the geometry then context-click your selection and choose Erase.要同时删除多个边和面,请使用“选择”工具选择几何体,然后右键单击您的选择并选择“擦除”。
Softening, Smoothing, and Hiding Geometry柔化、平滑和隐藏几何体
The real world isn't all sharp edges and hard angles, and your model shouldn't be either. SketchUp provides the tools you need to soften and smooth edges, or even hide geometry, without compromising your model's structural integrity.现实世界并不都是锋利的边缘和坚硬的角度,你的模型也不应该如此。SketchUp提供了软化和平滑边缘,甚至隐藏几何体所需的工具,而不会损害模型的结构完整性。
With this introduction to soft, smooth, and hidden geometry we'll talk about how it's done and the types of entities you can create. After we go over the basics we'll even throw in a few tips for improving your model's appearance and efficient modeling.通过对软、平滑和隐藏几何体的介绍,我们将讨论它是如何完成的,以及可以创建的实体类型。在我们复习了基础知识之后,我们甚至会提供一些技巧来改善模型的外观和高效建模。
Table of Contents目录
Understanding the edge properties了解边缘属性Softening and smoothing edges at once同时软化和平滑边缘Hiding geometry隐藏几何图形Viewing hidden geometry查看隐藏几何图形
Understanding the edge properties了解边缘属性
In SketchUp you can add the following properties to the edges in your model, in various combinations, enable you to control their appearance:在SketchUp中,您可以将以下属性以各种组合添加到模型中的边上,从而控制其外观:
Smooth光滑 -Smoothing an edge adds shading that makes the faces look smooth. When used alone, the edge remains visible.平滑边缘会添加阴影,使面看起来平滑。单独使用时,边缘仍然可见。Soft柔软 -Softening an edge hides it and all bounding faces become a surface entity. Surface entities join two or more faces so they look round. Surface entities act like single entities when selected but retain all inferences from the geometry they were made from.软化边会将其隐藏,所有边界面都会成为曲面实体。曲面实体连接两个或多个面,使其看起来是圆形的。选择曲面实体时,它们的行为类似于单个实体,但保留了从它们所基于的几何体中得出的所有推论。Hide隐藏 -Hiding an edge makes the edge invisible without creating a new surface entity.隐藏边会使边不可见,而无需创建新的曲面实体。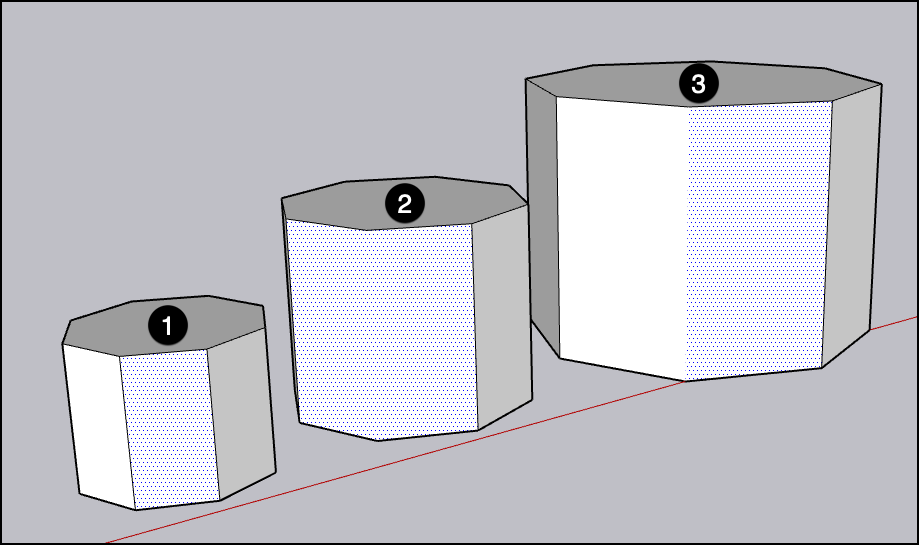
Softening and smoothing edges at once同时软化和平滑边缘
In SketchUp, softening and smoothing edges go hand-in-hand. That's why both the Eraser tool and the Soften Edges dialog box apply these properties together.在SketchUp中,软化和平滑边缘是相辅相成的。这就是为什么“橡皮擦”工具和“柔化边”对话框将这些属性一起应用的原因。
To soften and smooth edges with the Eraser tool:当您需要更精细的控制时,打开“柔化边”对话框。使用橡皮擦工具柔化和平滑边:
Select the Eraser tool (选择“橡皮擦”工具( ) or press the E key.)或按E键。
Tap the Ctrl key (Microsoft Windows) or the Option key (macOS) to toggle Smooth Edges and then "erase" these lines the same way you would to delete them.点击Ctrl键(Microsoft Windows)或Option键(macOS)切换“平滑边缘”,然后以删除这些线条的方式“擦除”这些线条。If you make a mistake or change your mind, tap the Alt (Microsoft Windows) or Command (macOS) and click the edges to undo the softening and smoothing.如果您犯了错误或改变了主意,请点击Alt(Microsoft Windows)或Command(macOS),然后单击边缘以撤消软化和平滑。
To soften and smooth with the Soften Edges dialog box, follow these steps:要使用“柔化边”对话框柔化和平滑,请执行以下步骤:
Use the Select tool and highlight the edges you want to soften and smooth. (See Selecting geometry for tips and selection techniques.)使用“选择”工具,突出显示要柔化和平滑的边。(有关提示和选择技术,请参阅选择几何体。)- Open the Soften Edges dialog box using one of these methods:
In macOS, open the Window menu and select Soften Edges.在macOS中,打开“窗口”菜单并选择“柔化边缘”。In Windows, open the Window menu, select Default Tray followed by Soften Edges.在Windows中,打开“窗口”菜单,选择“默认托盘”,然后选择“软化边缘”。Context-click your selection and choose Soften/Smooth Edges.在上下文中单击您的选择,然后选择“柔化/平滑边”。
Click and drag slider labeled Angle Between Normals. This slider sets the maximum size of all angles that will be smoothed or softened.单击并拖动标记为“法线之间的角度”的滑块。此滑块设置将被平滑或软化的所有角度的最大大小。The higher the setting, the more angles you are likely to smooth or soften. In the example, the slider is set to 20 degrees, which smooths and softens most of the rock's surface.设置越高,平滑或柔化的角度就越多。在该示例中,滑块设置为20度,可以平滑和软化岩石的大部分表面。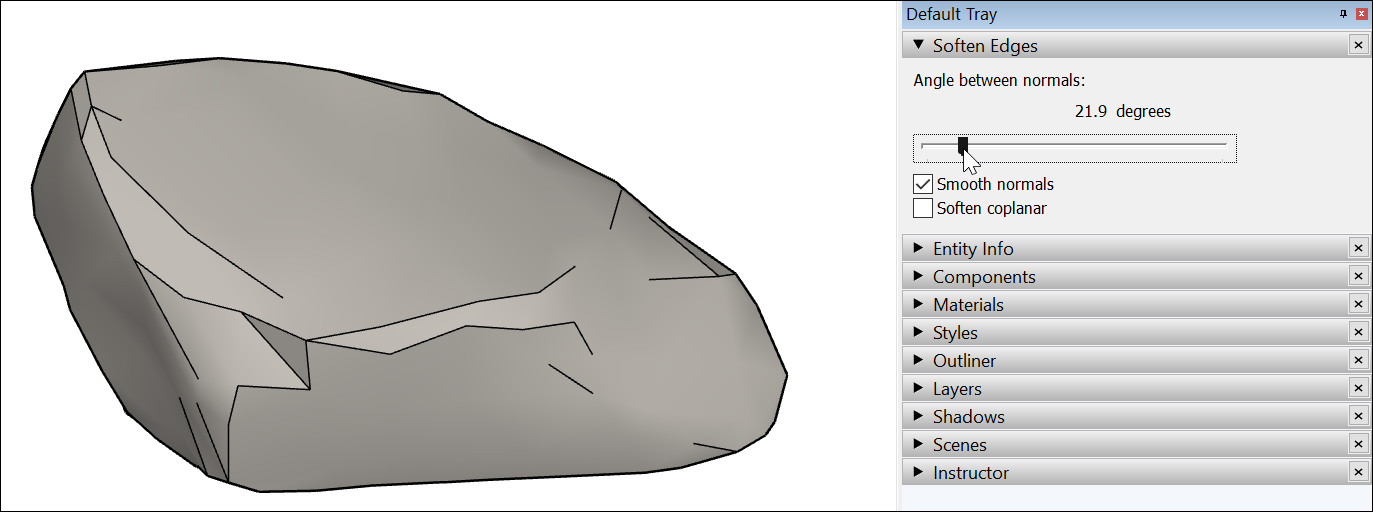
(Optional) The Smooth normals check box is selected by default. If you don't want the shading effect that makes your edges look smooth, clear this check box.(可选)默认情况下选中“平滑法线”复选框。如果不希望使用使边缘看起来平滑的着色效果,请清除此复选框。(Optional) Select the Soften coplanar check box to soften edges between coplanar surfaces, essentially deleting those edges. In the example of the rock, selecting the checkbox doesn't impact the rock much, because few (if any) of its faces are on the same plane.(可选)选中“软化共面”复选框以软化共面曲面之间的边,实际上是删除这些边。在岩石的示例中,选中复选框不会对岩石产生太大影响,因为岩石的面很少(如果有的话)在同一平面上。
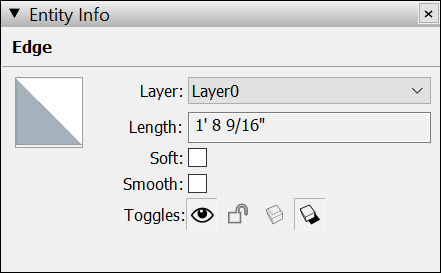
To check or change the properties applied to an edge, context-click and choose Entity Info. You'll see the type of entity in the upper left and can select or clear the Soft and Smooth check boxes. Select a face, and you can see whether it's a surface entity or another type of geometry.要检查或更改应用于边的属性,请右键单击并选择“实体信息”。您将在左上角看到实体的类型,可以选择或清除“柔和”和“平滑”复选框。选择一个面,您可以看到它是曲面实体还是其他类型的几何体。
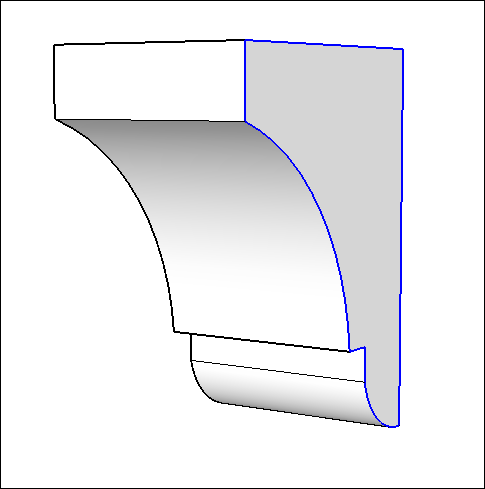
Tip: Softened and smoothed edges make basic geometry look polished. In a complex model, relying on soft and smooth edges can noticeably lighten the load on your computer's memory. For example, you can create the corbel shown in the figure by creating a 2D drawing in the shape of the selected edges. 软化和平滑的边缘使基本几何形状看起来很光滑。在复杂的模型中,依靠柔软光滑的边缘可以明显减轻计算机内存的负担。例如,可以通过以选定边的形状创建二维图形来创建图中所示的托梁。Then extrude the face into the 3D shape shown here. The shape is quite basic, but the softened and smoothed edges enhance the model's dimensions and shape. 然后将面部拉伸成此处显示的3D形状。形状非常基本,但软化和平滑的边缘增强了模型的尺寸和形状。Also, if you draw and extrude arcs, circles, or curves, these entities apply soft and smooth edges by default.此外,如果绘制和拉伸圆弧、圆或曲线,默认情况下,这些实体将应用柔和平滑的边。
Hiding geometry隐藏几何图形
As you draw a model, you don't necessarily want a line marking every edge in your model. Soften Edges hides lines, but also creates a surface entity, which means you can only apply one material to any face in the surface entity. 绘制模型时,您不一定希望模型中的每条边都有一条线标记。软化边隐藏线,但也会创建曲面图元,这意味着您只能将一种材质应用于曲面图元中的任何面。If you want to hide an unsightly line without creating a surface entity, seek out the Hide feature. You can hide lines, faces, and any SketchUp entity.如果要在不创建曲面图元的情况下隐藏难看的线,请找到“隐藏”功能。可以隐藏线、面和任何SketchUp实体。
Follow these steps to hide a line or any geometry:按照以下步骤隐藏线或任何几何图形:
Select the geometry you want to hide.选择要隐藏的几何图形。Context-click the selection and choose Hide from the context menu that appears, as shown in the figure. You can also open the Edit menu and select Hide. Even though it's still there, the selected geometry disappears from view like a ghost in the machine.右键单击所选内容,然后从出现的右键菜单中选择“隐藏”,如图所示。您也可以打开“编辑”菜单并选择“隐藏。即使它仍然存在,选定的几何体也会像机器中的幽灵一样从视图中消失。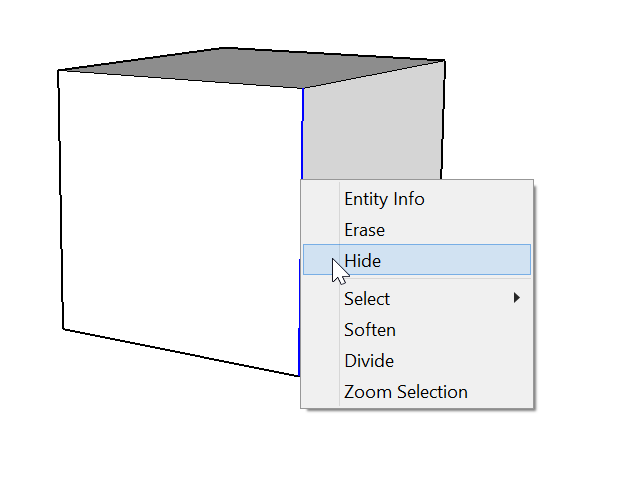
Hidden geometry can't be selected. To make hidden geometry selectable, you must display hidden geometry or unhide the geometry. 无法选择隐藏几何体。要使隐藏几何图形可选,必须显示隐藏几何图形或取消隐藏几何图形。See Viewing hidden edges for details.有关详细信息,请参阅查看隐藏边。
Viewing hidden geometry and objects查看隐藏的几何图形和对象
In SketchUp, any geometry that's hidden is still there. You just can't see or select it.在SketchUp中,任何隐藏的几何体仍然存在。你无法看到或选择它。
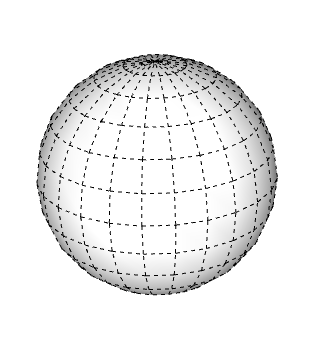
To see the hidden geometry or objects but keep them hidden, open the View menu and select Hidden Geometry or Hidden Objects. All hidden entities appear in a ghosted pattern (as shown in the figure), allowing you to select them. Select Hidden Geometry or Hidden Objects again to clear the option and make the ghost pattern or object disappear.要查看隐藏的几何图形或对象但保持其隐藏状态,请打开“视图”菜单,然后选择“隐藏几何图形”或“隐藏对象”。所有隐藏的实体都以重影模式显示(如图所示),允许您选择它们。再次选择“隐藏几何体”或“隐藏对象”以清除该选项,并使重影图案或对象消失。
To change geometry from hidden to visible, you need to unhide it. Select the hidden geometry, context-click the selection, and choose Unhide. (The Hide menu item changes to Unhide when selected geometry is hidden.)要将几何图形从隐藏更改为可见,您需要将其取消隐藏。选择隐藏的几何图形,右键单击所选内容,然后选择“取消隐藏”。(隐藏选定几何图形时,“隐藏”菜单项将更改为“取消隐藏”。)