Sticking a Photo or Texture to a Face将照片或纹理粘贴到面上
Have you ever stuck a decal on a window or a wall? In SketchUp, sticking an image on a face is even easier than those decals, because digital images don't wrinkle or trap air bubbles.你曾经在窗户或墙上贴过贴花吗?在SketchUp中,将图像粘贴在在面上比那些贴花更容易,因为数字图像不会起皱或捕获气泡。
Technically speaking, SketchUp enables you to import images that are already on your hard drive. When you import images from your hard drive (select File > Import to see the Open dialog box, shown in the figure), you can import the image as an image, a texture, or a matched photo.从技术上讲,SketchUp允许您导入硬盘上已有的图像。当您从硬盘导入图像时(选择“文件”>“导入”以查看如图所示的“打开”对话框),您可以将图像导入为图像、纹理或匹配的照片。
Here's how those options help you do different things with the image in your model:以下是这些选项如何帮助您对模型中的图像执行不同的操作:
Import the image as a basic image,将图像作为基本图像导入,and SketchUp enables you to place the image anywhere in your model. You can then move, rotate, scale, or stretch the image.SketchUp允许您将图像放置在模型中的任何位置。然后,您可以移动、旋转、缩放或拉伸图像。Import the image as a texture,将图像作为纹理导入,and you can apply the image to an existing face. However, you also gain access to all the materials and Position Texture tools. These tools are introduced in Adding Colors and Textures with Materials, but that article focuses on tiled images.您可以将图像应用于现有的面部。但是,您还可以访问所有材质和“位置纹理”工具。这些工具在“使用材质添加颜色和纹理”一文中介绍,但该文主要关注平铺图像。In this article, find out how to do special techniques with a single image, such as wrapping an image around corners, wrapping an image around a hidden face on a cylinder, or projecting an image onto a face.在本文中,了解如何使用单个图像执行特殊技术,例如将图像包裹在角落周围,将图像包裹到圆柱体上的隐藏面周围,或将图像投影到面上。When you project textures, you can apply them to curved surfaces.投影纹理时,可以将其应用于曲面。Import the image as a matched photo, and you activate SketchUp's Match Photo tool, which enables you to match a photo of an existing building to a model of that building or draw a building based on a photo.将图像导入为匹配的照片,然后激活SketchUp的“匹配照片”工具,该工具使您能够将现有建筑的照片与该建筑的模型进行匹配,或基于照片绘制建筑。Match Photo enables you to apply images to buildings two faces at time, using the corner of a building or room to apply a 2D image onto a 3D model.Match Photo允许您一次将图像应用于建筑物的两个面,使用建筑物或房间的角落将2D图像应用于3D模型。Unlike images or textures, which work best with rectangular images and faces, Match Photo works well with non-rectangular building shapes, such as angled roof lines.与最适合矩形图像和面的图像或纹理不同,Match Photo适用于非矩形建筑形状,如倾斜的屋顶线。Learn all about Match Photo in Matching a Photo to a Model (or a Model to a Photo).在“将照片与模型匹配”(或“模型与照片匹配”)中了解有关“匹配照片”的所有信息。
Table of Contents目录
Understanding image basics了解图像基础知识
Digital images come in myriad file types and sizes. SketchUp supports the image file formats outlined in the following table. Some formats may be more appropriate than others for certain types of images and applications.数字图像有无数种文件类型和大小。SketchUp支持下表中列出的图像文件格式。对于某些类型的图像和应用程序,某些格式可能比其他格式更合适。
| Microsoft Windows and macOS | Microsoft Windows | macOS |
|---|---|---|
| JPEG, PNG, EPS, TIFF | TGA, BMP | PDF, PICT, PSD, SGI |
An image's size is referred to as its resolution. An image's resolution reflects how many pixels the image contains. 图像的大小称为分辨率。图像的分辨率反映了图像包含的像素数。The resolution of an image depends on the image source. Typically, images captured with a digital camera, especially a dSLR camera, have very high resolutions, and images downloaded from the web have low resolutions. You can check an image's resolution in an image editing program, such as Photoshop.图像的分辨率取决于图像源。通常,用数码相机拍摄的图像,特别是dSLR相机,具有非常高的分辨率,而从网络下载的图像具有低分辨率。您可以在图像编辑程序(如Photoshop)中检查图像的分辨率。
Digital images and SketchUp models are so diverse, it's difficult to give specific recommendations here. However, here's an example to illustrate how you might find the right resolution and file type for an image. Say your image was captured with a digital camera in a JPEG or JPEG+RAW format. 数字图像和SketchUp模型非常多样化,很难在这里给出具体的建议。但是,这里有一个例子来说明如何为图像找到正确的分辨率和文件类型。假设你的图像是用数码相机以JPEG或JPEG+RAW格式拍摄的。Try saving a copy of your digital image at a resolution of 72 ppi (pixels per inch) and in the JPEG format. If you model dimensions aren't very large, you may want to reduce the image dimensions as well (the width and height in pixels). 尝试以72 ppi(每英寸像素)的分辨率和JPEG格式保存数字图像的副本。如果您的模型尺寸不是很大,您可能还需要减小图像尺寸(以像素为单位的宽度和高度)。Then, import the image into your SketchUp model and see how the image looks. If you save a copy of the original image, you can always go back and try different settings in your image editor until you find the resolution and dimensions that work well with your SketchUp model.然后,将图像导入SketchUp模型,查看图像的外观。如果保存原始图像的副本,则始终可以返回并在图像编辑器中尝试不同的设置,直到找到与SketchUp模型配合良好的分辨率和尺寸。
Importing a 2D image导入二维图像
To import an image from your hard drive into a SketchUp model, follow these steps:要将图像从硬盘导入SketchUp模型,请执行以下步骤:
With your model open, select File > Import.打开模型后,选择“文件”>“导入”。In the Import dialog box that appears, navigate to the image file on your hard drive and select it. If you don't see the image you're looking for, make sure All Supported Image Types is selected from the Files of Type drop-down list.在出现的“导入”对话框中,导航到硬盘上的图像文件并选择它。如果看不到要查找的图像,请确保从“文件类型”下拉列表中选择了“所有支持的图像类型”。Select an option for importing your image: Use As Image, Use As Texture, or Use As New Matched Photo.选择导入图像的选项:用作图像、用作纹理或用作新匹配的照片。Click the Import button and your image appears in your model.单击导入按钮,您的图像将显示在模型中。
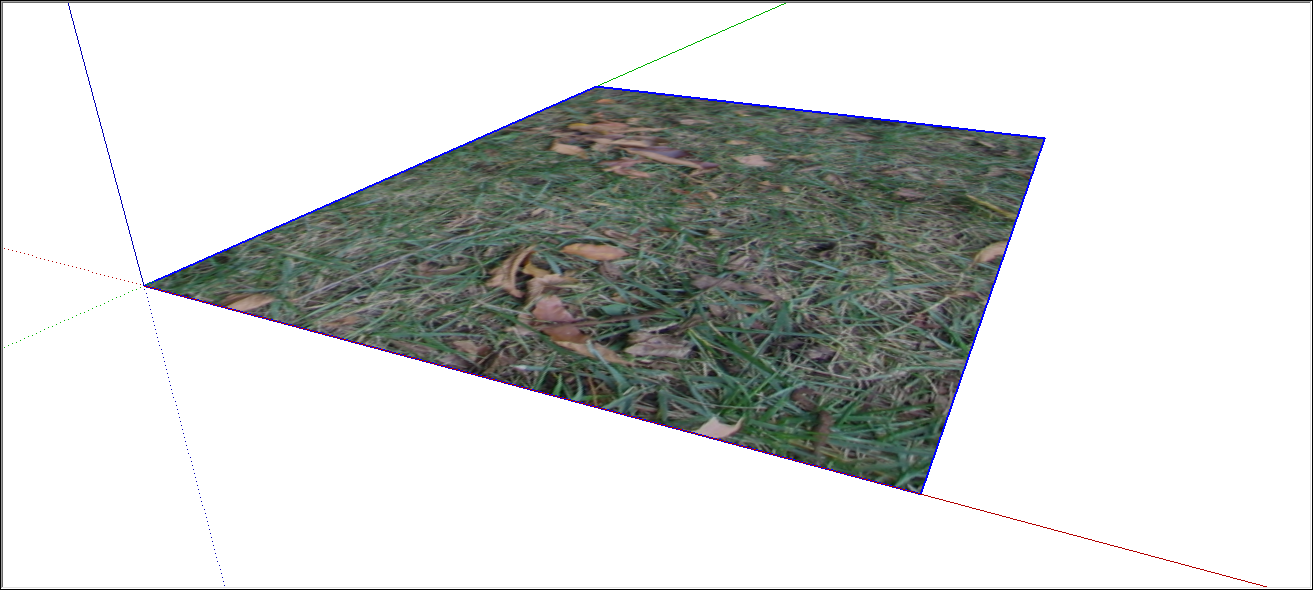
If you selected the Use As Image option, your image appears in your model as an image entity with a bitmap image applied to a face. Here are the basics of working with image entities in your model:如果选择了“用作图像”选项,则图像将作为图像实体显示在模型中,位图图像应用于面部。以下是在模型中使用图像实体的基础知识:
To place the image entity, click anywhere in your model to place one corner. As you move the cursor, the image entity grows or shrinks in size. Click again to place the opposite corner. SketchUp maintains the image proportions by default; to deconstrain the proportions as you place the file, hold down the Shift key.要放置图像图元,请单击模型中的任意位置以放置一个角。移动游标时,图像实体的大小会增大或缩小。再次单击以放置对角。SketchUp默认保持图像比例;要在放置文件时取消缩放比例,请按住Shift键。To move or rotate the image, use the Move or Rotate tool.要移动或旋转图像,请使用“移动”或“旋转”工具。To resize the image after you've placed it, use the Scale tool.要在放置图像后调整其大小,请使用“缩放”工具。
The following figure shows an image placed on a model's ground plane.下图显示了放置在模型地平面上的图像。
Applying a texture to the side of a building将纹理应用于建筑物的侧面
When you apply a photo as a texture instead of an image, you can't place the image anywhere in your model. You need to have a face already drawn to which you can apply the image. However, you do have a little more control over the texture's positioning on the face.当您将照片应用为纹理而不是图像时,您无法将图像放置在模型中的任何位置。您需要已经绘制了一张可以应用图像的面。但是,您确实可以对面部纹理的定位进行更多的控制。
The following steps walk you through the process of applying a photo texture to flat face and offer a few tips along the way:以下步骤将引导您完成将照片纹理应用于平面的过程,并在此过程中提供一些提示:
Select File > Import and select the Use As Texture option.选择“文件>导入”,然后选择“用作纹理”选项。Click in the lower-left corner of the face that you want to photo-texture.单击要拍摄纹理的面部左下角。Click in the upper-right corner of the face to finish applying the image.单击面的右上角以完成图像的应用。(Optional) If you need to stretch the image or adjust its position, context-click the texture and select Texture > Position from the menu that appears.(可选)如果需要拉伸图像或调整其位置,请右键单击纹理,然后从显示的菜单中选择“纹理>位置”。Then context-click the texture again and clear Fixed Pins, so that the Position Texture tool is in Free Pin mode.然后再次右键单击纹理并清除“固定接点”,使“位置纹理”工具处于“自由接点”模式。You can then drag the white pins to each corner of the face to stretch the image or otherwise apply it to the face more precisely. Click outside the texture when you're done.然后,您可以将白色图钉拖动到面部的每个角,以拉伸图像或更精确地将其应用于面部。完成后单击纹理外部。
Wrapping textures around boxes and cylinders将纹理包裹在盒子和圆柱体周围
After you import an image as a texture, you can wrap it around an existing box or cylinder, sort of like wrapping paper.将图像作为纹理导入后,可以将其包裹在现有的长方体或圆柱体上,有点像包装纸。
Follow these steps to import an image and wrap it around a box:按照以下步骤导入图像并将其包裹在一个框中:
Select File > Import.选择“文件”>“导入”。In the Import dialog box, navigate to your image, select it, select Use As Texture, and click Import.在“导入”对话框中,导航到图像,选择它,选择“用作纹理”,然后单击“导入”。Click on the lower-left corner of the face on which you want to start wrapping your image.单击要开始包裹图像的面的左下角。Then click the upper-right portion of the face. This places your image, as shown in the following figure.然后单击该面的右上角。这将放置您的图像,如下图所示。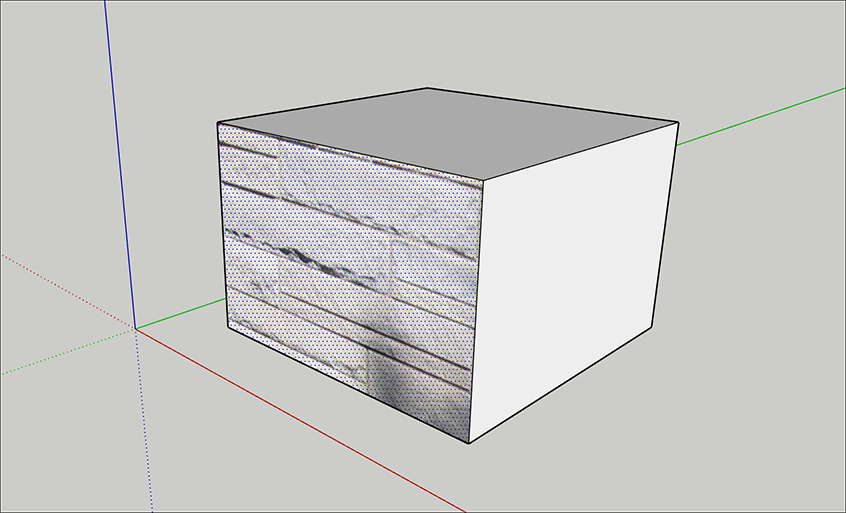 Tip:
Tip:If you need to stretch or reposition your image after you place it, see the section on repositioning textures in the article Adding Colors and Textures with Materials.如果在放置图像后需要拉伸或重新定位图像,请参阅文章“使用材质添加颜色和纹理”中关于重新定位纹理的部分。Select the Paint Bucket tool (选择“油漆桶”工具( ).)。
).)。Hold down the Alt key (Microsoft Windows) or the Command key (macOS) to switch to the Eyedropper cursor.按住Alt键(Microsoft Windows)或Command键(macOS)切换到吸管游标。Click the texture that you applied to the face. The Eyedropper samples your photo.单击应用于面部的纹理。滴管会采样你的照片。Release the modifier key to return to the Paint Bucket tool, and click an adjacent face or faces in your model to wrap the image around it, as shown in the following figure.释放修改器键以返回“绘制桶”工具,然后单击模型中的一个或多个相邻面以将图像包裹在其周围,如下图所示。
When you wrap a material around a cylinder, the steps are the same. However, because a cylinder is made of several faces that are hidden and smoothed, your image may look clipped at first. The following figure shows how the image looks after placing the texture by clicking the bottom edge of the cylinder and then the top edge.当您将材质包裹在圆柱体上时,步骤是相同的。但是,由于圆柱体是由隐藏和平滑的几个面组成的,因此您的图像一开始可能看起来会被剪裁。下图显示了通过单击圆柱体的底部边缘和顶部边缘放置纹理后的图像外观。

However, after you sample the texture with the Eyedropper cursor and click the cylinder with the Paint Bucket cursor, the whole image wraps around the cylinder, as shown in the next figure.但是,使用滴管游标对纹理进行采样并使用Paint 桶游标单击圆柱体后,整个图像将围绕圆柱体,如下图所示。

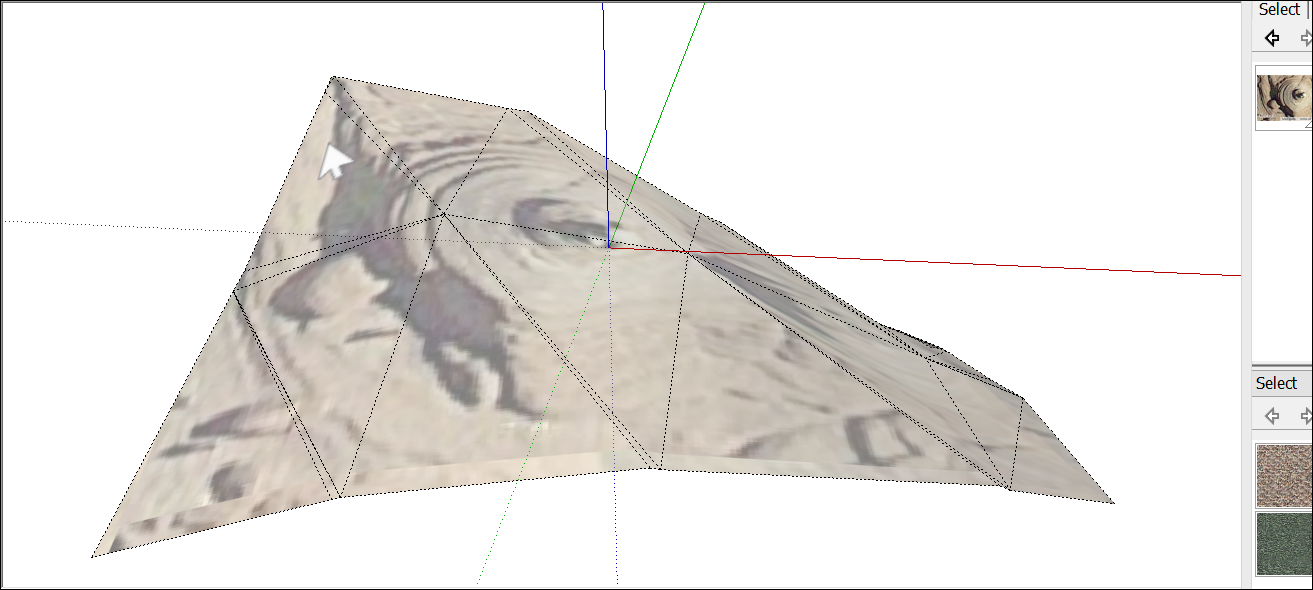
Projecting textures onto a curved surface将纹理投影到曲面上
In SketchUp, projected textures are images applied to faces as though a slide projector is projecting the image onto your model. Projected textures enable you to apply a texture over a curved surface. 在SketchUp中,投影纹理是应用于面部的图像,就像幻灯片投影仪将图像投影到模型上一样。投影纹理使您能够在曲面上应用纹理。This feature is particularly useful for applying a topographic image over a site model, because topography is rarely flat like the side of a building.此功能对于在场地模型上应用地形图像特别有用,因为地形很少像建筑物的侧面那样平坦。
To project a texture over a curved surface, follow these steps:要在曲面上投影纹理,请执行以下步骤:
Draw a single, flat face that matches the dimensions of your curved surface. The following figure shows a top view of a flat surface over a blank terrain.绘制一个与曲面尺寸相匹配的平面。下图显示了空白地形上平面的俯视图。Tip:Select the flat face and turn on X-Ray mode (select View > Style > X-Ray) so you can see the curved surface under the flat surface.选择平面并启用X射线模式(选择“视图”>“样式”>“X射线”),以便可以看到平面下的曲面。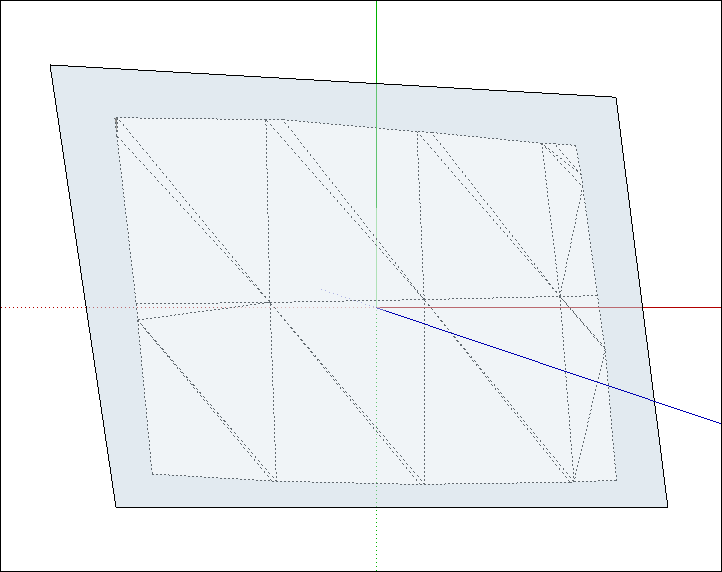
Import a photo as a texture, as explained in the earlier section Applying a texture to the side of a building.将照片作为纹理导入,如前一节,“将纹理应用于建筑侧面”所述。Remember that to see this texture, the Face settings in the Styles panel must be set to Display Shaded Using Textures.请记住,要查看此纹理,必须将“样式”面板中的“面”设置设置为“使用纹理显示着色”。(See Creating and Editing a Style for details about face styles.)(有关面样式的详细信息,请参阅创建和编辑样式。)(Optional) If needed, adjust the position of the texture so it matches your flat face. For example, in the following figure, you see the texture in Free Pin mode after each pin was dragged to a corner of the flat face.(可选)如果需要,调整纹理的位置,使其与您的平面相匹配。例如,在下图中,您可以在将每个固定点拖动到平面的一角后,在“自由固定”模式下看到纹理。See the section on repositioning textures in Adding Colors and Textures with Materials for details.有关详细信息,请参阅“使用材质添加颜色和纹理”中关于重新定位纹理的部分。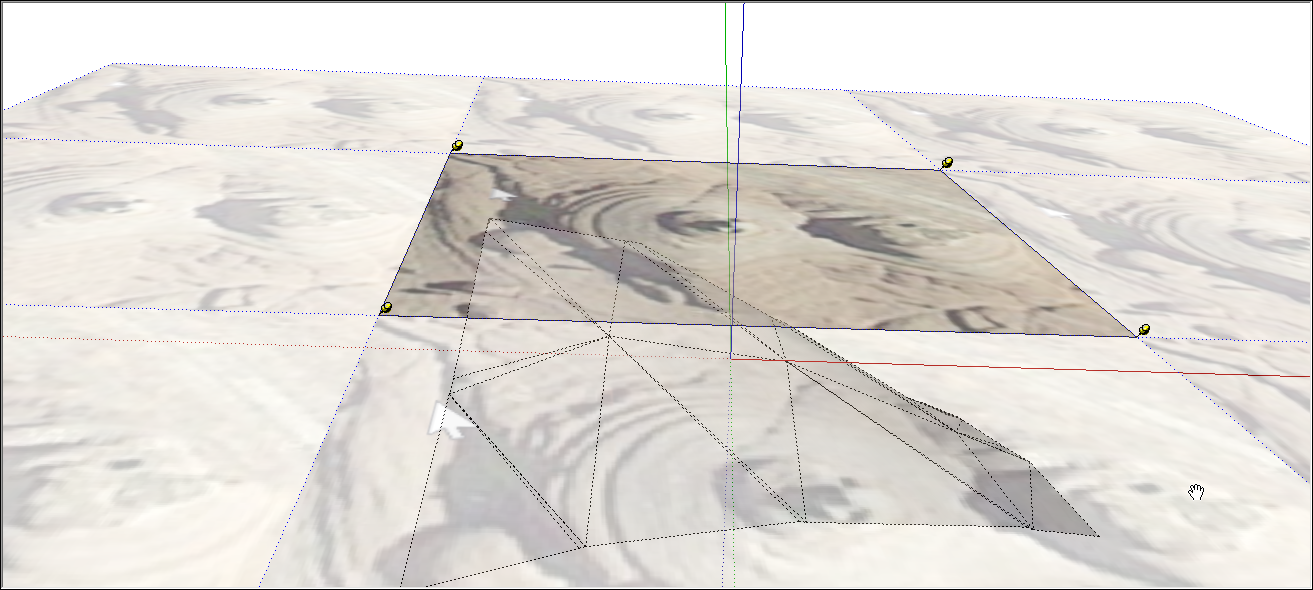
Context-click the texture that you applied to the flat face, and from the menu that appears, select Texture > Projected. This step transforms the texture into a projected texture, so that the remaining steps work.右键单击应用于平面的纹理,然后从显示的菜单中选择“纹理>投影”。此步骤将纹理转换为投影纹理,以便其余步骤正常工作。With the Select tool (使用“选择”工具( ), select all the faces in your curved surface.),选择曲面中的所有面。
Select the Paint Bucket tool (选择“油漆桶”工具(
).)。Hold down the Alt key (Microsoft Windows) or the Command key (macOS), and with the Eyedropper cursor that appears, click the projected texture to sample it. Release the modifier key so the cursor turns back into the Paint Bucket.按住Alt键(Microsoft Windows)或Command键(macOS),在出现的滴管游标的情况下,单击投影纹理进行采样。释放修改器键,使游标变回Paint 桶。With the Paint Bucket cursor, click the curved surface selection to apply the projected texture to all the faces.使用“绘制桶”游标,单击曲面选择以将投影纹理应用于所有面。Delete the flat surface, because you no longer need it. The following figure shows the projected texture after it's applied the curved surface and the flat surface is deleted.删除平面,因为您不再需要它。下图显示了将其应用于曲面并删除平面后的投影纹理。